A bit of a slow news day today. Being that it’s Sunday I’m taking a little break. We do have a couple of excellent emails to report, however, and a tip on buying from a wood carver that you’ll want to know about. Next week we’re going to go into the Janka wood comparison ratings and hardness chart, and also begin some book reviews which I think you will all appreciate. Have a happy Sunday!
Eagle Head Belt Buckle Carved by Bob Kozakiewicz
Bill sent in a response to my tutorial on “Carving a Moravian Star”. Bill writes:
“Nice, short tutorial that looks like a lot of fun!!! Thanks so much!!”
Thanks, Bill! I’m glad you enjoyed the tutorial.
Gene Kucker sent in an email along with photos of some awesome Moravian stars he carved. Gene writes:
“Hey Bob,
Here are a few Moravian stars I did and was playing with some add on and such. Let me know whatcyou think. I was thinking about doing a ball inside one of the bigger sized stars. I really love the new blog and I’m a huge fan of your carvings. Thank you for inspiring me and others and keeping carving alive.
Thanks
Gene Kucker
Blacklick Ohio transplant from Matawan NJ”
Moravian Stars Carved by Gene Kucker
Detailed Moravian Stars Carved by Gene Kucker
Thank you for your email and your photos, Gene! Those stars are truly magnificent! Very clean cuts and the detail is remarkable. I encourage you to keep pushing the envelope on what you can do with them…borders, balls inside, etc. And just think…we were practically neighbors once! Keep the pictures coming!
Buying From A Wood Carver
This is a matter I touched on about a week ago in response to a reader’s comment but I feel so strongly about it that I thought this particular point was worth publishing:
Let the chips fly! Tell your friends about Wood Chip Chatter, and don’t forget to send in your questions and comments so we can keep Wood Chip Chatter Active and keep the conversations going!
And remember to email your photos to carverbobk@woodchipchatter.com
The following is a tutorial on how I carve a Moravian star ornament. Some of you may have already seen it when it appeared on my Instagram page @carverbobk during April 9-14. I am posting it again here on my blog for the first time. I hope everyone enjoys it and carves along with it!
Although it may seem complicated with a whole lot of carving there are really only 6 basic steps involved in creating this beautiful ornament.
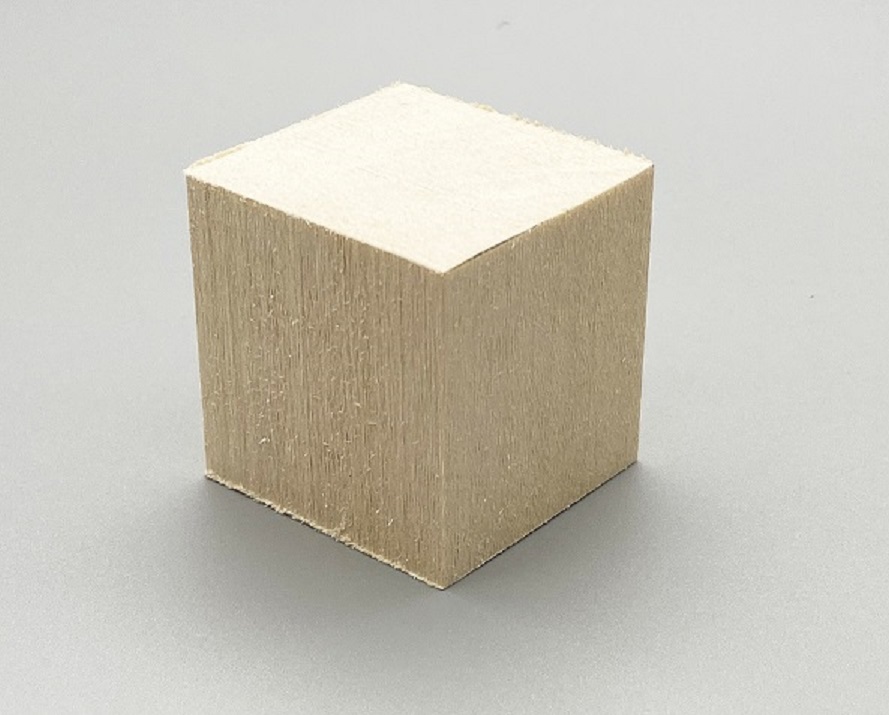
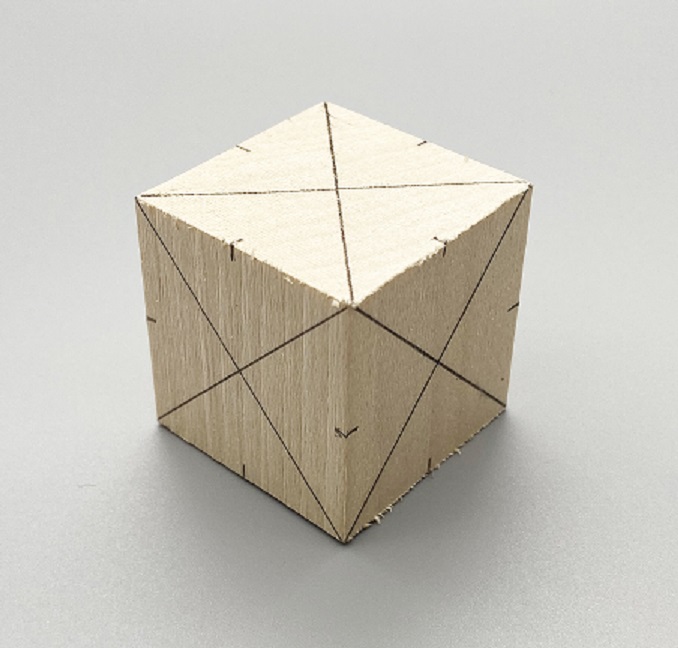
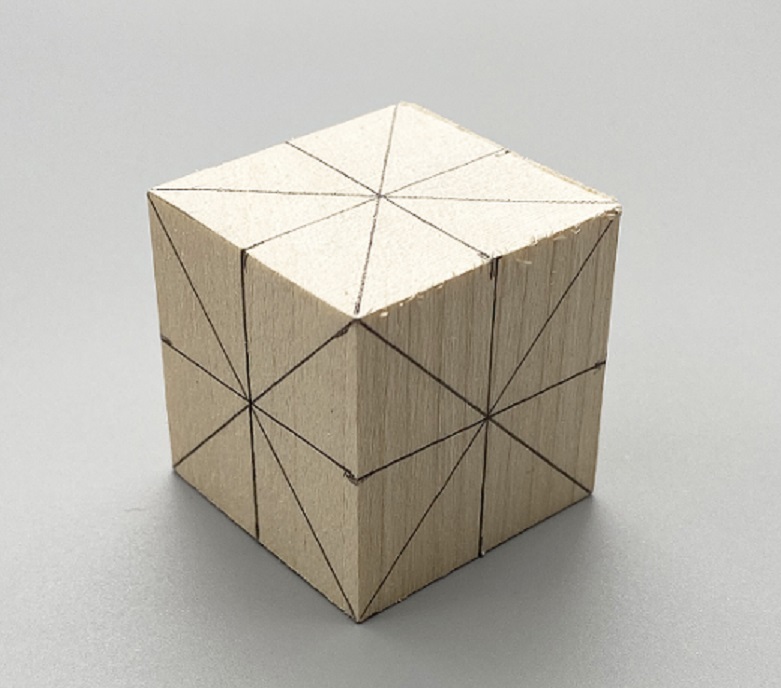
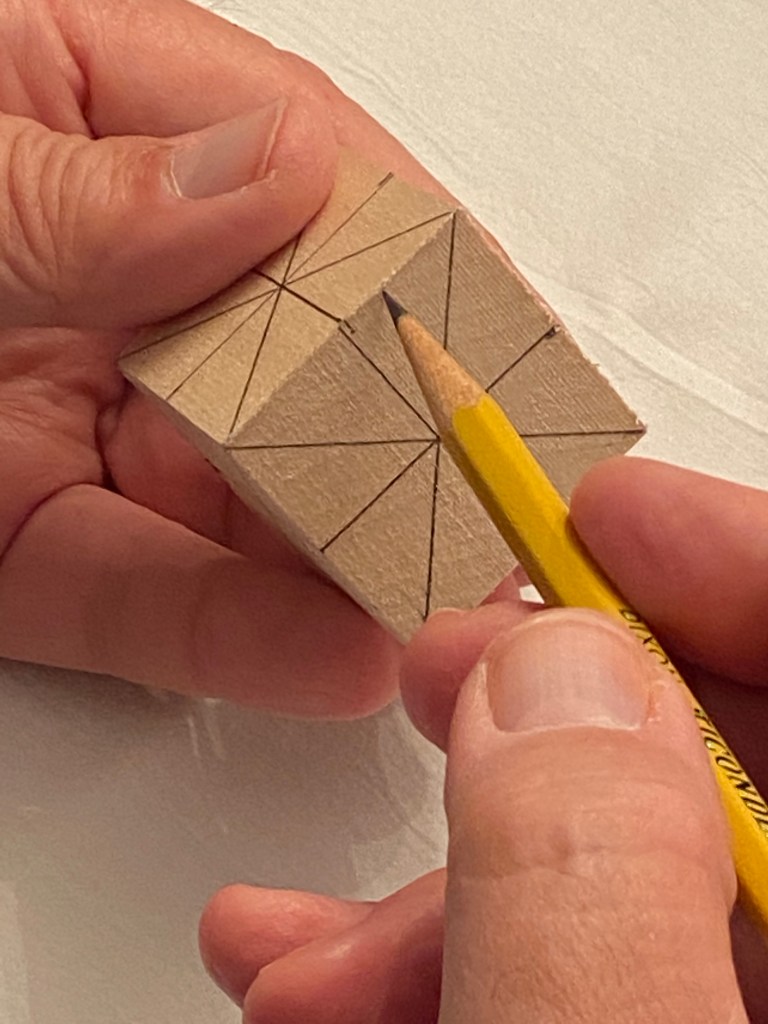
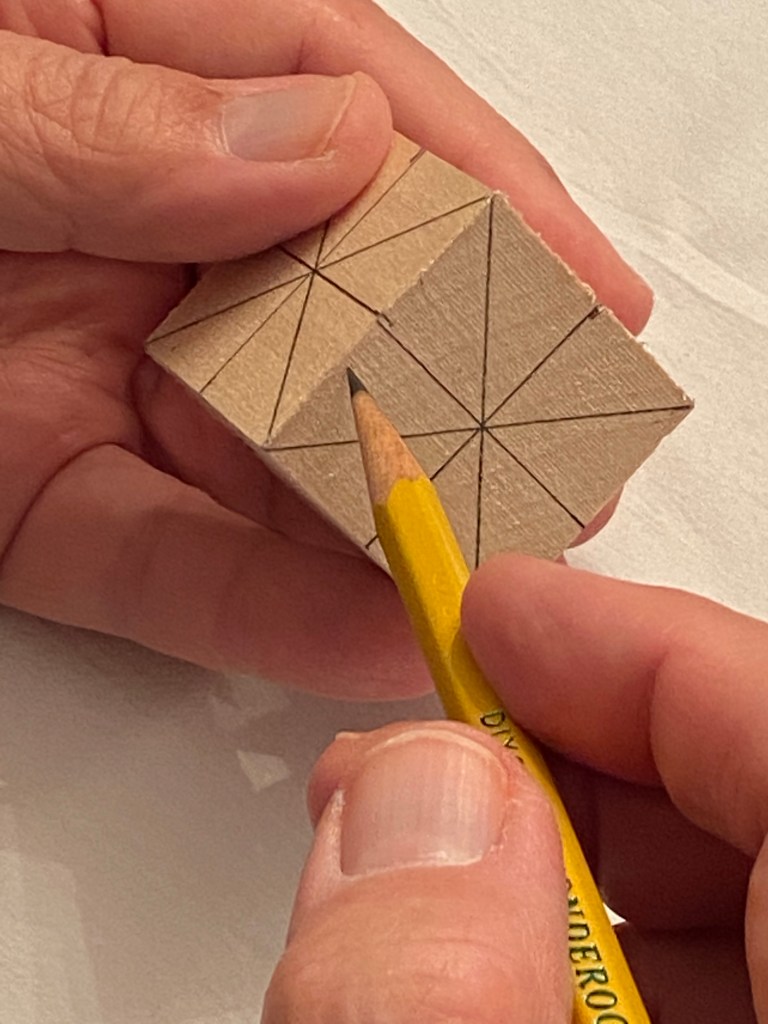
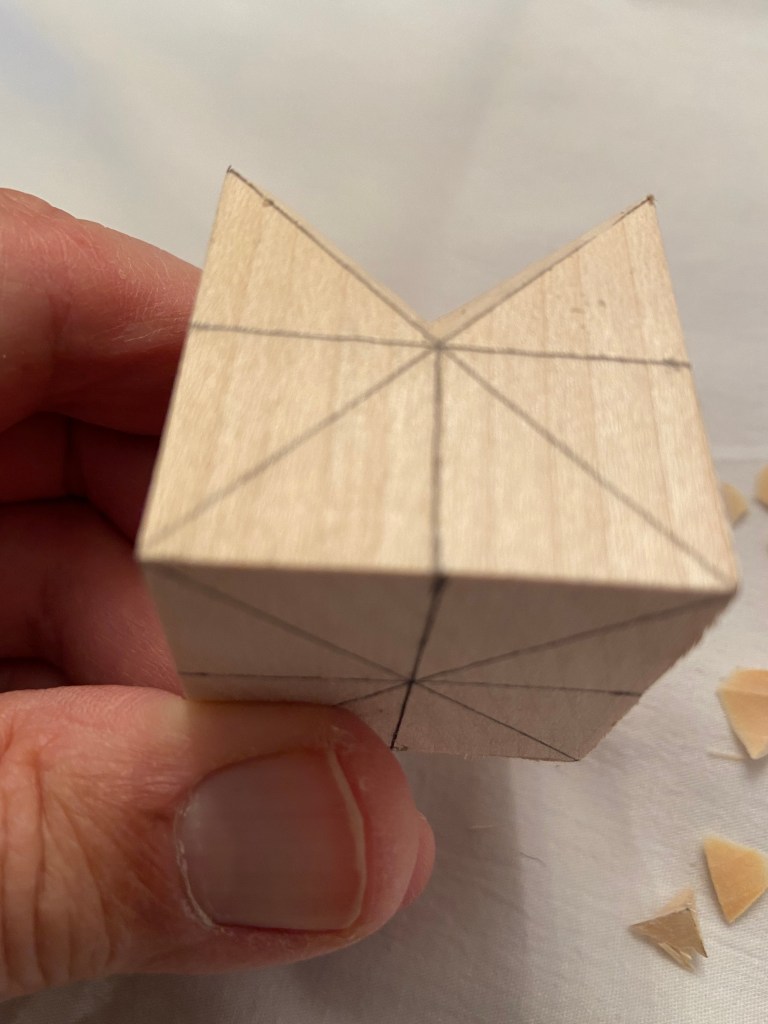
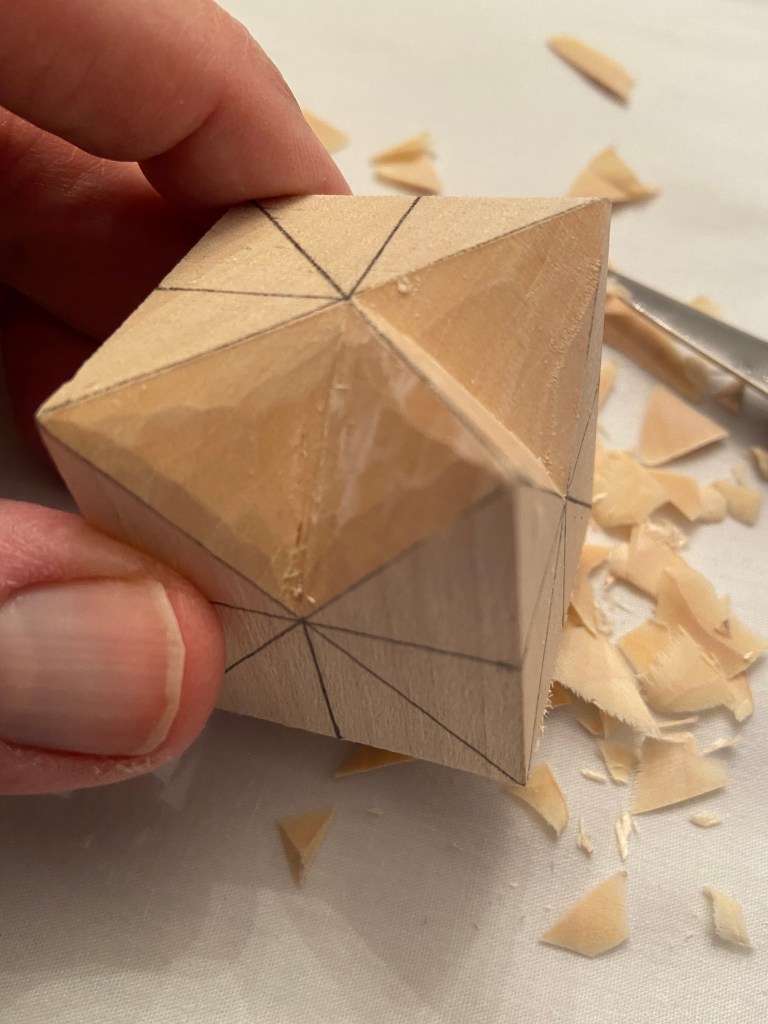
Step 1: Start with a 1.5″ x 1.5″ x 1.5″ block of basswood (Photo 2). Draw diagonal lines from corner to corner on all 6 sides of the block (Photo 3). Measure 3/4″ in from every corner to find the center of every edge of the block and make a mark at those points (Photo 4). Draw lines across the block from these center points on all 6 sides as shown in the photo (Photo 5). The block is now divided into many small triangles (8 triangles per side).
Photo 2
Photo 3
Photo 4
Photo 5
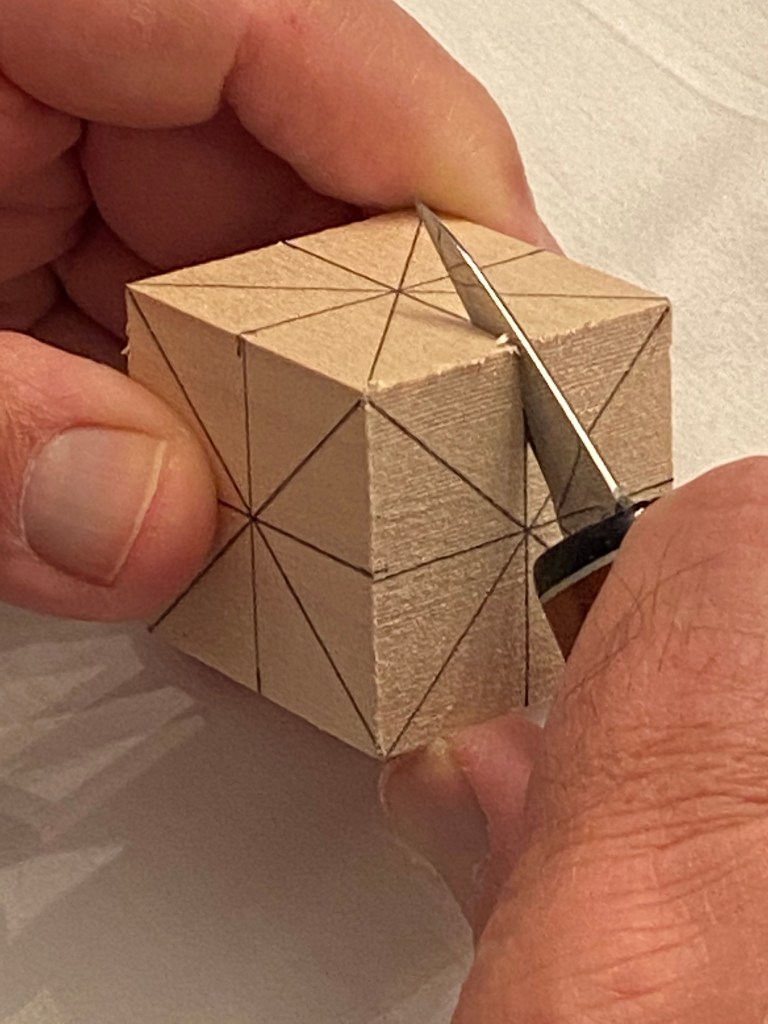
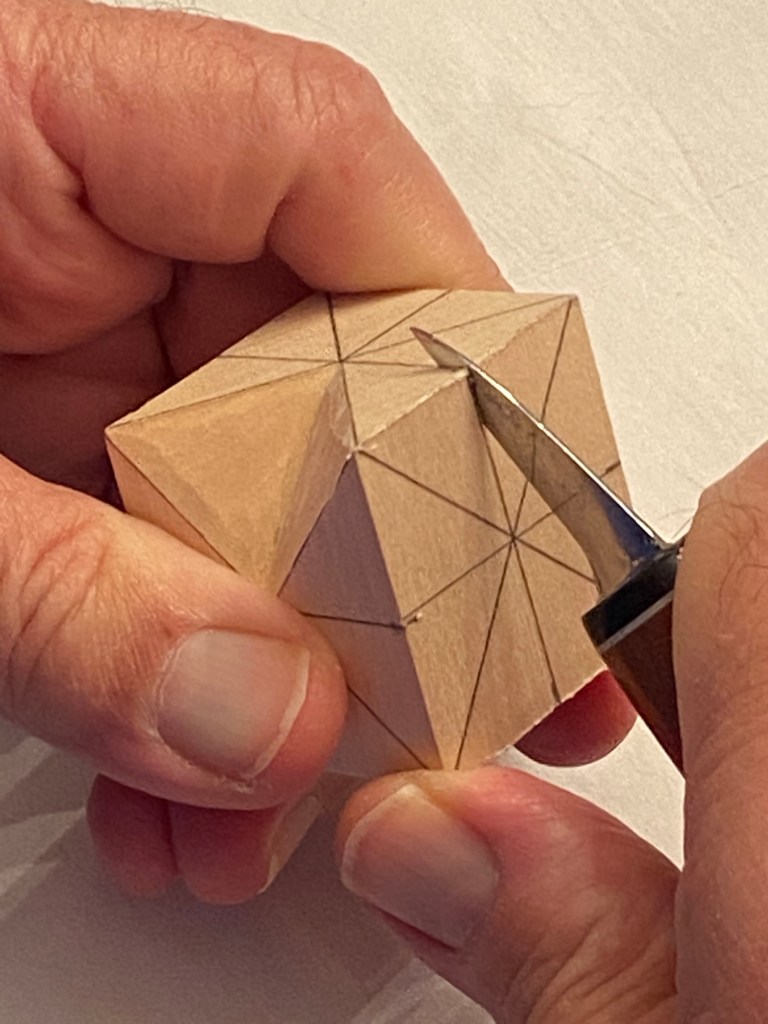
Step 2: Look at one of the edges of the block and you will see there are two triangles attached to each other (Photos 6 & 7). Use your carving knife and make a deep cut on the lines that attach the two triangles (Photo 8). The cut must go deep enough so that your knife blade stops at the points where all of the lines cross at the centers on the sides of the block. You may want to complete this cut as you carve Step 3 but remember to cut exactly on the line and do not cut past the center points! If you cut off the lines and past the centers your star will not have crisp edges. Now start at one of the triangles and carve straight in towards the line where you made the deep stop cut (Photo 9). Begin at the top and work your way down but be sure not to cut below the lines marking the edge of the triangle (Photo 10). When you get to the bottom be sure you make it perfectly flat. When you look at it from the side it should look level with no hump.
Photo 6
Photo 7
Photo 8
Photo 9
Photo 10
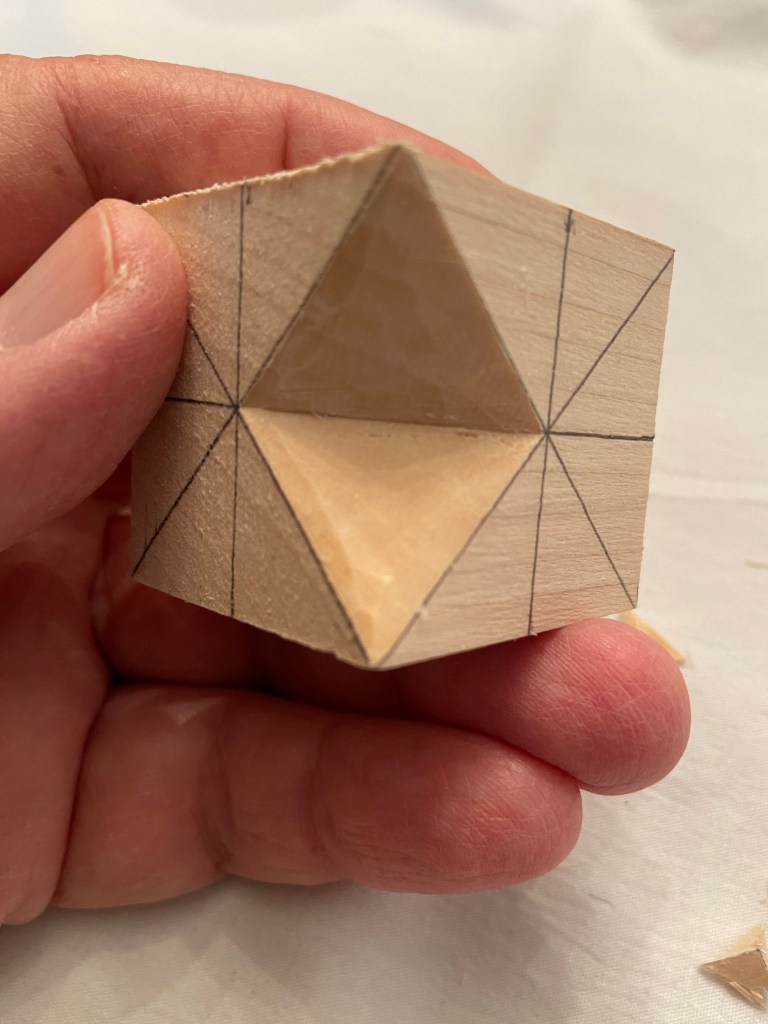
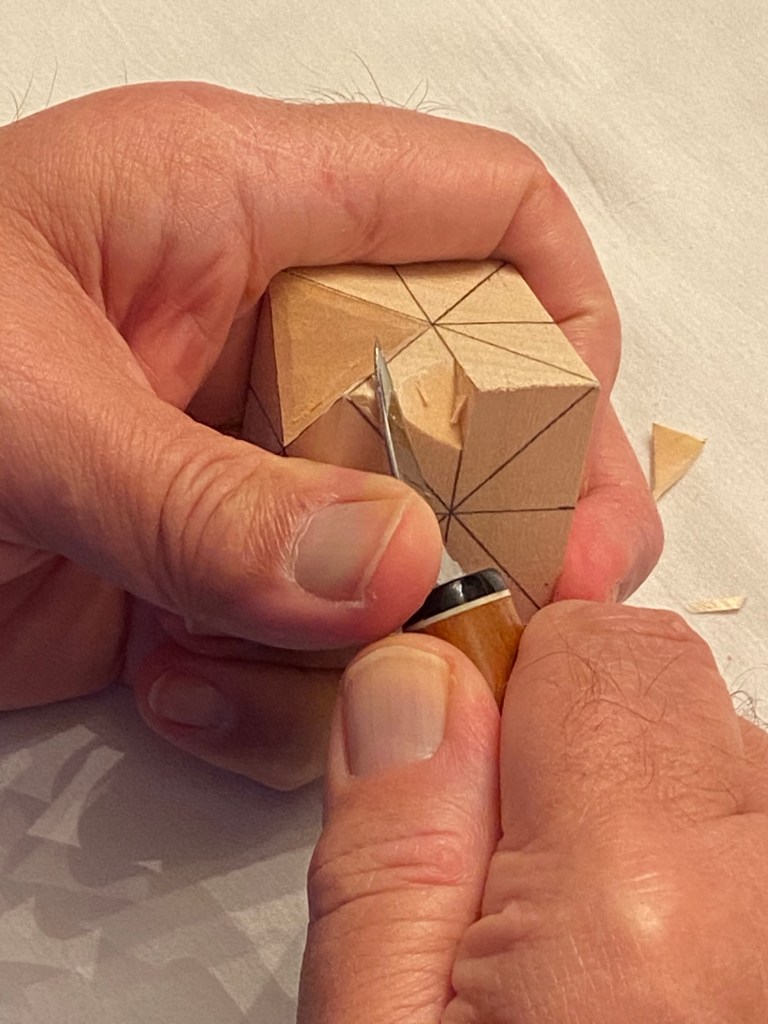
Step 3: Turn the block around to work on the opposite triangle. You will carve this triangle the same way as you did the first one. Begin carving wood away from the top and work your way down to the lines marking the edge of this triangle (Photo 11). Again, make the bottom perfectly flat (Photo 12). Note: The two bottoms should meet perfectly in the middle forming a perfect 90o “V” when seen from the side (Photo 13).
Photo 11
Photo 12
Photo 13
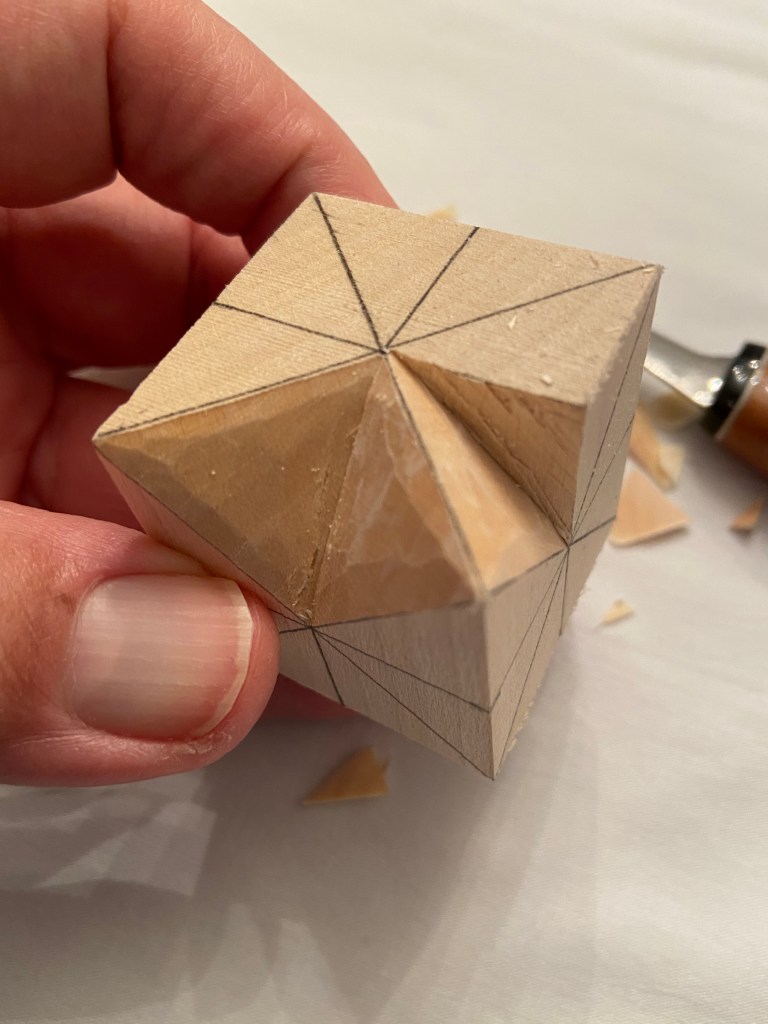
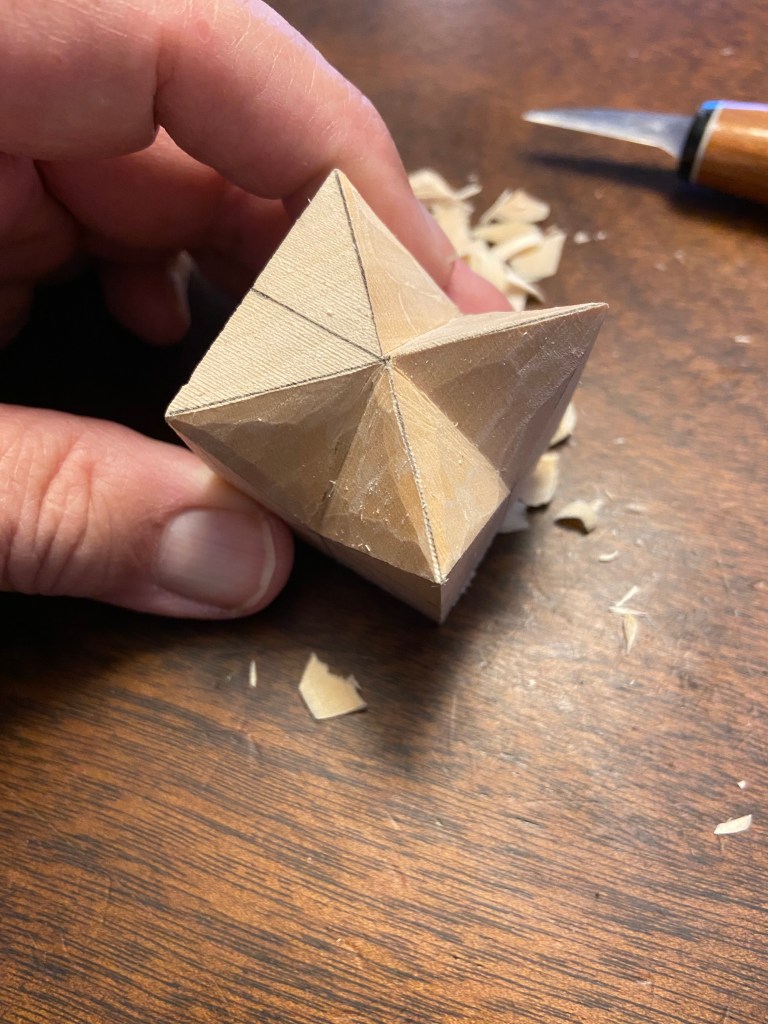
Step 4: Turn the block to an adjacent edge. Make a deep cut on the lines that attach the two triangles on this edge (Photo 14). Follow the instructions from Step 2. Work on the triangle adjacent to the one you carved before (Photo 15). Start at the top and work your way down as before but be sure not to cut past the edge of the triangle you carved previously (Photo 16). Again, the bottom of this triangle should be perfectly flat, and the edges where two triangles meet should be sharp and perfectly straight (Photo 17). Carve the opposite triangle as you did in Step 3 (Photo 18).
Photo 14
Photo 15
Photo 16
Photo 17
Photo 18
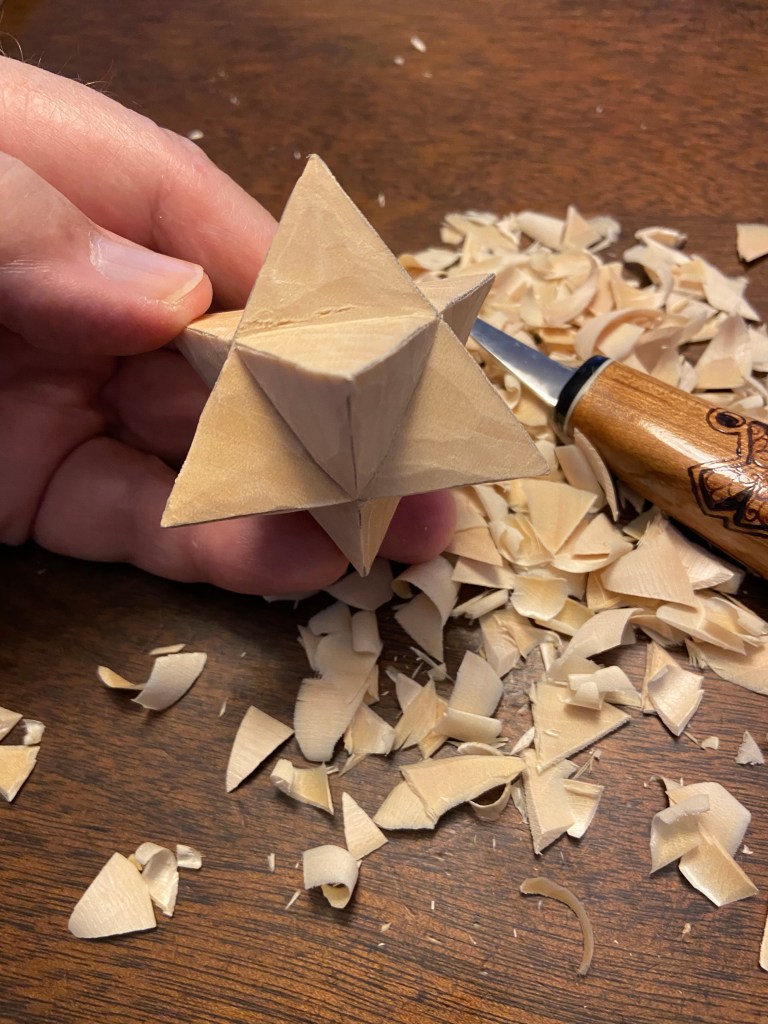
Step 5: Continue turning the block and carving the triangles as you go until you have carved away all of the triangles on the block (Photos 19 & 20). Go back over the block and make sure all of your triangle bottoms are flat and the edges where one triangle meets another are sharp (Photo 21).
Photo 19
Photo 20
Photo 21
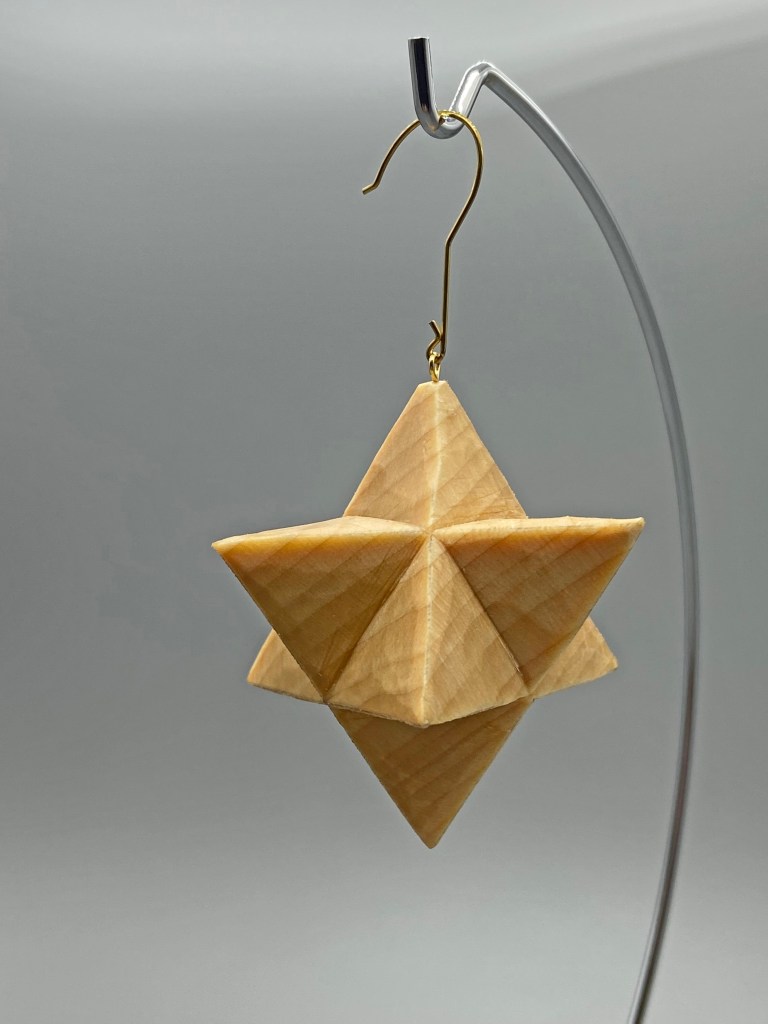
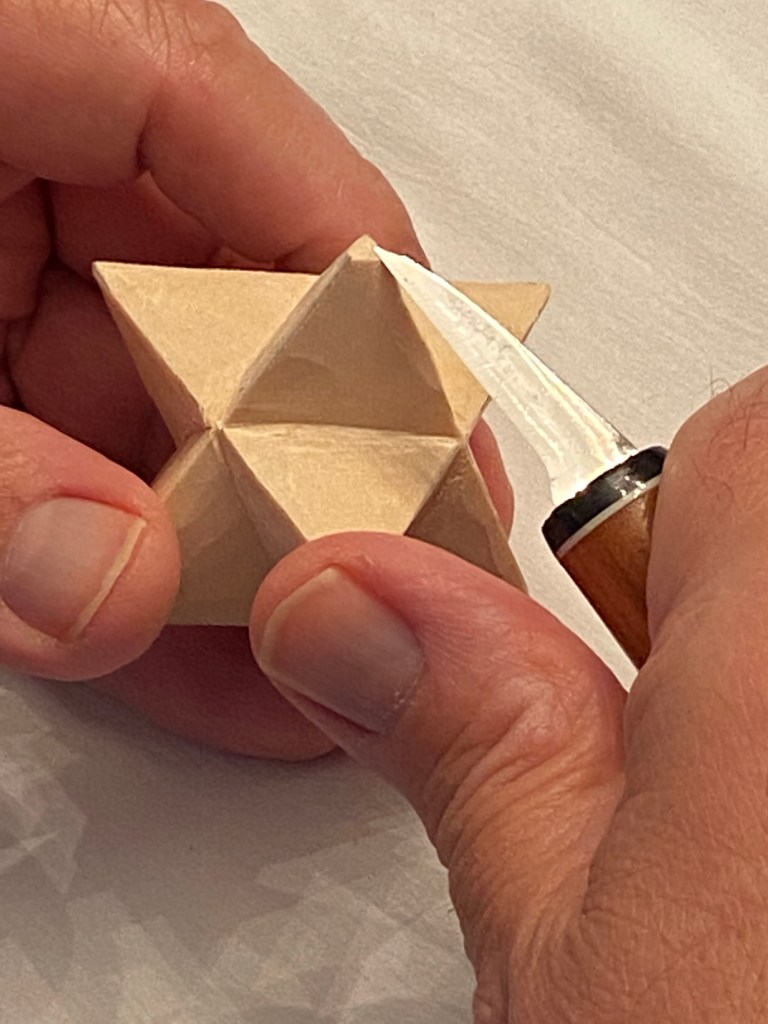
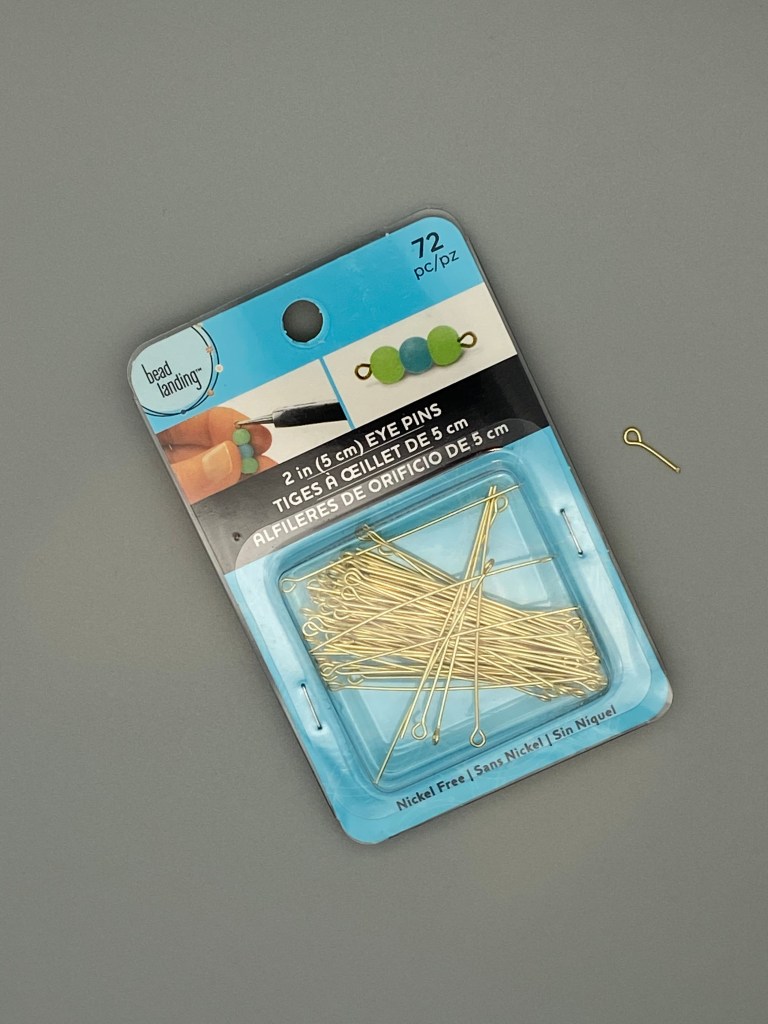
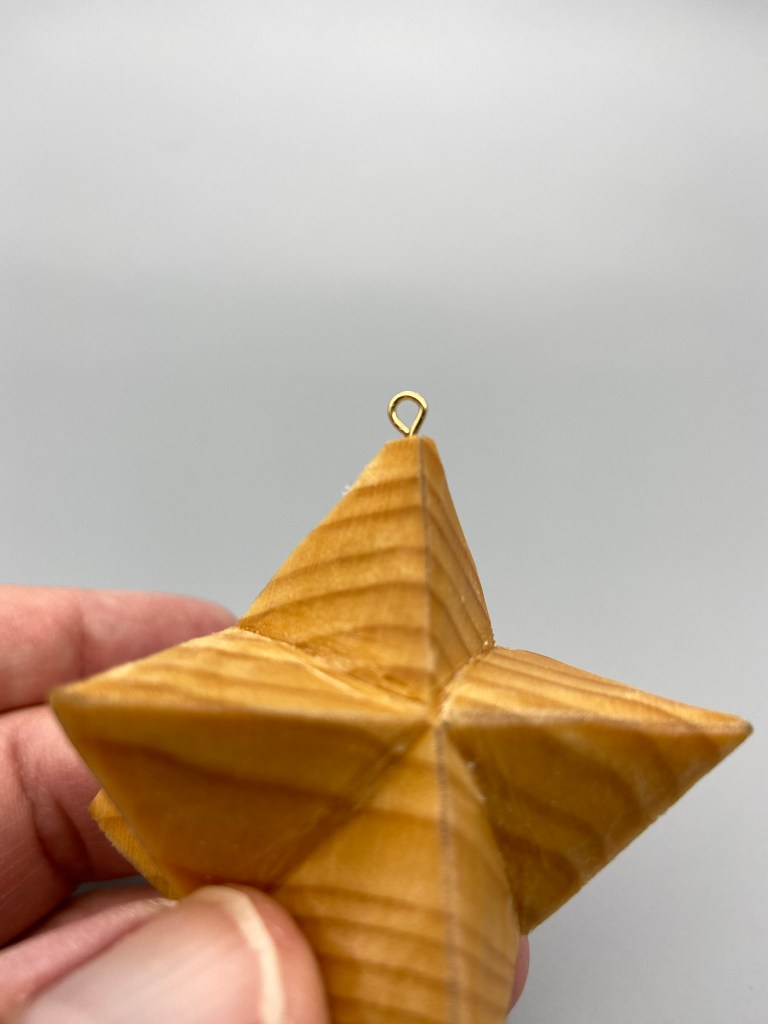
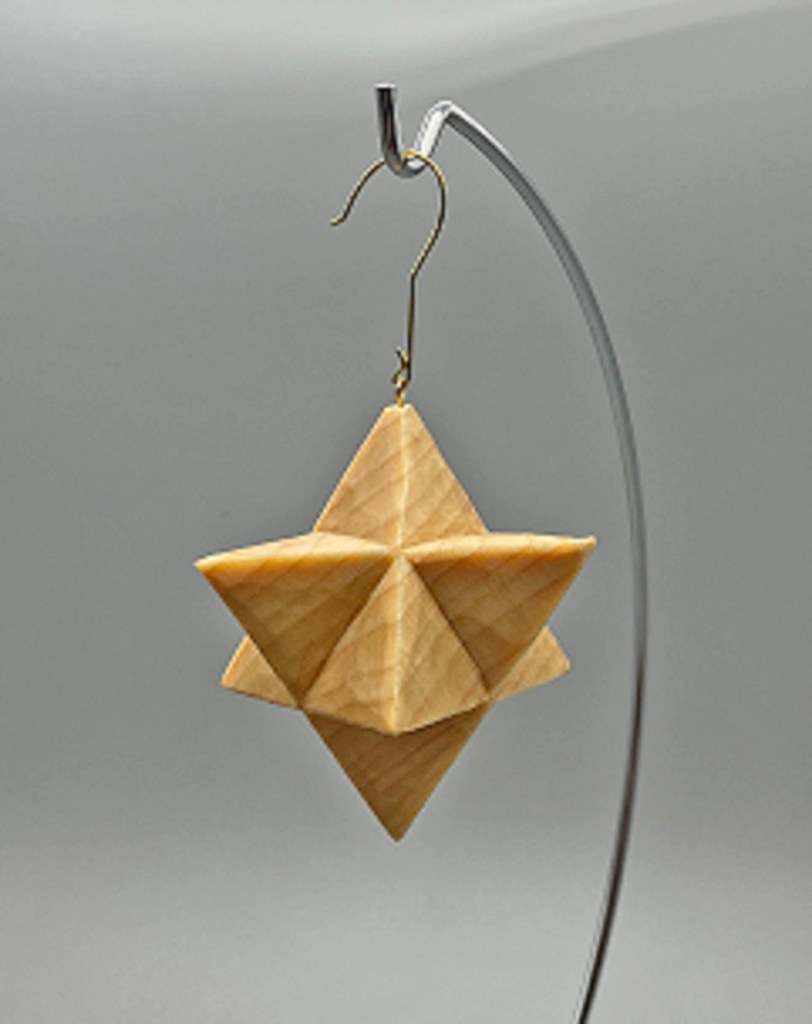
Step 6: If your knife was sharp and you made clean cuts your Moravian star should not require any sanding. Choose one of the star points and cut the tip off with your knife (Photo 22). Brush a coat of boiled linseed oil onto your star. Blot off the excess with a clean paper towel. Then lay the carving on another paper towel and allow to dry overnight. Note: Dispose of the paper towels appropriately; boiled linseed oil soaked paper towels can spontaneously combust. Cut a jewelry eye pin on an angle to a length of about 1/2″ (Photo 23) and carefully insert it with a pair of needle-nose pliers into the flattened star point (Photo 24). Finally, add a hook for hanging (Photo 25).
Photo 22
Photo 23
Photo 24
Completed Moravian Star Ornament – Photo 25
We’d love to see some photos of your Moravian star ornaments when they’re finished!
UPCOMING SHOW
Neil McGuire, president of the Charlotte Woodcarvers sent me an email and asked me to pass on the following information:
The Charlotte Woodcarvers will be sponsoring the 39th annual Showcase of Woodcarvers on April 1-3, 2022. All information can be found on their website: http://www.charlottewoodcarvers.com/showcase Information will be updated on the site as time goes on.
Keep a sharp edge and keep on carvin’!
Let the chips fly! Tell your friends about Wood Chip Chatter, and don’t forget to send in your questions and comments so we can keep Wood Chip Chatter Active and keep the conversations going!
And remember to email your photos to carverbobk@woodchipchatter.com
My wife sat down next to me as I was flipping channels. She asked, “What’s on the TV?” I said, “Dust.”
I‘ve recently received a few emails I’d like to share with you today:
We have an email from Rick Boyer with a very interesting question that I have no answer for. Hopefully some of our readers can answer Rick’s question. Rick wrote:
“I have a question I know cotton Wood bark is carved. How about the cotton wood itself is that a wood that is carved?”
While Cottonwood bark is very soft to carve, Cottonwood itself is considered a hardwood. I have never tried carving Cottonwood (only Cottonwood bark) so I can’t say. Perhaps some of our readers have had some experience with it.
Elevated Brit (Brittany) wrote in response to my blog post on “Coming Shows & Events”:
“This was so helpful, thank you! Surprised there are none in Texas for how big of a state we are, BUT I’m only an hour or two from Broken Bow so I’m absolutely going to go check them out in September! Thanks for the list of events!
You’re welcome for the list, Brittany…I’m glad it was helpful.
Elevated Brit (Brittany) also wrote in response to my blog post on “Choosing The Right Carving Knife”:
“I’m so glad for this article! I bought a blade and just about gave up woodcarving because I couldn’t get it to shave or cut the wood without a lot of work. I felt frustrated and like I was going to cut myself. (Or that my hands weren’t strong enough..)
But it could just be the cheap starter knife. I’ll try to find a place that sells them to see if I can find a good quality one that I can actually use!”
Brittany, a good quality carving knife really does have a big influence on your wood carving success, especially for beginners who already have so much to learn. Any of the knives I mentioned in my article are high quality tools that you won’t go wrong with. If you have difficulty finding any of those knives please feel free to send me an email and I can help you.
Timothy Sisko sent in an email asking about push knives. He wrote:
“Bob, When using a flat blade push knife is the bevel suppose to be up or down? ie .toward your piece or toward the scrap?”
Thank you for writing, Timothy. That’s a good question. If I understand what you are saying, what you are referring to as a push knife is actually a type of gouge and just knives which have two bevels (one on each side) gouges can be used with either side up, although they are designed to be used with the bevel down. I have used gouges both ways depending on what I am trying to do. Below is a photo of what Helvie calls their Thumbnail Gouge. It is what I would consider sort of a push knife.
You can see the bevel is on the bottom and it is flat on the top. I believe this is what you are referring to as a push knife. Let me know if this doesn’t answer your question.
Keep a sharpedge and keep on carvin’!
Let the chips fly! Tell your friends about Wood Chip Chatter, and don’t forget to send in your questions and comments so we can keep Wood Chip Chatter Active and keep the conversations going!
And remember to email your photos to carverbobk@woodchipchatter.com
I’m at the emergency room. Today was not a good day. I decided to go horseback riding, something I haven’t done for a long time. It turned out to be a big mistake! I got on the horse and started out slow, but then we went a little faster before I knew it, we were going as fast as the horse could go. I couldn’t take the bright sun in my eyes and fell off and caught my foot in the stirrup with the horse dragging me. It wouldn’t stop. Thank goodness the manager of the store came out and unplugged the machine.
Yesterday I listed the over 200 species of Hardwoods (angiosperms) found around the world. Today I will list the approximately 50 Softwoods (coniferous) species.
Today we have some emails and comments from our readers that I think everyone will find quite interesting:
Steve Hibbard wrote in about my question regarding the use of catalpa wood for carving. Steve writes:
“Hi: Catalpa isn’t too common in Southwest Ontario where I live, but it is popular for carving due to its beautiful grain. I have a friend who does human busts with it. I have found it too hard to carve with gouges, but I did manage to power carve a Christmas ornament from it.”
John Pearson wrote in an email making a point that all wood carvers should always adhere to. John wrote:
“Hi Bob,
I thought this might be a nice FYI for beginners on Wood Chip Chatter? Common courtesy to all who instruct and inspire us.
John”
“I recently listened to podcast 002 published by the International Association of Woodcarvers. It featured a Q & A with Doug Linker. Doug has many YouTube videos/tutorials geared toward beginners. One of the topics I found interesting was his disdain for folks who carve one of his projects and claim it has their own on social media.
The purpose of my email today is to encourage all beginners to be sure and give credit where credit is due. For example, …this carving inspired by @Douglinker or @Carverbobk”
That’s so true, John. It really annoys me when that happens to me. I actually get offended. I welcome all carvers everywhere to use my designs but I also ask them to just simply mention my name when the piece is completed. All carvers, whether they are beginners or seasoned should give credit where credit is due. I understand when a carver completes a carving he or she can be very proud of it but if it is not their own design, if they used the design (for example a roughout) from another carver it is only common courtesy to mention that carver as the originator and give that person credit. The creator of a design spends many hours in designing the pattern, carving the original, and perhaps going through multiple failures until he gets it right. The designer is not only putting in hours of work, he is also putting his heart and soul into creating that carving and it’s only right and fair that he or she be acknowledged for all of that when someone else imitates their work.
Thank you so much, John, for bringing up this significant point!
Patrick Weddle sent in a nice email saying:
“Bob,
Thanks for everything you are doing! You’re not just a pretty face. Seriously, what you’re doing is special and very much appreciated!
Pat”
Patrick,
Thank you very much for your kind words. I’m not so sure about the pretty face part but I greatly appreciate it. It’s folks like you who make it all worthwhile.
Bob
Let the chips fly! Tell your friends about Wood Chip Chatter, and don’t forget to send in your questions and comments so we can keep Wood Chip Chatter Active and keep the conversations going!
And remember to email your photos to carverbobk@woodchipchatter.com
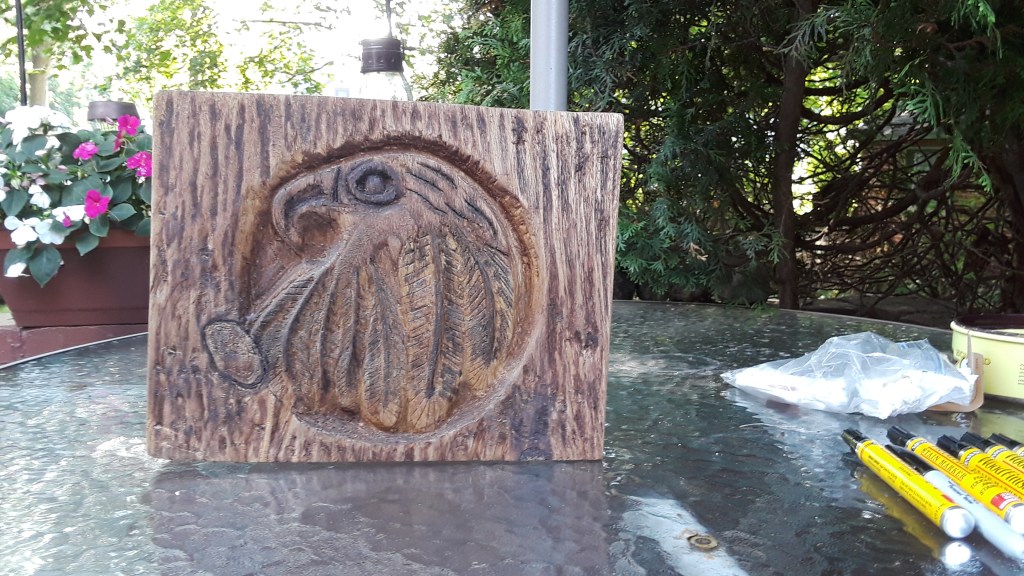
Jim Morasco replied to my question about what type of wood he used to carve his eagle head shown here:
Eagle Head carved in Catalpa by Jim Morasco
Jim replied:
“I’m glad you like th e carving. The wood is Catalpa. It’s the wood I use the most.”
That’s interesting, Jim. Is it local to your area? As you can see from the chart above catalpa is considered to be a hardwood. Is it hard or soft to carve? I don’t know of anyone else who carves Catalpa.
Today we have a note and a photo of an excellent carving from my good friend Wayne Smith. Wayne Writes:
“Hi Bob, ….. just to let you know I’m enjoying your blog and look forward to your daily posts.
I’m attaching a photo of a recent carving that I did ( I expect you recognize the little fellow as I used some of the steps you suggested in one of your past submissions in WCI …) he’s 3 -1/2″ high, and the fish shack is 3″w × 6″h x 1/2″ thick.
I took that one and two others to a local giftshop to see if there might be some interest. By the time I got home (8 miles) I had a message waiting for me saying they had sold those 3 and were looking for more. Guess I’m going to busy for the next couple of weeks .
Wayne”
Fisherman and Fish Shack carving done by Wayne Smith
I‘m sure you will be busy, Wayne. That’s a cute little fisherman you’ve created there with excellent workmanship on both the carving and painting. You took a good thing and made it even better!
NEW EMAIL ADDRESS!!! We have finally worked all the kinks out of my email situation and my new email address is now fully up and running. You can now send all of your email, including questions, comments AND photos to carverbobk@woodchipchatter.com. Of course you can still use the Comment button at the bottom of the Blog page just for leaving questions or comments. Thank you everyone for your patience and understanding.
Let the chips fly! Tell your friends about Wood Chip Chatter, and don’t forget to send in your questions and comments so we can keep Wood Chip Chatter Active and keep the conversations going!
And remember to email your photos to carverbobk@woodchipchatter.com
“Toilet Paper Sale” Carved During the 2020 Lock Down by Bob Kozakiewicz
A recent study found that women who carry a little extra weight live longer than the men who mention it.
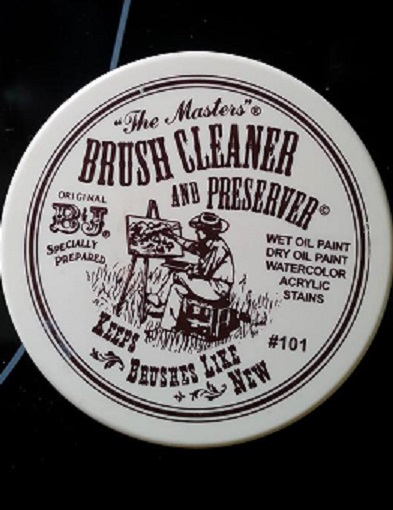
I tend to use somewhat more expensive brushes when I paint my carvings. I just like the way they work. But if you’re like me you go through paint brushes as fast as the water you wash them in. Here are a few tips on washing your brushes and preserving them to get longer life out of them:
“The Masters” Brush Cleaner and Preserver
1. Swirl your brush back and forth over the cake of “The Masters” Brush Cleaner & Preserver until bristles are soapy. Brush back and forth in my dampened hand until all paint is removed. Repeat a second time. Rinse well, then reform the bristles with a little soap on the fingers. Let dry with the soap on the bristles. Rinse brush with water before using.
2. Clean in a cup of Dawn, put soap in my hand and clean the brush back and forth in the palm of my hand. Rinse well. Then reform bristles with a little Dawn on the fingers. Let dry with some soap on the bristles. Rinse brush with water before using.
3. Clean brushes in a bowl of Aqua Net hair spray. Mash bristles well until no more paint comes out (add more Aqua Net if necessary). Reform the shape and let dry with some Aqua Net on the bristles. Rinse brush with water before using.
4. Wash brushes with soap and use a little bit of hair conditioner on them and they will smooth back out. Reform the bristles and let dry with a little conditioner on them. Rinse brush with water before using. Use regular hair conditioner. They sell brush conditioner in art supply stores, however it’s the same stuff.
5. Do your final brush cleaning with rubbing alcohol. It removes any remaining redisue and allows the bristles to relax. Also, find a spring you can stretch atop your glass and put the handle in the coil holding the brush of the bottom. Use the same for drying. And when the brush gets ratty give it a haircut. You’ll get maximum life from your brushes this way.
6. Clean brush on a bar of Lava soap. Rinse clean. Reshape with a little soap on the fingers. Set out to dry. Rinse brush with water before using.
QUESTIONS & COMMENTS
We have a comment from Phyllis today with some excellent advice for all new carvers. Phyllis writes:
“I just want to comment on the upsweep knives. A carving friend gifted me with one several years ago and I never used it until last year. I have the Flexcut brand that Bob showed on his blog yesterday. I love it and use it a lot more now. I can get a lot more wood off in places that before were difficult to get at. I used to have a lot of trouble rounding wood until I started using my upsweep knife, now it’s much easier for me. I have several Flexcut knives, v-tools and gouges and I love them all. Plus I have a couple of Helvie knives and love them also. My suggestion for any new carver is not to go out and buy all the knives you can get all at once. Take your time, get one really good knife to start out with until you figure out what you like to carve the most. Start your collection slowly so you don’t waste your money on tools you might never use again. Also I always suggest that you save your first ever carving so that in a year or so you can refer back to it to see the awesome improvements you have made.—-Phyllis”
Thank you for the excellent information and advice, Phyllis! This is something all wood carvers should keep in mind when first starting out.
Phyllis also replies to Steve’s questions regarding her scroll saw problem. Phyllis writes:
“Hi Steve,
Yes I have the tension lever loose when I install the blade. The bottom is most often the one that lets loose and it’s usually the one I tighten first and as to the question about the wingnuts, sorry I can’t remember if they are loose or not.” The saw is a Dremel, model 1830, and it’s about 15 years old. Any thoughts?
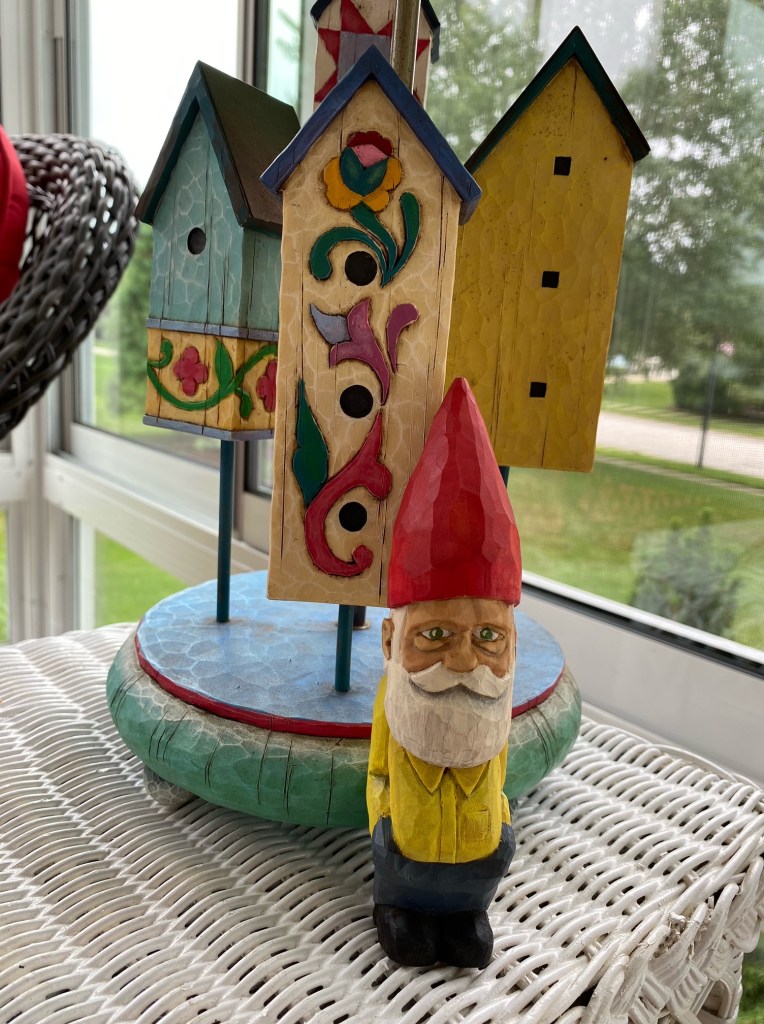
Today Dean writes a reply to my comments on his photo. Dean writes:
“Bob Thanks for the compliment one the eyes. I did not make the bird houses they are actually part of a lamp in my sunroom. They just seemed like a good backdrop for the gnome. I’ve decided that he is a retired consultant gnome. A guy who knows stuff”
Gnomes are known to live for many, many years so they learn a lot of stuff over that time!
Jim Morasco has sent in a photo of one of his excellent carvings:
Wood Carving by Jim Morasco
Thank you so much for the photo, Jim. That’s amazing work! I like how you carved the feathers. What type of wood is that?
Thank you to everyone for submitting your questions, comments and photos! This is what keeps Wood Chip Chatter active and interesting!
Keep a sharp edge and keep on carvin’!
Let the chips fly! Tell your friends about Wood Chip Chatter, and don’t forget to send in your questions and comments so we can keep Wood Chip Chatter Active and keep the conversations going!
And remember to email your photos to carverbobk@woodchipchatter.com
BREAKING NEWS: Condoms don’t guarantee safe sex anymore. A friend of mine was wearing one when he was shot dead by the woman’s husband.
“how is an upsweep knife used, and its purpose ? am sorry but new to carving here.”
Never be apologetic that you are new to carving, Richard. We were all there once.
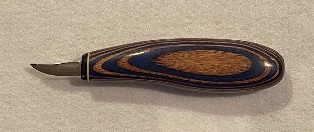
Your question happens to be a very good one and one that I’m certain many other carvers also have. An upsweep knife is a knife with a convex blade which arches upwards. The upsweep knife is used in the same manner as a straight blade knife but with some advantages. The convex blade on an upsweep knife makes easy “slicing” cuts through the wood which are more difficult to make with a straight blade. The upsweep blade is also capable of getting into areas a straight blade can’t get into. The downside of upsweep knives, however, is that they are not as commonly available by most knife makers.
Typical Upsweep Knife
Our next question comes from Steve in response to Phyllis’ problem with her scroll saw. Steve asks:
“Philis, is the blade breaking or just slipping out of the holder??? What brand and model number saw is it???”…Steve
Thank you so much for your response to Phyllis’ scroll saw question, Steve. I’m sure we’ll hear back from here soon.
Dean Stewart has sent in a photo of one of his latest carvings! Dean writes:
“Here’s a photo of my most recent project. I can’t decide what vocation this gnome pursue”
Gnome carving by Dean Stewart
Terrific job on that gnome, Dean! Nice work on the eyes too! Thank you so much for sending in your photo! Did you also do the bird houses?
EMAILS: I’m still working out the bugs with my web designer on setting up an email account through which you can send photos. Right now there is my personal account: rwkoz51@gmail.com. For now just submit photos through that account directly. I’m currently working on a blog account through which where you will be able to email everything but that one is not quite ready. Dean, your photo came directly into my Wood Chip Chatter account. Can you tell me what email address you used and how you did it? It may help solve the problem. Thanks for your patience.
Keep a sharp edge and keep on carvin’!
Let the chips fly! Tell your friends about Wood Chip Chatter, and don’t forget to send in your questions and comments so we can keep Wood Chip Chatter Active and keep the conversations going!
And remember for now to email your photos to rwkoz51@gmail.com
“Black Bart” A pottle stopper carved by Bob Kozakiewicz
Today we have some interesting questions from readers about scroll saw issues and problems finding a good upsweep blade knife. Hopefully some of our other knowledgeable readers can provide some input.
1. Phyllis is having a problem with her scroll saw and comments:
“I’m having problems with my scroll blades coming off when I start carving the wood but I’m sure I have them in the slots where they belong and I’m pretty sure I have the tension correct because I listen for the ping after I tighten it.”—Phyllis
Can anyone out there offer Phyllis some advice?
We have another kind comment and question today from Andy who writes:
2. “Hey Bob, first off, I wanted to thank you for starting this blog. It’s a great way to exchange ideas and ask questions. My question is as follows, what is a good quality upsweep knife, that is attainable? I have been looking for one for a while , but so far I have been unsuccessful. Helvie wasn’t selling them this last go around, and I don’t see them made by OCCT or Drake. I know some other knifemakers do them, but I can’t seem to find one. Thanks!”
Thank you for the kind compliment, Andy! I’m glad you’re enjoying reading my blog and are getting something out of it.
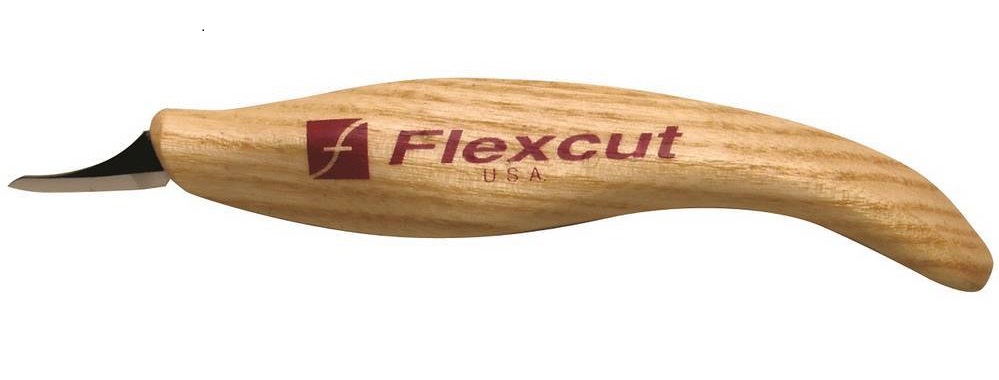
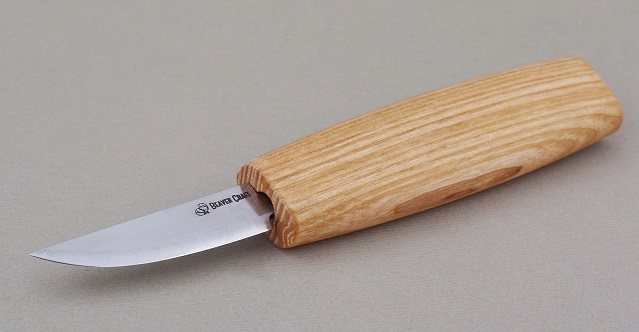
Your question is a good one and one that many carvers are struggling with. To the best of my knowledge neither OCCT or Drake make an upsweep knife at this time. I did some research, and although they are rare I was able to locate a couple of upsweep knife makers. I will try to break them down as follows below
Helvie Sweep Knife – Sold in 3 blade sizes by Helvie Knives; Around $33.00. Excellent knife but extremely hard to get.
Flexcut Pelican Knife #KN18 with a 1 5/8″ blade; Sold by Greg Dorrance Co. $23.76
2. Flexcut Mini Pelican Knife #KN19 with a 7/8″ blade; Sold by Greg Dorrance Co. $23.56
3. Beavercraft C1-Small Whittling Knife with a 2.36″ blade; Sold by Beavercraft…$16.95
4. Knives of the North – Mora knives; these knives have a long gradual upsweep with 3-4″ blades, very high quality, good reputation…around $33.00
5. Deepwoods Ventures – Slim Carver #205F upsweep with 1 1/4″ or 1 1/2″ blade…$37.98
6. Ramelson Sloyd knife Model #HM-3Y4W-ZWSS, Sold by Woodcraft – Item #166912; 2 7/8″ blade…26.99
So there you have a few, and as you can see there are only a few to choose from when it comes to upsweep knives. The Helvie by far would be my first choice. Then the other others I would consider to be upsweep knives that compare to the Helvie sweep knife are the two Flexcuts, the Beavercraft and the Deepwoods Ventures knives. Although I am aware of some excellent wood carvers who do their work with Mora and Sloyd knives. After all the Scandinavians have been carving with them for centuries!
I hope that helps with choosing the right upsweep knife for you.
If anyone has any other comments, ideas or sources for upsweep knives please send in a comment and let us know! We’ll be happy to hear from you!
Keep a sharp edge and keep on carvin’!
Let the chips fly! Tell your friends about Wood Chip Chatter, and don’t forget to send in your questions and comments so we can keep Wood Chip Chatter Active and keep the conversations going!
And remember to email your photos to carverbobk@woodchipchatter.com
Having a cold drink on a hot day with a few friends is nice, but having a hot friend on a cold night after a few drinks…..Priceless!
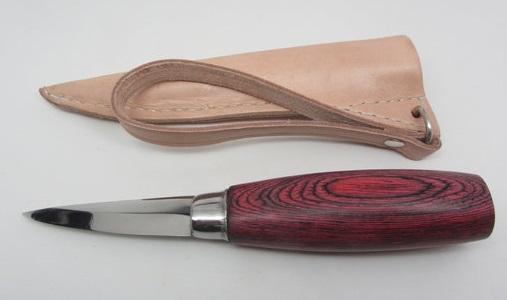
A few days ago I wrote a piece about wooden spoons. Well today I’d like to talk a little about a very special type of wooden spoon, and that is the lovespoon. Here is some brief information about the origins and symbolism of lovespoons.
Typical Welsh Lovespoon
A lovespoon is a wooden spoon decoratively carved that was traditionally presented as a romantic gift. A spoon is normally decorated with symbols of love, and was intended to reflect the skill of the carver. Due to the intricate designs, lovespoons are no longer used as functioning spoons and are now only considered as decorative items.
LOVESPOON ORIGINS
The lovespoons are a traditional craft that dates back to seventeenth century Norway. Over generations, decorative carvings were added to the spoons and they lost their original practical use and became treasured decorative items often to be hung on a wall.
The earliest known dated lovespoon from Wales, displayed in the St Fagans National History Museum near Cardiff, is from 1667, although the tradition is believed to date back long before then. The earliest dated lovespoon worldwide originates from Germany, and is dated as 1664.
LOVESPOON SYMBOLISM
The lovespoon traditionally was given to a young woman by her suitor. It was important for the girl’s father to see that the young man was capable of providing for the family and had good skills in woodworking.
Sailors would often carve their lovespoons during their long journeys at sea, which is why anchors would often be incorporated into the carvings.
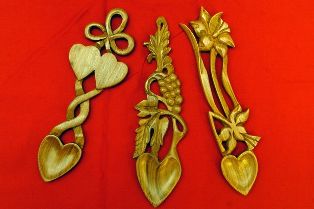
Various Welsh Lovespoons
Certain symbols came to have specific meanings: a horseshoe for luck, a cross for faith, bells for marriage, hearts for love, a wheel supporting a loved one and a lock for
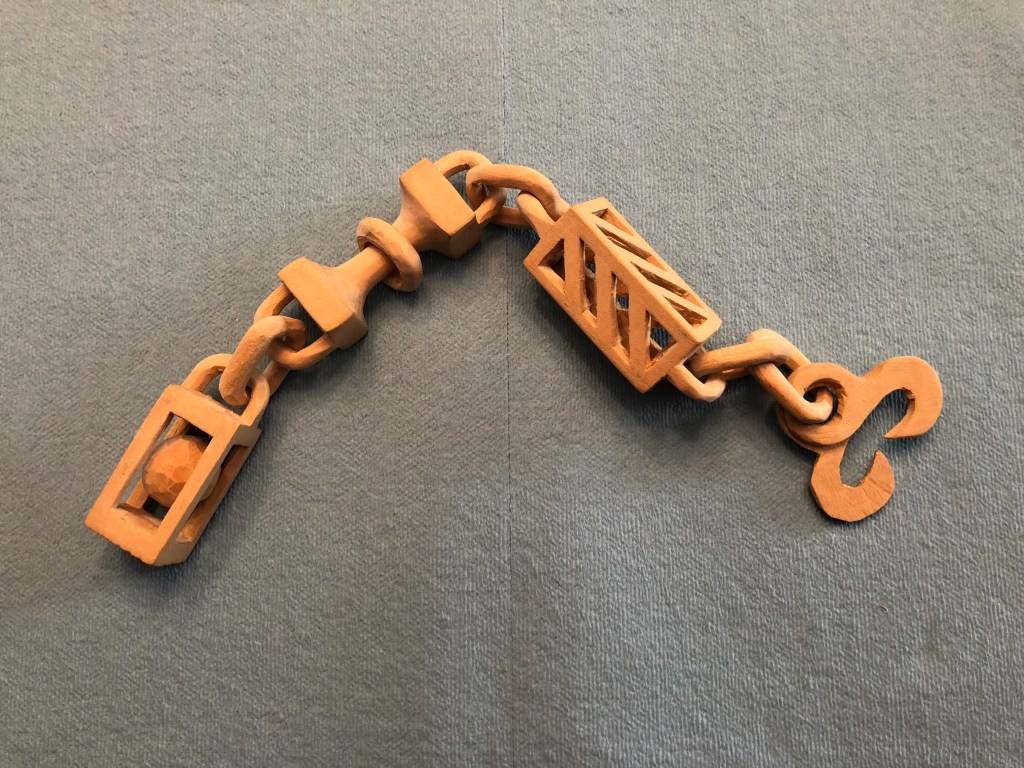
security, among others. Caged balls indicated the number of children hoped for. Other difficult carvings, such as chains, were as much a demonstration of the carver’s skill as a symbolic meaning.
Although the Welsh lovespoon is the most famous, there are also traditions of lovespoons in Scandinavia and some parts of Eastern Europe, which have their own unique styles and techniques when it comes to the lovespoon.
Today lovespoons are given as wedding and anniversary gifts, as well as birthday, baby gifts, Christmas or Valentine’s Day gifts.
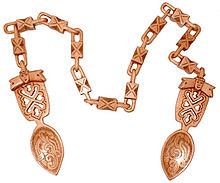
WEDDING SPOONS
Norwegian Style Carved Wedding Spoons
Many years ago newly married Norwegian couples ate with linked lovespoons to symbolize the bond of their marriage. The spoons were sometimes referred to as wedding spoons. These spoons and chain were often carved from a single piece of wood, demonstrating the groom’s wood carving craftsmanship.
REFERENCE:
Wikipedia The Free Encyclopedia
APOLOGIES
My apologies to everyone for the misleading information about submitting photos to the blog along with your comments. Several of you have contacted me and said they couldn’t find a way to attach a photo. After checking with my web designer I’m told
there is no way to attach a photo to a comment. So here is what I’ve done. I’ve opened a new Wood Chip Chatter email account specifically for anyone who cares to send me an email. The address is: carverbobk@woodchipchatter.com. Going forward, anyone wanting to submit photos to the blog should send them through this email account. Just comments can still be submitted through the Comment button but all comments and or photos can now be sent through the new email account: carverbobk@woodchipchatter.com.
I hope this clears things up and apologize for any inconvenience.
Remember:
Let the chips fly! Tell your friends about Wood Chip Chatter,
and don’t forget to send in your questions and comments so we can keep Wood Chip Chatter active and keep the conversations going!
And remember to email your photos to carverbobk@woodchipchatter.com
The following shows have been added to the schedule of Coming Shows & Events I posted the other day. Please make a note of these additions.
~~2021~~
August 5-7…Norwood, MO. 14th annual carving seminar with Ron Allison, Harold Enlow, Van Kelly, and Roger Stegall. Allison Kidder (304) 532-7450, missalliek12@gmail.com
August 21…Waterbury, VT. 48th annual Green Mountain Woodcarvers show at Rusty Parker Park, 9am-3pm. Free admission tables. Matthew Strong (802) 253-2957, carvestrong@gmail.com; Bob Lindemann (802) 229-2062, rlindemann@pshift.com. greenmountainwoodcarvers.org
September 18…Muncie, IN. Raintree Woodcarvers Show, Sale, & Competition at Muncie/Delaware County Fairgrounds, 1301 Craig Ave.; 9 to 4. Free admission Email: bwkicrandall@gmail.com, Jay Kokena (765) 623-4720; Kokena3@man.com.
September 18-19…Big Stone Gap, VA. 10th annual Carv-in at Carnes Gym, E. 5th St. Sat. 9-4, Sun. 12-4. Maurice Vanhook (276) 393-2045, mauricevanhook@yahoo.com; or Victoria Eldridge (276) 220-6818, thewhodatzworkshop@gmail.com.
October 2-3…Coon Rapids, MN. Metro Chapter’s 16th annual Carve-In at Coon Rapids VFW Post 9625, 1919 Coon Rapids Blvd. NW. Email Roger Serdahl at dahjrlia@gmail.com, or Tom Sheldon at Tbshel@comcast.net.
October 9-10…Colorado Springs, CO. Pikes Peak Whittlers Show/Competition at Colorado Springs Shrine Club, 6S. 33rd St. Sat. 10-5; Sun. 10-4. Admission $3; children and military $2. Steve Gurnett (719) 339-5164; sgurnett@comcast.net.
October 16…Camdenton, MO. Lake of the Ozarks Woodcarvers Show at Community Christian Church, 1064 N Business Highway 5. Hours: 8:30am to 3:30pm. Free Admission. Doug Bibles (573) 286-1049; dbibles@charter.net.
October 16-17…Denmark, WI. 38th annual Northeastern Wisconsin Woodcarvers Show & Sale at 450 N. Wall St. Admission $3 (under 12 free). Hours: 9am to 4pm. Call Pat Williams (920) 883-6089. http://www.NEWWG.org/annualshow
October 23-24…Lakewood, CO. Colorado Carvers Club hosts 46th show/competition/sale at West Metro Fire Training and Event Center, 3535 S. Kipling St. St. 10 to 5; Sun. 10 to 4. Small admission free. Email: CCCAnnualShow@centurylink.net. Website: http://www.ColoradoCarvers.org.
November 6-7…Rogers, AR. 41st annual woodcarving show/competition/sale at Frisco Station Mall, 100 N Dixieland Rd. Free Admission. Saturday 9-5; Sunday 10-3. Vicky Standridge (479) 366-3951, or Scott Boyle (479) 381-3014. http://www.woodcarversofnorthwestarkansas.weebly.com.
December 4…Inverness, FL. Nature Coast Wood Carving Club’s 24th show and sale at Citrus County Fairgrounds Auditorium, 3610 Florida Ave. South; 9am to 4pm. Admission $3. Gene Short (352) 634-2003;Shortyswoodshop@gmail.com.
~~2022~~
January 7-8…Punta Gorda, FL. Southwest Florida Wood Art Exposition & Competition at Charlotte Harbor Event and Conference Center, 75 Taylor St.; 9am to 4pm. Jim O’Dea (941) 697-2002; jeodea@aol.com. flwoodartexpo.com
Questions & Comments
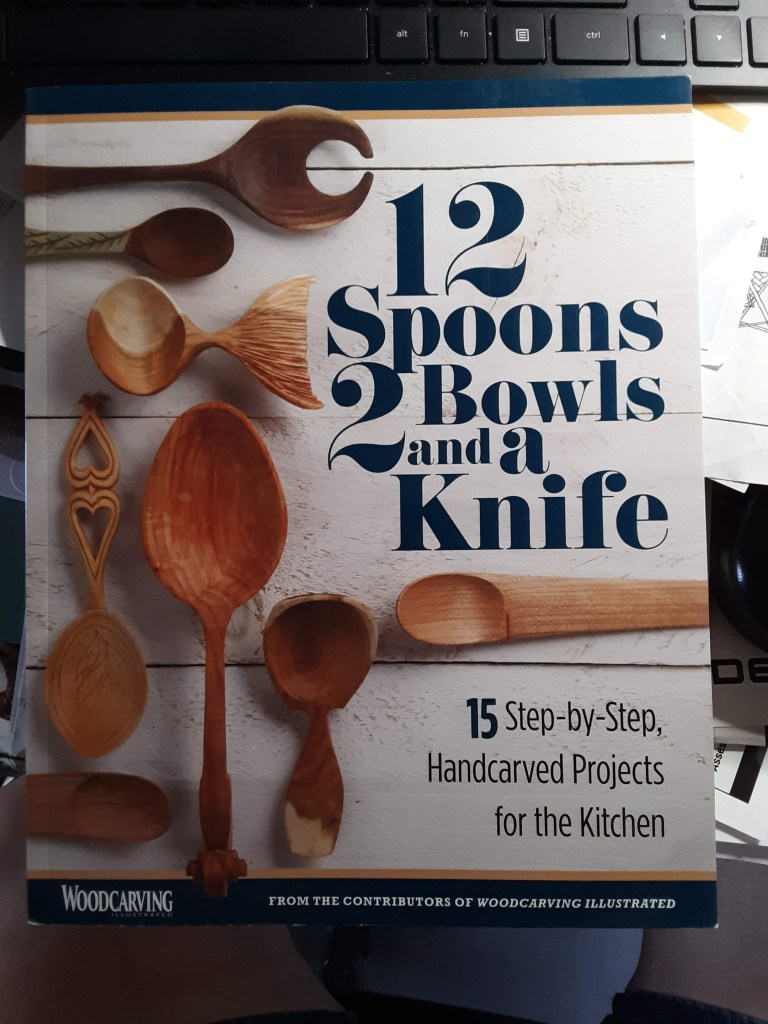
Today we have a comment from Phyllis who writes:
“Very nice blog about spoons Bob. I have carved a couple of decorative spoons but never a practical spoon. Last week I went to Fox Chapel’s warehouse and bought a book that was printed in 2020. The book is called “12 Spoons 2 Bowls and a Knife”. Eventually I hope to carve some practical spoons from this book. I hope everyone has a wonderful day and keep on carving.—-Phyllis”
Thank you for your comments and input on the new book about spoon and bowl carving. I have seen the book advertized but have not yet had a change to look at it. The title of the book is “12 Spoons 2 Bowls and a Knife.” My question is, are these all projects that can be done completely with a knife? I’ll be anxious to see some of the spoons you carve from the book!
Remember:
Let the chips fly! Tell your carving friend about Wood Chip Chatter, %%%
and don’t forget to send in your questions and comments so we can keep Wood Chip Chatter active and keep the conversations going!
HOW ABOUT SOME PHOTOS! We would love for you to share the work you’ve done in the past or even what you’re working on right now!
Two times a week we go to a nice restaurant, have a little beverage, good food and companionship. She goes on Tuesdays, I go on Fridays.