Strops & Stopping
by Del Stubbs, Pinewood Forge

Strops & Stropping
A Strop for carving tools needs a very fine surface for accepting compound – yet is thin enough to not cause gross rounding of the micro bevel. I go through lots of hides at my leather wholesaler before I choose the ones that have a knap and thickness that is ideal.
When you get a new strop it will need a bit of preparation. Take the sharpening compound and rub it diligently into the leather – about 50 strokes around the entire surface, pushing down fairly hard, to work the compound into the leather. Commence with stropping a few tools, watching for ‘dry’ spots that will inevitably appear. Rub in more compound there, strop tools, repeat…..until it has an even appearance. Before long it will need very little compound re-applied. Long term I re-apply just a couple of strokes of compound after every 4 or 5 heavy uses.
Compound for strops is a formula of super fine abrasive powder mixed with various waxes. Sometimes called ‘rouge’ it can be confused with jewelers’ rouge, (which is generally made of very mild abrasives good for only gold and silver, not for hard steel). There are many brands of compound to choose from that can work well. We have chosen “White Gold” to offer our customers because it is formulated specially for hand stropping – it polishes the edge while micro sharpening it. If you have another type of compound, just check that the leather is turning black as you strop – this indicates that the compound is hard enough to be removing metal – (remember that stropping is sharpening) – but it must also leave the tool shiny (not dull) as this proves that the abrasive is a super fine ‘grit’.
When stropping, lay the tool flat on the leather and with your finger on the blade draw it backwards away from the edge. Use a fair bit of pressure, the finger turns a little white. This is needed because the compound is so super fine. (Do not flip the tool up and away at the very end of the stroke – this usually means an unconscious twist of the wrist – which will blunt the edge). All knives flex slightly towards the tip so one must slightly raise the handle as one nears the end of the stroke – to provide the same pressure to the last third of the tool as you do to the first third. If you have a tool whose edge is not holding up as well as you’d like after honing – try adding a micro bevel to the edge by raising the back of the knife about the thickness of itself off the strop. This will put much more pressure on the edge. Be careful with this technique as too much pressure will round over the edge and make it cut poorly. What you are looking for is a compromise between too fragile an edge – and too rounded an edge. It is an important technique to learn and refine, think of it as adjusting the very edge of your tool microscopically. When an edge gets too rounded – that’s what hones are for, a strop cannot re-flatten an edge.
Strop Maintenance
Every so often I get an inquiry about strops that have become uneven / irregular / lumpy with compound, normally occurring only after considerable service. But the fix is easy!
Firstly, the hard wax that is the binder for the oxide polish is soften-able, so it may be softened by holding the strop – leather side down – over low heat (hair dryer, cookstove, etc.) till it is just warm to the touch. Don’t make it hot to the touch, just warm. This should make it easy to scrape off the old compound.
Secondly, take a knife you’re not particular about, say an old butter or paring knife, and just scrape away, going sideways, to get down to leather – holding the edge at 90o / perpendicular to the strop surface. In the future strive to apply the compound in even, long strokes and use a bit less – properly used a strop should never get ‘lumpy’ – it means far too much compound is being applied.
Del Stubbs is the owner of Pinewood Forge, a maker of fine Scandinavian woodcarving knives & woodcarving supplies from Leonard, MN. Del makes some of the best woodcarving and spoon carving tools on the market, which are in very high demand. His Fine Leather and Ash Bench Strop ($19.00) is the best strop I have found anywhere…I own 3 of them! Check out Pinewood Forge at: http://www.pinewoodforge.com
QUESTIONS & COMMENTS

First, before we get into readers’ comments I want to address Jakobo’s comments from my last post regarding a new kangaroo leather strop and the way it is used. Although I have never used one I’m sure the kangaroo strop works well. When properly used almost all strops will work. The problem I have is with Tom’s explanation of the proper way to strop a knife.
First of all, the illustration Tom shows of the leather being compressed and the knife edge being rounded is grossly exaggerated (see the link provides by Jakobo). When we talk about stropping knife blades we are talking about microscopic changes to the edge. However, those microscopic changes can make the difference between a sharp edge and a dull one, and unless the blade edge has been extremely over rounded further proper stropping will bring it back to where it should be.
Proper stropping all comes down to a technique that you must learn and refine. As Del Stubbs explained above you want to press down with just enough pressure to form that micro bevel on the knife edge, but not too much so as to round the edge off. Tom neglects to address this micro bevel which is so critical to a truly sharp knife edge.
Regardless of what kind of strop you are using, as Del further states, if after repeated stropping you are still not getting that all important micro bevel you need to try lifting the back of the blade about 1/16″ (the thickness of the blade) off the strop when you strop it. Think of it as microscopically fine tuning the edge of your knife.
Secondly, I would like to address Del’s comments on strop maintenance. In the beginning, Del mentions strops that have become lumpy, uneven and irregular with compound. This is caused by too much wax built up from repeated applications of the compound to the strop leather.
For this reason, I have found waxy stick compounds to be a pain to use. They more often than not go on unevenly and build an excess amount of wax in a short amount of time. And regardless of what compound you use (red, white, green or yellow) they all do it.
For this reason, I use aluminum oxide powder which is pure aluminum oxide with no wax binder. My thinking is that if it’s the aluminum oxide that’s sharpening your knife why add the unnecessary waxy binder that only clogs up your leather? With the aluminum oxide powder I have never had to perform maintenance on my strops.
I just sprinkle a little powder along the length of the strop and work it in with my finger. No rubbing, scrubbing or scraping! Easy peasy! Aluminum oxide powder is available in 2 oz. containers through numerous woodcarving suppliers.
Our first question today comes from my good friend Jim Arnold who makes the finest chess sets I have ever seen. Jim writes:
“Bob,
Thanks for the blog…very informative, but fun too. Doing a chess set commission and my client wants a ‘painted’ set that also has that glassy glossy shine to it. Can I apply a gloss lacquer over acrylic paint and still make it shine? You have any alternate suggestions for me?
Thanks, Bob, always enjoyed your painting abilities along with your carving work,
Jim Arnold”
Hi Jim,
I’ve always liked to use Deft spray lacquer. I’ve used the semi gloss which give a shine but it’s not what you’re after. Go with the gloss spray with two or three coats. That should do it. If you don’t want a spray Deft also come in a brush on form. As usual, try it on a scrap piece first.
Thank you so much for your kind words. I greatly appreciate them.
Our next comment is in the form of a compliment from Timothy Sisko on my posting of his method for Drying A Wood Project. Tim said:
“Nice article Bob, you did a good job of putting the information together.”
Thanks, Tim! Unfortunately, your diagram and the table didn’t transfer over when I put the blog post together. I’m bummed about that but it’s a problem with the WordPress web design that I use. Thanks for sending it in!
Una Schlaebitz from Montana sent in a comment along with some photos of the fine Simple Santas he has been carving lately. Una writes:
“Hi Bob! I’m really enjoying your newsletter. You already know I love your no-eyes Santas and I’ve made lots of them. I make different hats with long tails and hands down so they can hold a sign or stocking or candy corn. Most recently mine have a long braided beard and I taught a short class on the beard at the West Glacier Rendezvous last month. The bottoms of my photos are partly cut off because I had the names below to remind me of who I sent them to. There’s a Santa with brown coat and black fur and an unfinished sign below – – It ended up being a “Bah-Humbug”. I did one as a joke for myself and then during COVID it seemed appropriate for a couple people. One with “Go Diggers” was for the A.D. of Montana Tech in Butte. It’s fun to do team logo Santas with stickers or small pieces of logo fabric on the bases or packages. This is a great pattern. Una Schlaebitz”

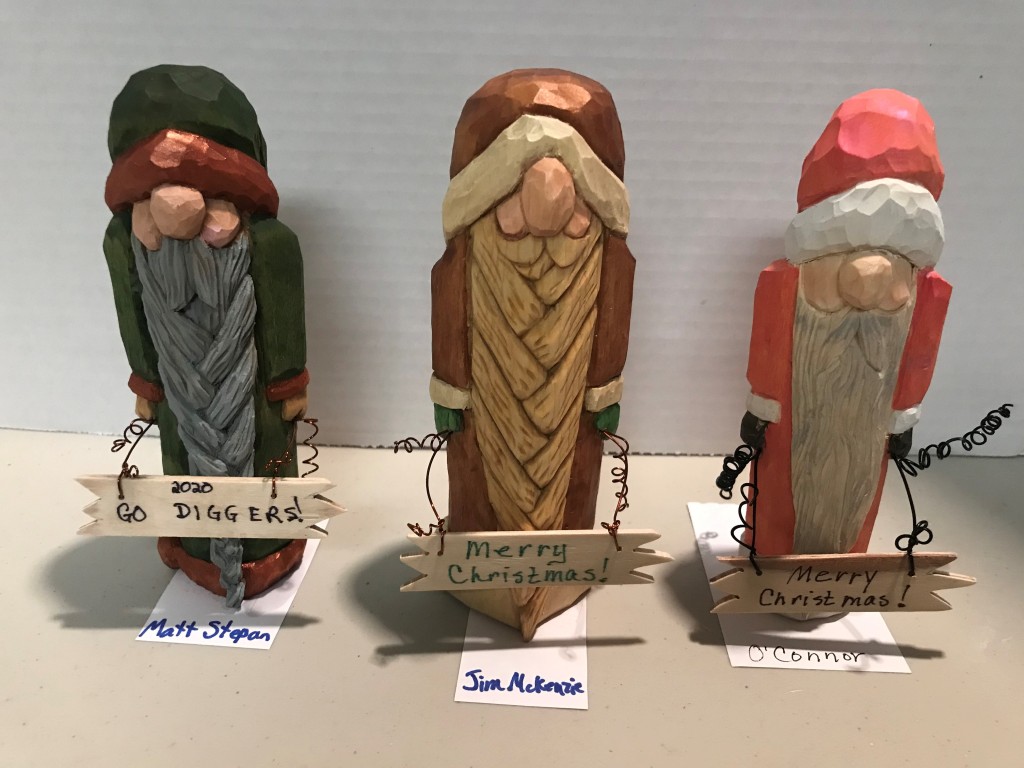


Hi Una…I’m really happy you’re enjoying Wood Chip Chatter. I work very hard to make it informative and interesting every time. Your Santas are awesome! My Simple Santa was designed to be very adaptable. You can make unlimited changes to it and get a lot of mileage out of the pattern. I like the way you do your braided beards…cool idea, and they look great. I especially like the candy corn Santa! It’s very unique. I’ve done a few Santas with sports logos and they come out very cool looking. Have fun making more Santas! You’re on a roll and Christmas is right around the corner!
My Simple Santa was written up in an article by me (as the “Quick Wizard”) in the Summer 2017 #79 issue of WCI and again in their 2017 Holiday Pattern Collection. If anyone hasn’t seen it and would like a copy of the pattern, just drop me a comment or email and I can get one out to you.
Let the chips fly! Tell your wood carving friends and spread the word about Wood Chip Chatter, and don’t forget to click the ‘Comment’ button at the bottom of the page to send in your questions and comments so we can keep Wood Chip Chatter active and keep the conversations going!

And remember, we need your photos! I’m sure you all have some terrific carvings to share and photos of your carvings will help to liven up the blog’s appearance and make it more interesting. Perhaps we can start a carvers photo section! Email your photos to carverbobk@woodchipchatter.com
Keep a sharp edge and keep on carvin’!


Please send me a copy of your santa. Thank you
LikeLiked by 1 person
Anita, send me your email address so I can email it to you. Thanks!
Bob
LikeLike
Hi Anita, First of all, I apologize for the delay in getting this pattern to you. Please send me a note assuring me that you got the pattern. Have fun with it and feel free to contact me if you have any problems or questions. Bob
On Sun, Sep 19, 2021 at 5:55 AM Wood Chip Chatter wrote:
>
LikeLike