This week I am introducing Part 1 of a photo eye tutorial done by my good friend, Tony Harris from Tennessee. Tony is an excellent carver who creates his own Santa ornaments and was gracious enough to share his expertise with us on how he carves the eyes. Because of the number of photos in this tutorial I have broken it into two parts of 12 photos each. Part 2 will follow next week.
Part 1
Sharp tools are important. Before you begin, make sure your tools are sharp. Keep them sharp as you go with periodic stropping.
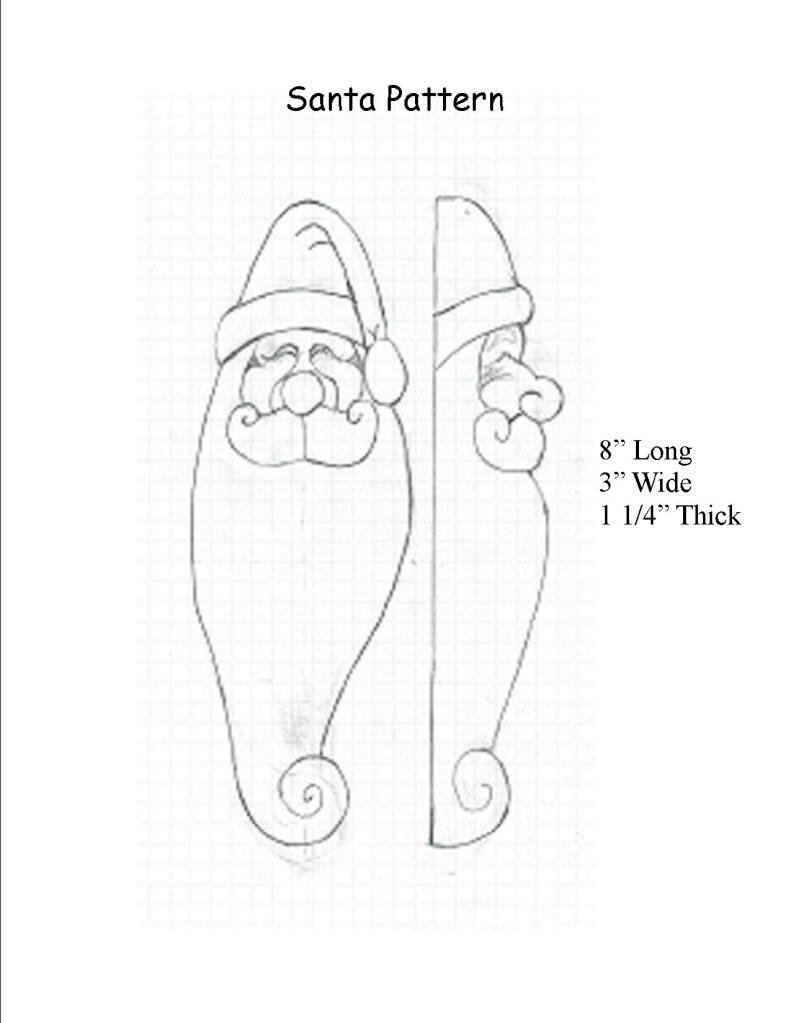
Santa Ornament Pattern
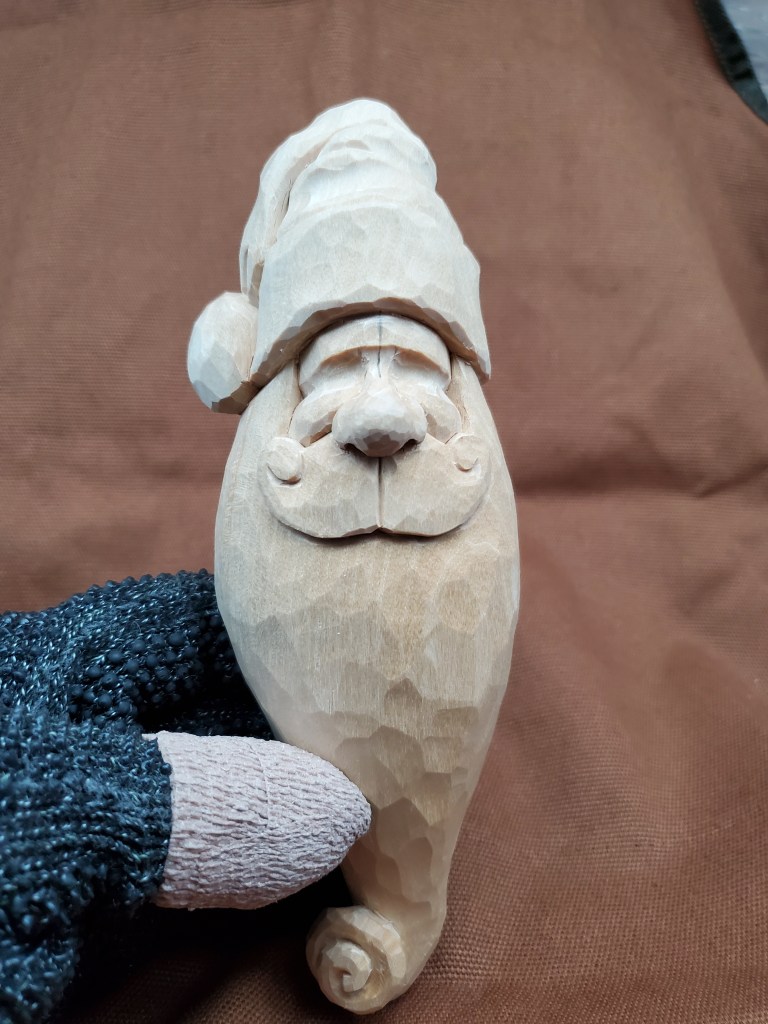
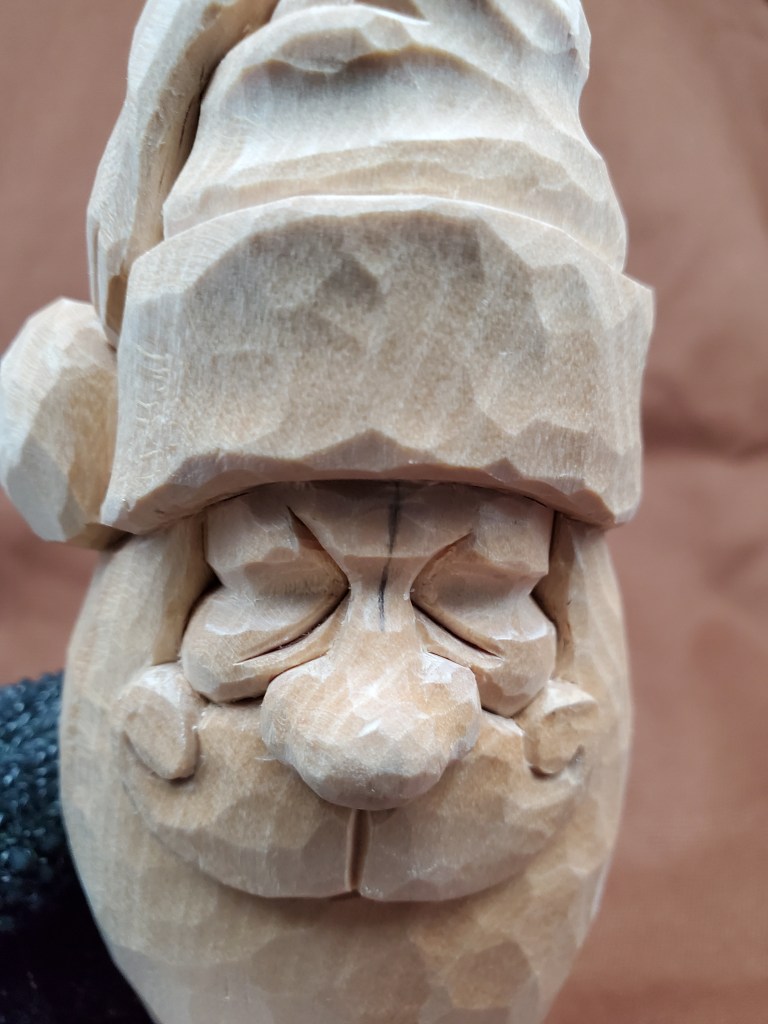
#1 Face foundation set up.
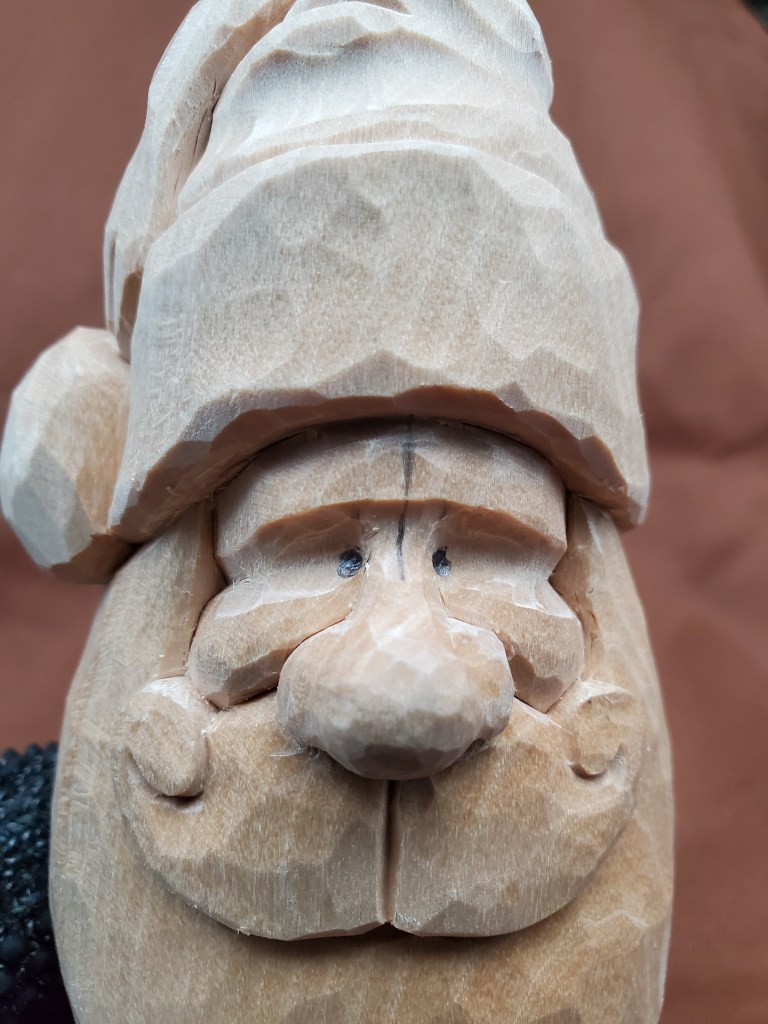
#2 Draw two dots for the point of the inner corners of the eyes.
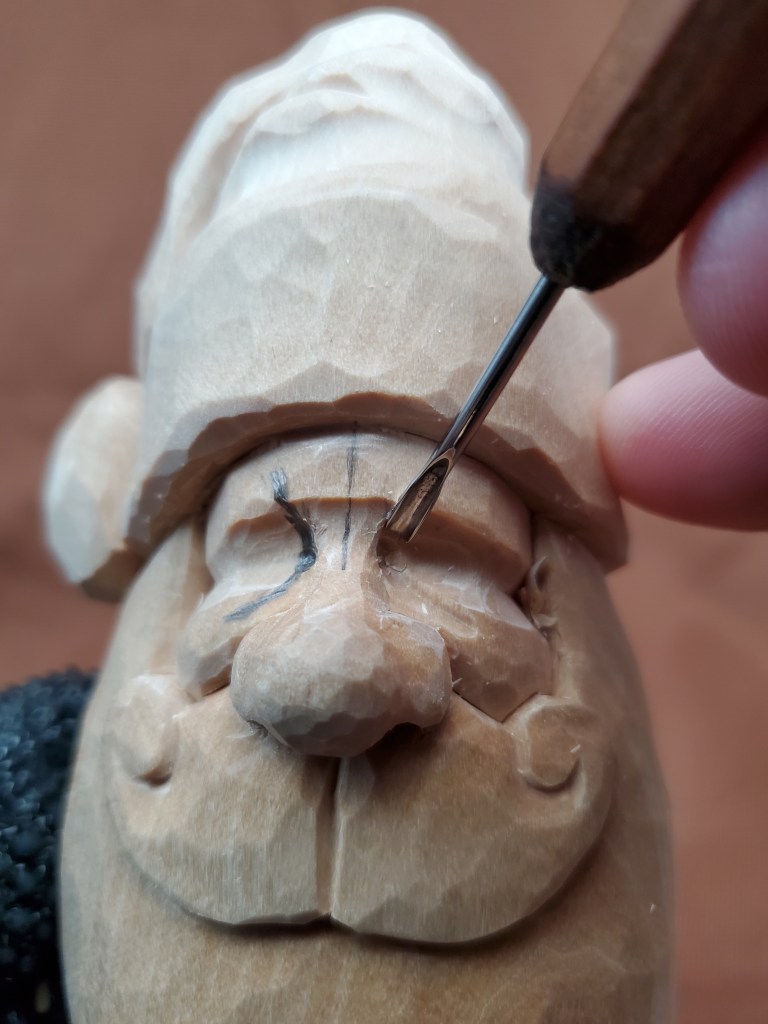
#3 Draw two “C” shaped lines for the main wrinkle.
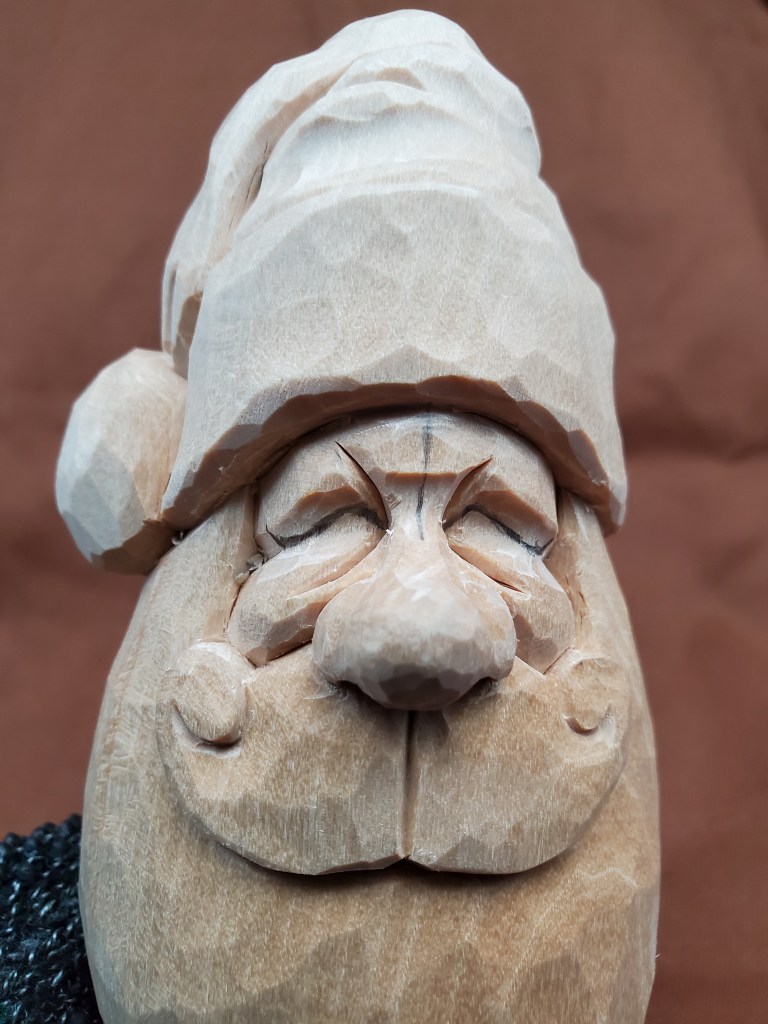
#4 Use a 2mm Dockyard gouge on those two lines.
#5 Use a detail knife straight in the center of the 2mm cuts.
#6 Use the detail knife in at an angle to make a wedge cut out of the 2mm cuts. Take that wedge out. This will create a good shadow for the setup of the top eyelid.
#7 Progress. Both sides completed to this point.
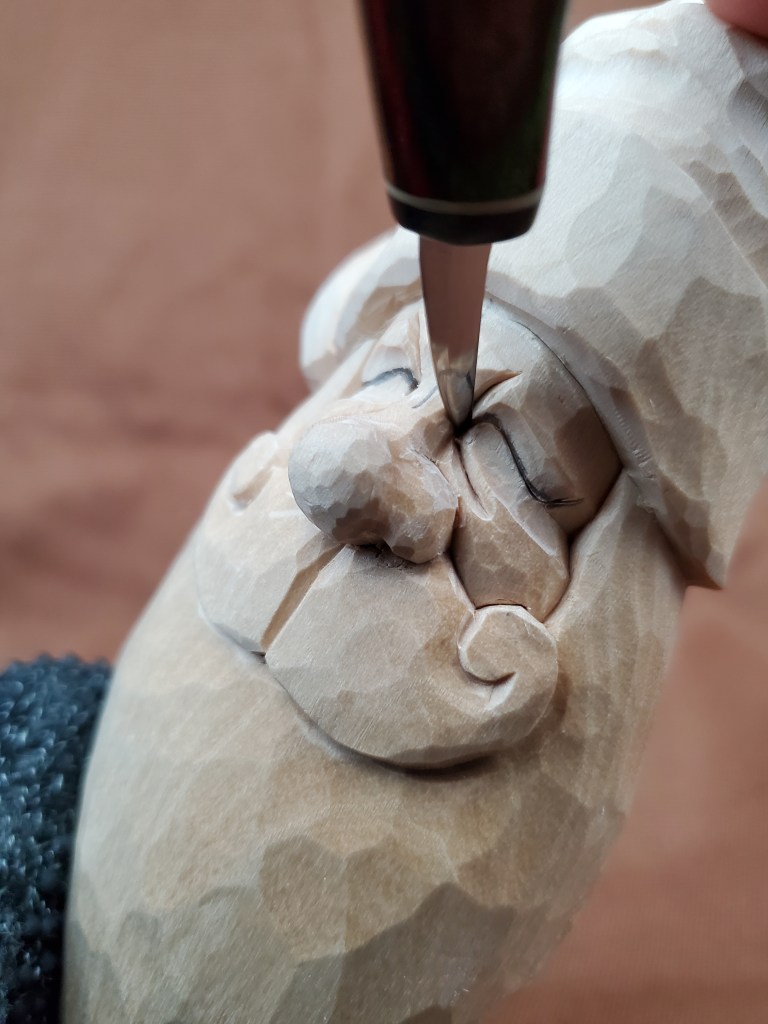
#8 Draw the top eyelids, trying to match both sides.
#9 Use the detail knife straight in on the lines. Stab deep into the corner but “soft cut” the rest of the line. I usually make 3 passes. This way it doesn’t tear the wood on the eyelid and makes a good clean cut.
#10 Cut up to the eyelid line to start forming the eyeball.
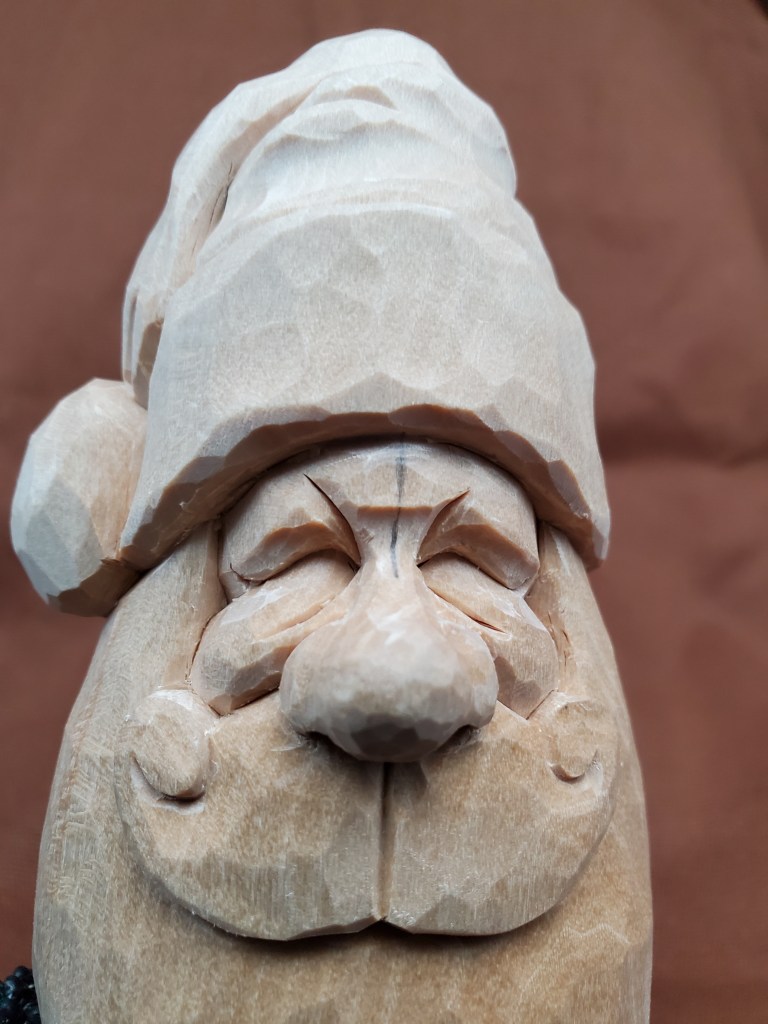
#11 Clean up the eye, and carve away the pencil lines. Carve deep in the corners.
#12 Draw the bottom eyelids corner to corner. Most times it will be almost straight across.
This ends Part 1 of the Eye Tutorial. Part 2 will follow next week.
Readers’ Comments
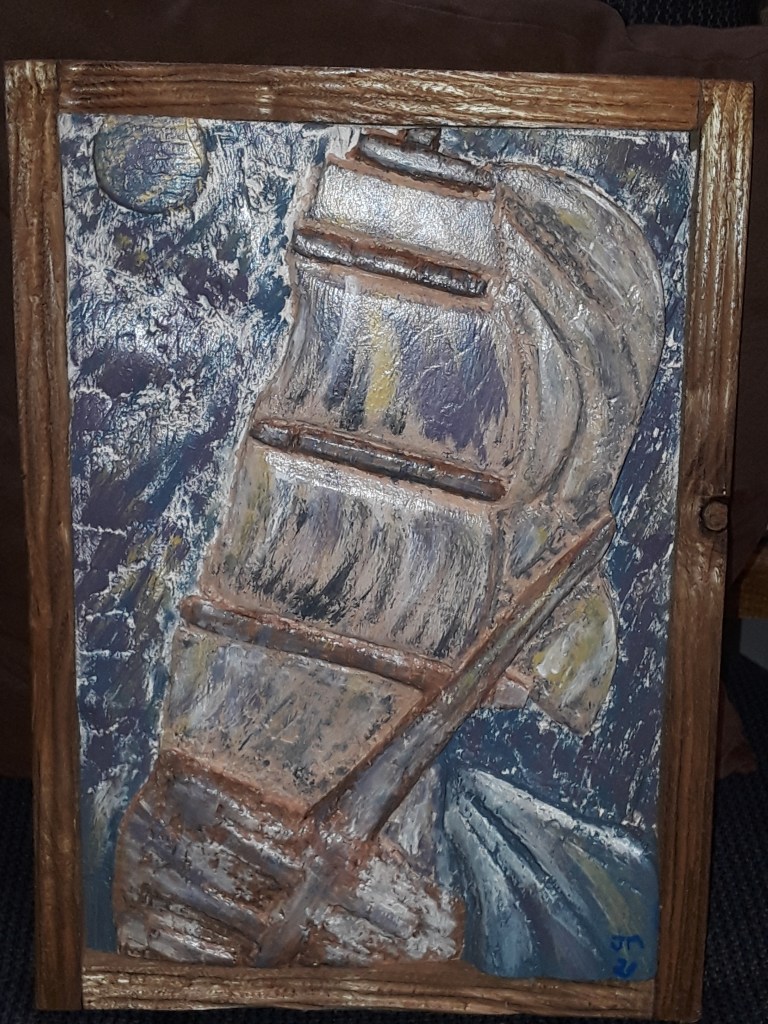
Our first comment this week comes from Jim Morasco along with a photo of the terrific relief carving he did from a painting:
“Hi
Just thought i would share a picture of my first attempt at carving a ” painting “. I call it “weathering the storms of life”.
Jim”
That’s quite an impressive carving, Jim! It reminds me of a big sailing ship. Very unique.
Our second comment comes from John (Mr. T) also along with a photo of some fantastic carvings he did for his wife:
“Bob…. This is some misc. Carvings in my wife’s collection.
John”
Those are spectacular carvings, John! Very clean work. Excellent carving and painting, and brilliant use of antique shading on all of them! Great job!
Announcements
I’m disappointed to have gotten only two comments this week. I thought for sure last week’s discussion on the use of BLO would have drawn some comments and questions on the topic. Surely many of you have carving questions or suggestions, tips and photos in general that you can share with the rest of us. It doesn’t have to be about a current or past post. Start a new topic of discussion. Wood Chip Chatter is the type of blog that thrives on reader participation. Without it the blog becomes dull and uninteresting.
The International Association of Woodcarvers has upcoming Zoom meetings on the following Saturdays at 3PM with special guests. Check them out…
Zoom: 3104603575
SCHEDULE:
11/13 – Ryan Olsen
11/20 – Dwayne Gosnell
11/27 – Thanksgiving
12/4 – Dave Dion
12/11 – Dale Green
12/18 – Eric Owens
INTERNATIONAL ASSOCIATION OF WOODCARVERS
COME JOIN US!!!
Let the chips fly! Tell your wood carving friends and spread the word about Wood Chip Chatter, and don’t forget to click the ‘Comment’ button at the bottom of the page to send in your questions and comments so we can keep Wood Chip Chatter active and keep the conversations going!
And remember, we need your photos! I’m sure you all have some terrific carvings to share, and photos of your carvings will help to liven up the blog’s appearance and make it more interesting. Perhaps we can start a carvers photo section! Email your photos to carverbobk@woodchipchatter.com
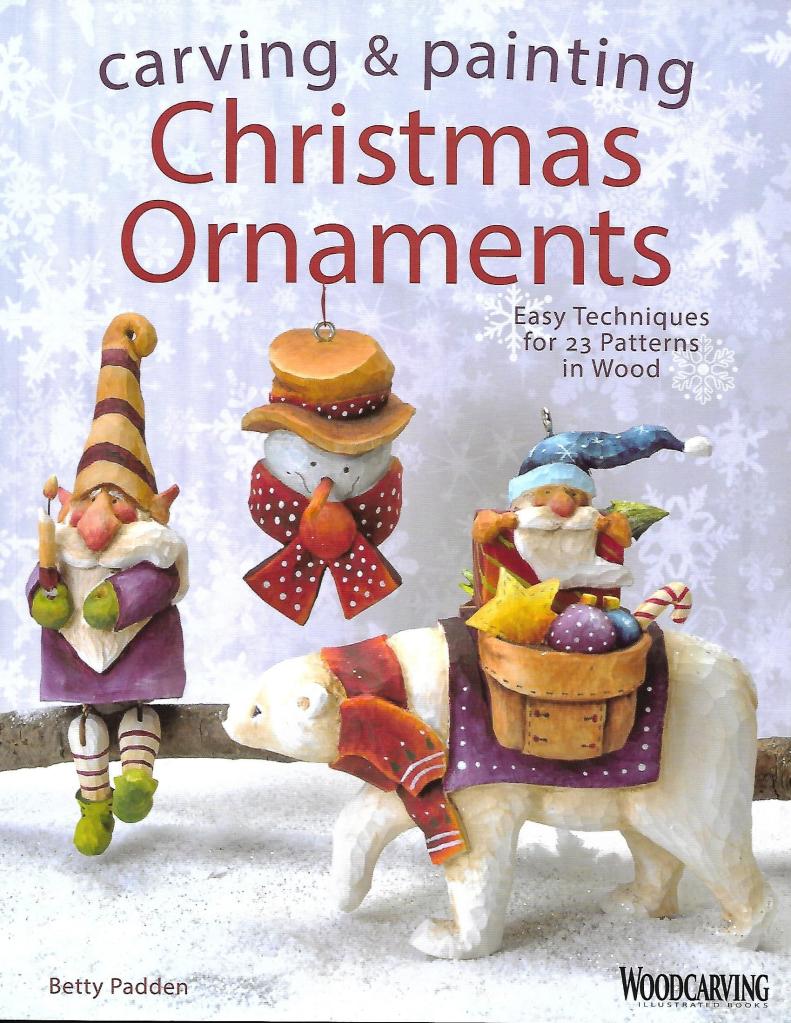
You’re all probably busy right in the middle of your Christmas carving just about now so I thought this would be an appropriate time to introduce you to this great must-have book! If you can’t get it now put it on your list to Santa!
“Carving & Painting Christmas Ornaments” by Betty Padden is probably one of the best books I have in my library. Published in 2014 by Fox Chapel Publishing Company, Inc. this 98 page full-color book contains techniques and patterns for 23 enjoyable ornaments to keep the carver busy all year long.
Front Cover
Back Cover
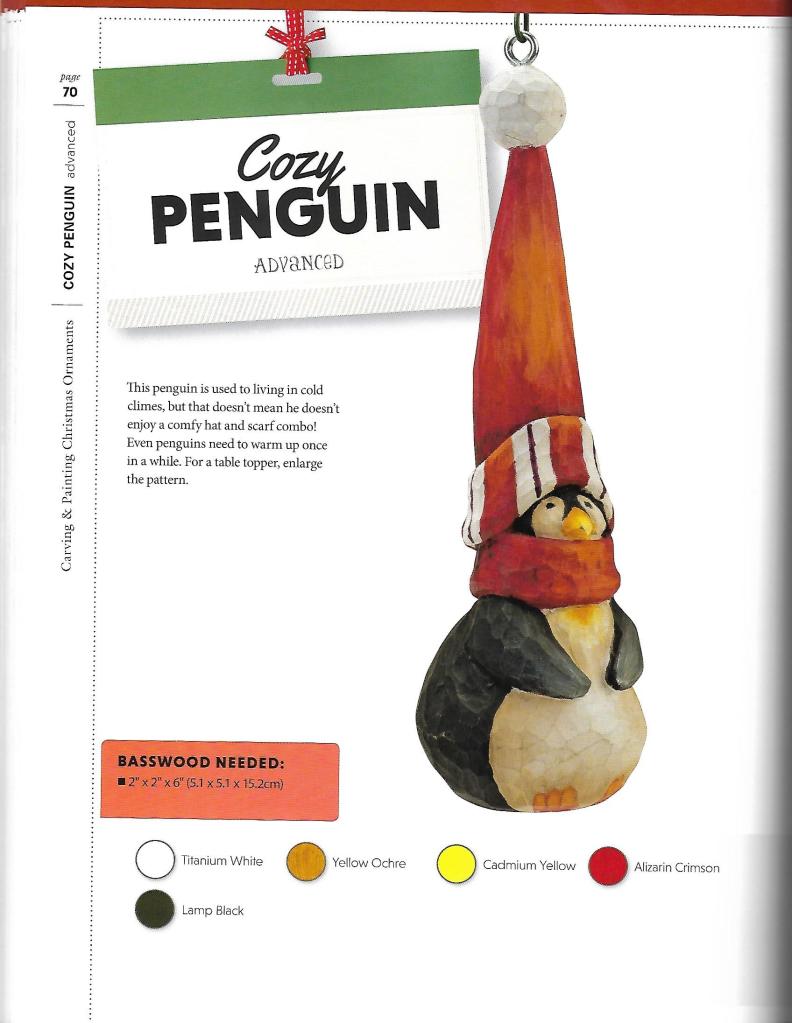
There are 6 step-by-step projects all arranged by skill level from beginner through intermediate to advanced. The projects include Angels, elves, stars, snowmen, penguins, poinsettias, and more. One of my favorites is the Christmas candle.
Candle Ornament
Stocking Ornament
The front of the book includes a full list of the tools required to complete all of the projects, but the most helpful part is the section on painting the ornaments. Betty Padden is perhaps one of the best painters I know, and in her book she covers brushes, highlighting, shading, blending and mixing of colors. She also shows you the colors used to paint each ornament.
Penguin Ornament
“Carving & Painting Christmas Ornaments” is available for $16.99 US | $21.99 CAN | 11.99 RRP UK from Fox Chapel Publishing Company, Inc. I highly recommend this book to any carver who enjoys carving Christmas ornaments or is looking for new Christmas ideas.
Questions & Comments
Our first comment this week comes from Dean who tells us about one of his favorite carvers:
“We all have favorite carvers on YouTube. But I want to add one of my favorites. He hasn’t posted from many years so lots of folks won’t know him. His name is Gary McDaniel. His face tutorials are my favorite. His Indian, greenman and Santa are excellent for beginners or intermediate. Check him out.”
Thanks for sharing that information, Dean. I have heard of Gary McDaniel but have never seen any of his videos. I will definitely have to look into them.
Our next question comes from Cory Rower who needs some advice on gouges:
“Hello! I just had a question and maybe someone else has already asked this but I am trying to decide between palm Chisels/Gouges or the Schaff 12 piece carving set with a full length handle. Are there benefits to having a certain one? Or is it more of a personal preference? I have been kind of tossing around the Flexcut palm set or the Schaff 12 piece set. Thank you for any help you are able to give. It is very much appreciated. -Cory”
I will offer my opinion here and maybe some of our readers can write in with more advice on what you should do. First of all, I’m not familiar with Schaff tools so I can’t speak to their quality. As far as long handle vs. palm gouges goes it’s a matter of preference. I know carvers who use both but personally I prefer palm gouges. And finally, this may not be what you want to hear but I am not a fan of tool sets because I can assure you that if you buy a 12 piece tool set there will surely be 3 or 4 gouges in that set you will never use. So in the end you paid for tools you really don’t want. My advice there is to buy your gouges individually as you need them. This way you are always getting a tool you will use. Buy 2 or 3 now, then add more as you need them.
I received another message from Cory R. this week who sent in some photos of his latest work:
“Hi, I had messaged you on Instagram about the tutorial you did on your Patriotic Santa. So I still have to add in his mustache and beard hairs but he looks so much better. Definitely not perfect but I was pretty happy how he turned out. Thank you for taking the time to explain it to me.
I also have some pictures for the WoodChip Chatter Blog if you want to use them. The first is a star ornament with JOY wood burnt onto it. The second is one of the many penguin ornaments I’m making this year and then we have a before and after your help on my Santa ornament!
Also in reply to your October 16th post my name is Cory R. from Ohio and I am definitely still in the beginning stages of carving but I really enjoy it.”
Thanks for your message, Cory, and thank you especially for the photos. I always appreciate receiving photos from my readers. We’ve all been in the beginning stages of carving at one time. I think you’re off to a good start. The nose on your Santa is much improved but if you want to make it rounder cut more off the bottom. I really like your star ornament! Your wood burning is excellent, and your penguins are looking good too. Keep up the good work and keep those photos coming!
My good friend Tony Harris sent in an all too kind accolade after reading my stories about Halloween and the Jack-O-Lantern:
“WOW! so much information. Your writing talents are awesome, plus a very talented woodcarver as well. =]”
Thank you so much, Tony! I greatly appreciate your all too generous compliment!
Our next message comes from Dean Stewart with some meaningful information on the comparison of BLO versus mineral oil:
“Bob, I was the one who first mentioned the Doug Linker video (Live Stream). I mistakenly believed that live streams were archived like videos are. My mistake. To make up for it, I am sending the attached picture of my three women. I hope this can be the start of a mineral oil versus BLO discussion. Lizzy on the left is sealed with mineral oil. Natalie in the middle is natural basswood and Rita on the right is BLO. These have been sitting for about 9 or 10 months. You can see some yellowing on Rita that is not visible on Lizzy. The grain on Lizzy really pops, but that might be just this wood. I didn’t do any painting comparisons. Maybe someone else has done that. I’m personally sold on mineral oil. Very inexpensive, you can paint on it wet or dry, the colors stay sharp and the rags don’t require the same care as BLO.”
They say a picture tells a thousand words and your picture, Dean, helps to demonstrate what I’ve been saying all along, and that is that BLO will yellow your carvings after a period of time. After using BLO your “Rita” carving shows major signs of yellowing after just 9 months! Your “Lizzy” carving treated with mineral oil shows no changes at all. This is exactly why I encourage all my fellow carvers to break away from using BLO and switch over to either mineral oil or walnut oil. Thank you very much, Dean, for sharing your research results with us!
As further proof, the first photo below is an award-winning carving I did in 2015. The second carving below that is what the same carving looks like today in 2021.
Santa carved in 2015
Same Santa in 2021 (after 6 yrs.)
You can easily see a major difference in color after only 6 years. The flesh tones have darkened significantly and the whites of the hair, mustache and beard have also all darkened. For this reason, I do not advocate the use of BLO on wood carvings.
Let the chips fly! Tell your wood carving friends and spread the word about Wood Chip Chatter, and don’t forget to click the ‘Comment’ button at the bottom of the page to send in your questions and comments so we can keep Wood Chip Chatter active and keep the conversations going!
And remember, we need your photos! I’m sure you all have some terrific carvings to share, and photos of your carvings will help to liven up the blog’s appearance and make it more interesting. Perhaps we can start a carvers photo section! Email your photos to carverbobk@woodchipchatter.com
Here’s a little Halloween treat this week that I think you will enjoy, and maybe learn something along the way. Enjoy!
The Story of Halloween
Most people think of Halloween as a night of dress up in ghostly or funny costumes, to have parties, or to go “trick-or-treating” and never consider why or how much a holiday evolved from a serious annual rite in ancient times. What is actually being celebrated is two customs that have been combined into one.
The first tradition is the observance of a Catholic religious day set aside to honor saints. Referred to as “All Hallows Day” or “All Saints Day,” this holy day is held on November 1st. The night before is known as “All Hallows Eve,” from which the name Halloween evolved.
The second celebration is from Northern France and the British Isles where the Celtic people celebrated the end of the Celtic year known as Samhain (pronounced sow-en) or “Summer’s End.” This festival was a time set aside to honor the dead. The Celts believed that the realm of the dead, or the spirit world, and the physical world were closest together during Samhain.
The traditional celebration of Samhain included carving jack-o-lanterns from gourds and turnips, then lighting them with coals or candles to show the way for deceased loved ones. At the same time, these lanterns were believed to ward off evil spirits. Another version of the celebration indicates that disembodied spirits of those that died during the year intermingled with the living on that night. They attempted to possess the living to hopes of being allowed to have an afterlife. In an effort to frighten away the spirits, people would leave their houses unlit and cold, dress up in ghoulish costumes and parade around town being destructive as possible. This tradition set the stage for today’s children’s refrain “trick or treat.” When the Europeans arrived in the New World, they discovered a new fruit that was larger than the turnip and easier to carve: the pumpkin. The pumpkin has been the symbol of Halloween ever since.
The Story of the Jack-O-Lantern
The story of the name jack-o-lantern has a history of its own. It derives from a folk tale about a disreputable drunkard by the name of Jack who, upon learning that the devil had come for his soul, tricked the devil into buying him one last drink. Having no money, Jack convinced the devil to transform himself into coins so that Jack could buy his last drink. Instead of buying the drink, Jack placed the coins in his pocket along with a silver cross, thus preventing the devil from returning to his common state. To be released the devil agreed to leave Jack’s soul alone for ten years.
After ten years had passed, the devil appeared to Jack as he was walking down a country road. The silver tongued Jack managed to talk the devil into climbing an apple tree before claiming his soul. While the devil was in the tree, Jack pulled out his knife and carved a cross in the base of the tree, thus trapping the devil again. Again he struck a bargain with the devil, this time extracting a promise that the devil would never take his soul.
When Jack finally died, he went to Heaven but was not allowed in because of his drinking and dastardly ways. With no place to go he went to Hell. The devil, remembering Jack’s trickery, refused him entrance. Jack then convinced the devil that the way back was so dark and windy that he needed a light to find his way. To get rid of Jack, the devil gave him an ember from Hell. Jack placed the ember in a turnip he was eating to shield the flame from the wind and began to wander back in the darkness forever doomed.
Questions & Comments
Our first questions come from Rick C. from Wichita, Kansas who writes:
“Hi Bob In response to your survey: Name: Rick C. From Wichita Kansas Carving for 6 months, so still pretty new. I’m always looking for good resources of things to carve to learn new things. So many videos out there are hard to follow or just too simple so I’m always looking for new things somewhere in the middle. Trying to figure out how to paint, blending colors is a challenge, would also love to see the video someone mentioned where Doug Linker compares different oils, I can’t find that. Would be interesting to see about any online courses people can take. I ran across one the other day that someone mentioned in a post somewhere and it’s a class by Charles Banks that looks just like what I was looking for so I signed up for that. Would have never found that on my own.
Thank you so much for this forum and for supporting the community. Rick”
When it comes to painting you can’t go wrong with any books or videos by Betty Padden. Betty is by far the best painter I have ever seen. In the coming weeks I will be doing a book review on a carving and painting book by Betty Padden…a must have book!
Several people have inquired about Doug Linker’s oil comparison video. Well I spoke with Doug and it turns out it was not a video but rather a live stream he did. So if you were in the right place at the right time you saw his comparison but Doug told me there is no video. Perhaps some of those who were fortunate enough to see the live stream can provide the rest of us with a summary.
My best recommendation for online classes is to subscribe to the Woodcarving Academy (woodcarvingacademy.com). I’ve mentioned this several times before and highly recommend it. I also did an in depth article on the Woodcarving Academy in my August 8, 2021 post where you can go back and check it out.
Thanks for writing in, Rick. Always appreciate your input.
Next we have a photo that Don Dalton sent in of his first carving. Don is brand new to carving and is just starting out.
Santa Ornament by Don Dalton
That’s a terrific job for your first carving, Don! Looks like you’re off to a great start. Thanks for the photo and keep up the good work!
Finally this week we have several excellent questions from Liam M. from Dublin, Ireland. Liam writes:
“Hi Bob,
Thanks for your answer to my recent question about a wax and how to apply it on carvings…I’m waiting for some Howard Feed N Wax to arrive to try it out 🙂
In response to your survey, I would regard myself as a Beginner+, i.e. not a total beginner but not yet at an intermediate level, as I just done a limited range of small simple carvings so far.
In relation to possible topics that you might talk about in your blog, I was wondering about “green carving” and the types of wood that are available and good for carving in different countries. I hear about quite a range of wood available in USA and Canada that I know aren’t available here in Ireland, and it would be interesting to hear perhaps from friends from Europe on what green wood they like to carve.
Another topic that interests me is “how to make contacts with local carvers?” I’m pretty new to Instagram, just about 5 or 6 weeks so far, and I have yet to come across another person from Ireland posting their carvings / whittlings on Instagram.
Another topic relates to carving fairs, or craft fairs that host a lot of wood carving stalls. In the past when I played badminton, my friends and I would travel to Birmingham in the UK each year to watch the All England Badminton championships where the world’s top players (professionals) that play in the Olympics used play. It was a fantastic weekend, we would watch the professionals in awe, meet up with friends from other clubs around the country that we hadn’t seen since the previous year, make new friends, and enjoy some lovely meals in great company. If there was an online database of carving fairs around the world it would be an awesome resource for all of us interested in carving. We could see look up where such fairs were taking place, when, perhaps a website link for more information. It would be lovely to visit these fairs, meet friends and make new friends, and meet other carvers, and find out more about this great and enjoyable activity – and for those who may not be quite as interested in the carving as us carvers (e.g. our spouses/partners etc.) there’s still the opportunity to visit a new place, enjoy some nice meals out over the trip. Could a page be added to your blog with this info, with different members providing you with such information from their areas / countries?
I hope I haven’t been too demanding mentioning the above? 🙂
All best best Bob, and looking forward to more posts on your blog.
Best regards,
Liam M (Dublin, Ireland)”
All good questions, Liam. To address your first question, when you ask about “green” wood are you asking about raw, fresh-cut, un-dried wood? That’s what is considered green wood here in America and it’s mostly used by spoon carvers and bowl makers.
You may be asking about dried wood which of course any wood can be dried. The woods used throughout Europe are predominantly softwoods such as various species of pine. Most softwood lumber in Europe is produced mainly in Sweden, Finland, Germany and Austria. Hardwoods such as oak, beech and ash are also available. These European hardwoods are used extensively in construction, furniture and door manufacture.
If you can find it, lime wood which is said to be Europe’s equivalent to our American basswood is a good choice. My best advice here is to check with the lumber mills near you to see what kinds of woods they carry.
Now to your last question. Instagram is good but not the best. Consider getting an account on Facebook and look for different carving group to join. These groups have thousands of members from all corners of the globe and there is no limit to the number of different groups you can belong to.
Craft fairs are good but they’re not necessarily the best way to meet carving friends. It’s easy to find craft fairs by just Googling Craft Fairs in your town or in Ireland. I did a Google search and found loads of them. A far better way to meet other carvers is to search for carving clubs or classes near you. You can find them the same way you would find a craft fair. Just Google Woodcarving Clubs/Classes in my area. By simply joining a club or taking a class you’re sure to meet several wood carvers who are on the same level as you.
Announcements
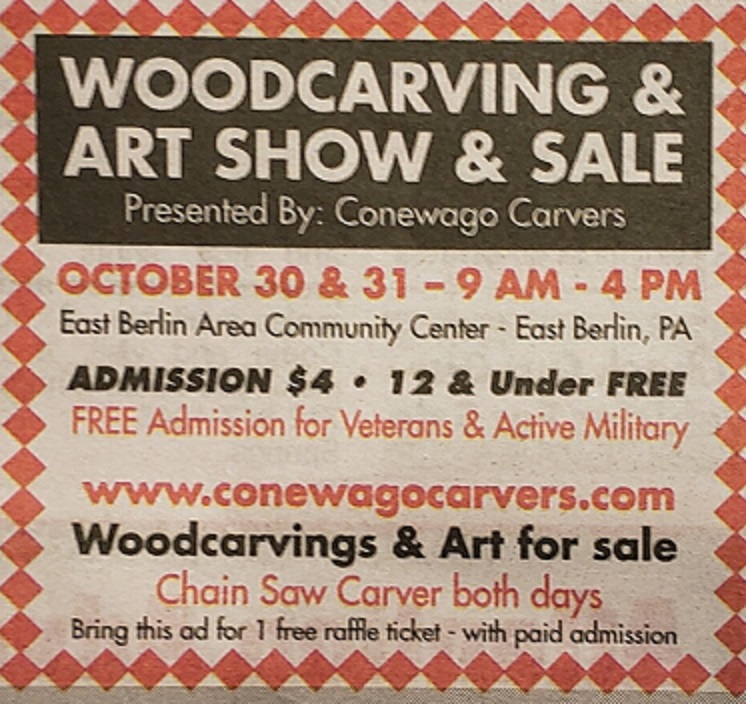
If you’re in the area this weekend stop by the show. It’s a great show and well worth it.
The International Association of Woodcarvers has upcoming Zoom meetings on the following Saturdays at 3PM with special guests. Check them out…
Zoom: 3104603575
SCHEDULE:
10/30 – Jarrod Wood 11/6 – Helvie Knives 11/13 – Ryan Olsen 11/20 – Dwayne Gosnell 11/27 – Thanksgiving 12/4 – Dave Dion 12/11 – Dale Green 12/18 – Eric Owens
INTERNATIONAL ASSOCIATION OF WOODCARVER COME JOIN US!!!
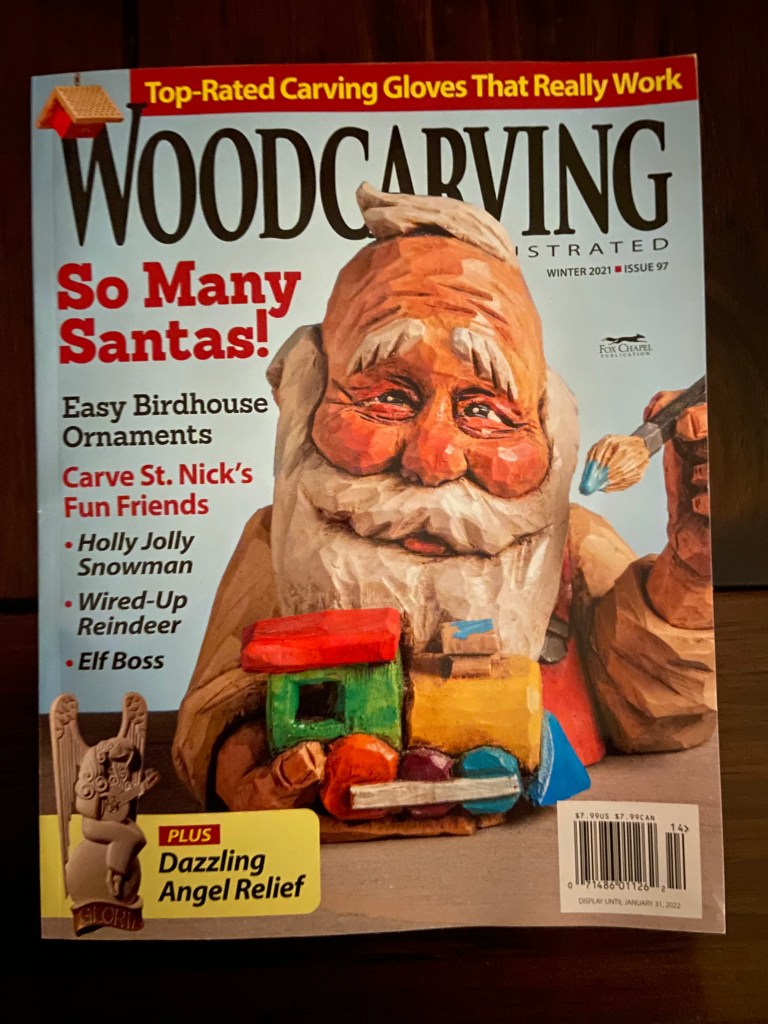
Don’t forget to check out my latest article on how to carve a Simple Snowman Ornament on page 37 in the 2021 Winter issue #97 of Woodcarving Illustrated!
Let the chips fly! Tell your wood carving friends and spread the word about Wood Chip Chatter, and don’t forget to click the ‘Comment’ button at the bottom of the page to send in your questions and comments so we can keep Wood Chip Chatter active and keep the conversations going!
And remember, we need your photos! I’m sure you all have some terrific carvings to share, and photos of your carvings will help to liven up the blog’s appearance and make it more interesting. Perhaps we can start a carvers photo section! Email your photos to carverbobk@woodchipchatter.com
The response to my survey last week sparked some interesting comments and questions, and I hope I will continue to hear from more of you. Your comments and questions are what ignite stimulating conversations on various woodcarving topics from which we can all learn. In fact, we have such a terrific response that today’s post is made up entirely of your questions and comments. There were so many good questions and requests that I just had to post them this week. I’m sure everyone will find the information to be compelling and helpful.
I’m really pleased to see so many of you writing in this week, and hope this encourages more of you to write in because this is really what helps make Wood Chip Chatter what it is.
Questions & Comments
Our first comment today comes from Barbara L. from Dayton Ohio in the form of two questions. Barbara asks:
“Hi Bob, I’m Barbara L from Dayton Ohio. I have been carving since 2018 and consider myself a beginner. Although I am never really sure how to define beginner, intermediate and advanced in the carving world. Everyone always asks but what exactly defines those terms? How many carvings you have done or the quality of your work? Maybe that is my first question for Wood Chip Chatter. Thank you for creating this new opportunity for woodcarvers.”
Hi, Barbara! Thank you for taking the time to write in. I know we’ve been friends on Facebook for a long time! Your questions are somewhat subjective so they are hard to answer. To begin with, the definitions of beginner, intermediate and advanced are broad and subject to interpretation. An individual’s class description is mainly left up to that person’s interpretation of the definition. Much of it has to do with how you view your work when compared to others.
One of the best ways to help make your determination is to enter your work in carving competitions. For example, let’s say you enter some pieces into the beginner class. In the end if your carvings don’t win anything perhaps you still have more work to do…keep on practicing. On the other hand, if you keep coming away with winning awards, then it’s time to consider yourself an intermediate carver and move up to the next class. Also, in some competitions the competition rules determine the carvers’ classes.
In my opinion the determination comes down to the quality of your work and not so much the amount of time you’ve been carving or how many carvings you’ve done because a carver can spend 3 years carving 100 caricatures, but if he’s carving the last one the same way he carved the first one, and hasn’t learned anything along the way, he’s most likely still a beginner.
I hope that helps, Barbara!
Our next comment comes from Don P. from Fort Thomas, KY who writes:
“Hi Bob, Don P from Fort Thomas Ky. I just decided to give carving a try, but I’m decently experienced with other forms of woodworking. Thanks for this blog- I can tell it’s going to be helpful. I’ve enjoyed discovering the work of other carvers on Instagram. There are some crazy talented people out there!! I also love Doug Linker’s videos. That’s what led me to you and this site. Keep up the good work!”
Thanks for writing in and for your kind words, Don! One of the best ways to learn is to watch and see what other carvers are carving and how they do it, and Instagram is a good source for that. Doug Linker is a talented carver who also makes excellent carving videos. YouTube is an excellent source for all kind of videos for wood carvers of all levels. For beginners, you might want to watch Doug, Gene Messer and Arlene Zomer. For a little more advanced carvers there’s Kevin Coates, Blake Lunsford, Kevin Applegate and Jim Feather.
We have a question from Dave Valley about carving eyes. Dave writes:
“Thank you for the carving information you are providing.
You ask for suggestions for blog information. I am a beginner that has been carving fo 4 years. The problem is I started carving a year before COVID. So finding classes has been difficult. The club I am in just restarted and they are not going to have classes until 2022. So if you can provide info on how to do eyes and face layout would be great.
I started as chip carver and have moved onto figure carving. I want to really do Santa’s but I am terrible with eyes. I have several classes scheduled for next year. But different technics is always helpful.
Keep carving, Dave Valley”
Good question, Dave, and one that I’m sure many readers have in mind. First off, there are loads of how-to videos out today on YouTube for carvers of all skill levels. Secondly, you might be interested in looking into subscribing to the Woodcarving Academy. It’s an online source of videos, carving lessons and tutorials from some of the country’s top carvers. The videos cover every type of carving category from caricature to chip carving, and new videos are added on a regular basis. I spoke more about this in one of my blog posts back on July 8, 2021, or go to woodcarvingacademy.com to see what it’s all about.
Books are also good reference sources of information. Harold Enlow has a 32 page book out on how to carve eyes and lips along with his other books on how to carve the nose, ear and hair. These books are available through most woodcarving suppliers.
Beginning November 5th I will be posting some helpful information on carving eyes so stay tuned.
Our next comment comes from John Tuttle from Vancouver, WA with and answer to my question from last time about what his tall Witch was carved from:
“Bob…. It’s a basswood spindle that I picked up quite some time ago…. It approx 22 in. Tall
John”
Thank you for your response, John! Much appreciated!
We have a comment from Wayne Whiting along with two photos of an exceptional Indian bust he carved from a Stu Martin roughout:
“Here ya go Bob. Please give credit to Stu Martin for the roughout. I did follow his tutorial on woodcarvingacademy.com.
Wayne”
That’s an outstanding carving, Wayne! Excellent facial detail and the finish is spot on. Nice work!
Our next comment comes from Deb from Salina, Kansas. Deb says:
“Hi, I’m Deb from Salina, Kansas, and I am a person who carves only once a week at the Senior Center with a group of mostly guys. Many of them have been carving for years and do large, impressive projects. It’s not possible to carve at my home due to a dog. I prefer to do smaller projects of flowers, words, and creatures. Even though I’ve been going for several years I feel very much a beginner compared to the talented people who come to our Friday carving session.”
Thank you for writing in, Deb! You are very fortunate to be able to carve with a group of talented carvers once a week. It’s one of the best ways to learn and improve your carving skills. Take the time to ask questions of your fellow carvers. Don’t be shy. I’m sure they’re more than happy to help you. As I mentioned earlier, if you have the capability check out some videos on YouTube. It’s free information and is another great way to learn and pick up tips. Send in a photo or two of your work to carverbobk@woodchipchatter.com. We’d love to see what you’re doing!
Paul E. from Devon in the UK wrote in to say:
“Hi Bob. Paul E here from Devon in the UK. I’m a novice carver, I’ve been carving for a few years mainly following guides from you and other wood carvers illustrated contributors (which I order but it takes a while to reach me) also you tubers like Doug Linker and Kevin Coates, and various books I’ve acquired. My next step will be to try and come up with original projects which takes a lot of trial and error, it makes me appreciate the skills you have when you can present plans for us to follow easily. I don’t necessarily have comments to make on each blog you put out, but I find them interesting, and the information is building into a nice reference which can be dipped into as the needs arise. I’ll try and send you a few photos soon. Thanks Bob”
Thanks for writing in, Paul! I feel honored that you are following my work and appreciate what I do. It looks like you’re going in the right direction with your woodcarving. Once you’ve developed your carving skills to a certain point the next step is to start creating designs of your own. It’s fun and rewarding, but like you mentioned it also requires a lot of time, effort, and trial and error which most people don’t realize or appreciate. I look forward to seeing photos of some of your work!
Phil H. wrote in with two questions as follows:
“Bob, I want to thank you for the time you spend putting together this valuable resource. I am a true beginner. I’ve taken this hobby up this past summer. I have two questions.I’m a huge fan of Doug Linker. His true appeal is the production quality of his videos, and the fact that the majority of his projects are from a block of wood. Can you recommend other resources who primarily start with just a block of wood? This leads to question number two. I do hope to get a bandsaw in the future. I know this will “expand my horizons” in the future. My drawbacks will be cost and space like so many others. Can you touch on budget and space friendly options for newbies? Thank you so much and advance.Phil HNorth Carolina”
You’re right, Phil. Along with his easy to follow instructional videos much of Doug Linker’s appeal to beginning carvers are the projects he makes starting with just a simple block of wood. Two other excellent carvers who make great videos on YouTube are Gene Messer and Arlene Zomer. Most of their project start with just a block of wood as well.
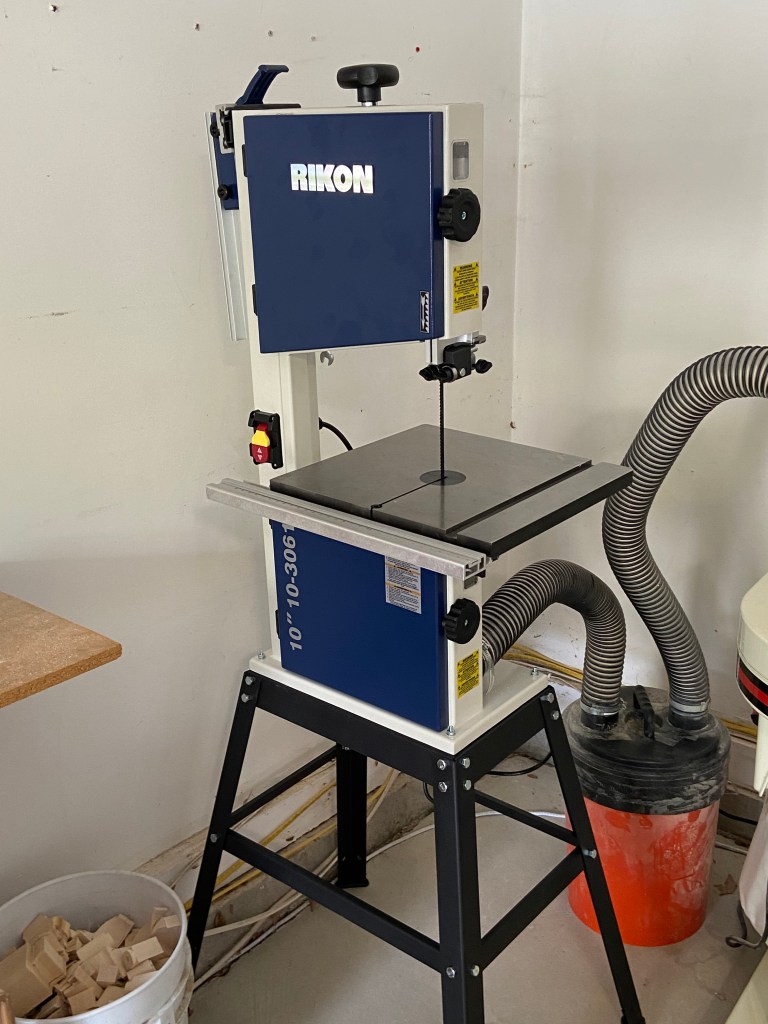
As far as band saws go, you will probably want to get one that’s no more than 10″ for space saving purposes. When it comes to price my best advice is, don’t buy cheap. A decent 10″ band saw will run you around $500. Originally, I thought I would save money and bought a 10″ WEN band saw for $300. Huge mistake! It fell apart in one year! Then I bought my 10″ Rikon band saw for around $500 two years ago and I love it. It’s a real work horse!
Rikon 10″ Band Saw
There are all kind of brands out there and the prices run the gamut. Shop around. Perhaps some of our readers can recommend the band saws they use.
Of course any band saw you purchase will require a dust collection system attached to it. So that is something else to consider.
Well, this post is getting rather lengthy and you’re all probably getting tired of reading by now. There are a few more compelling comments which I promise to get to but I’ll save them for next week. Also, next week is Halloween so I intend to have something a little “spooky” for you!
If you’re in the area next weekend stop by the show. It’s a great show and well worth it.
Let the chips fly! Tell your wood carving friends and spread the word about Wood Chip Chatter, and don’t forget to click the ‘Comment’ button at the bottom of the page to send in your questions and comments so we can keep Wood Chip Chatter active and keep the conversations going!
And remember, we need your photos! I’m sure you all have some terrific carvings to share, and photos of your carvings will help to liven up the blog’s appearance and make it more interesting. Perhaps we can start a carvers photo section! Email your photos to carverbobk@woodchipchatter.com
Christmas is just about two months away so ’tis the season to be doing your Christmas carving, and probably the most popular Christmas carving subjects are Santas. I mean who doesn’t love getting a hand carved Santa as a Christmas gift? Well to help you along with your Christmas chores I have found a book that’s chock full of Santa carving ideas just in the “Nick” of time.
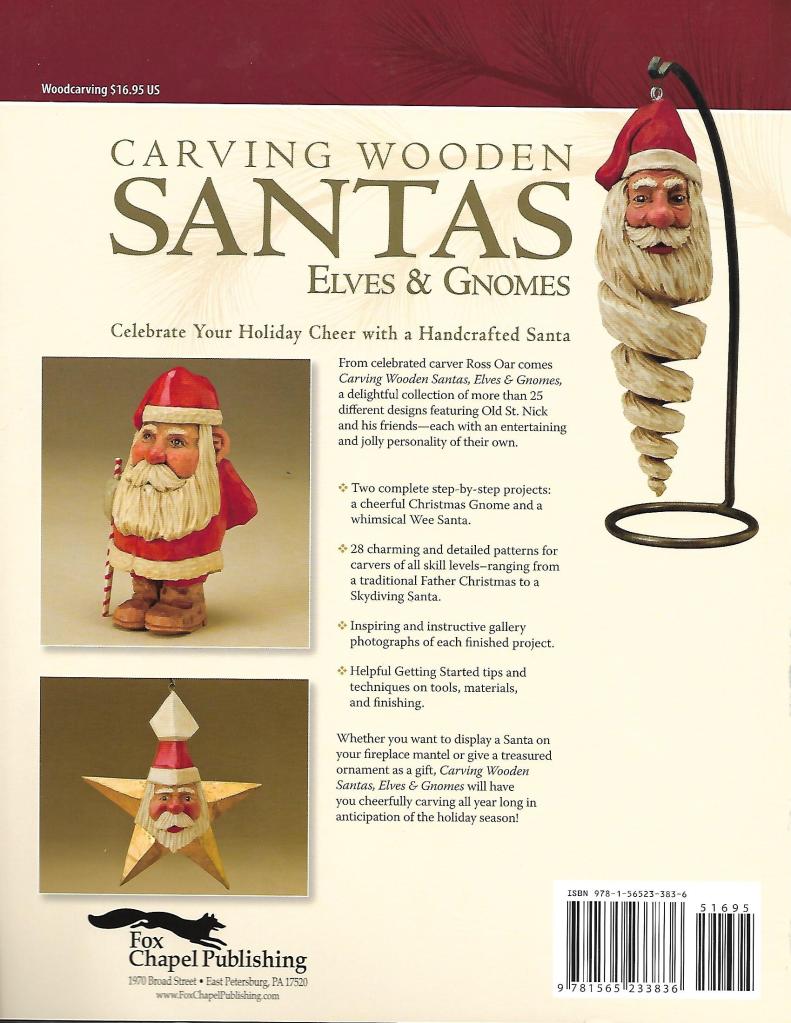
Carving Wooden Santas Elves & Gnomes
By Ross Oar
A Book Review
Front Cover
Back Cover
If you love carving Santas and if you’re looking for ideas, this is the book for you! “Carving Wooden Santas Elves & Gnomes” is a full-color 96 page book published by Fox Chapel Publishing Company, Inc. in 2008.
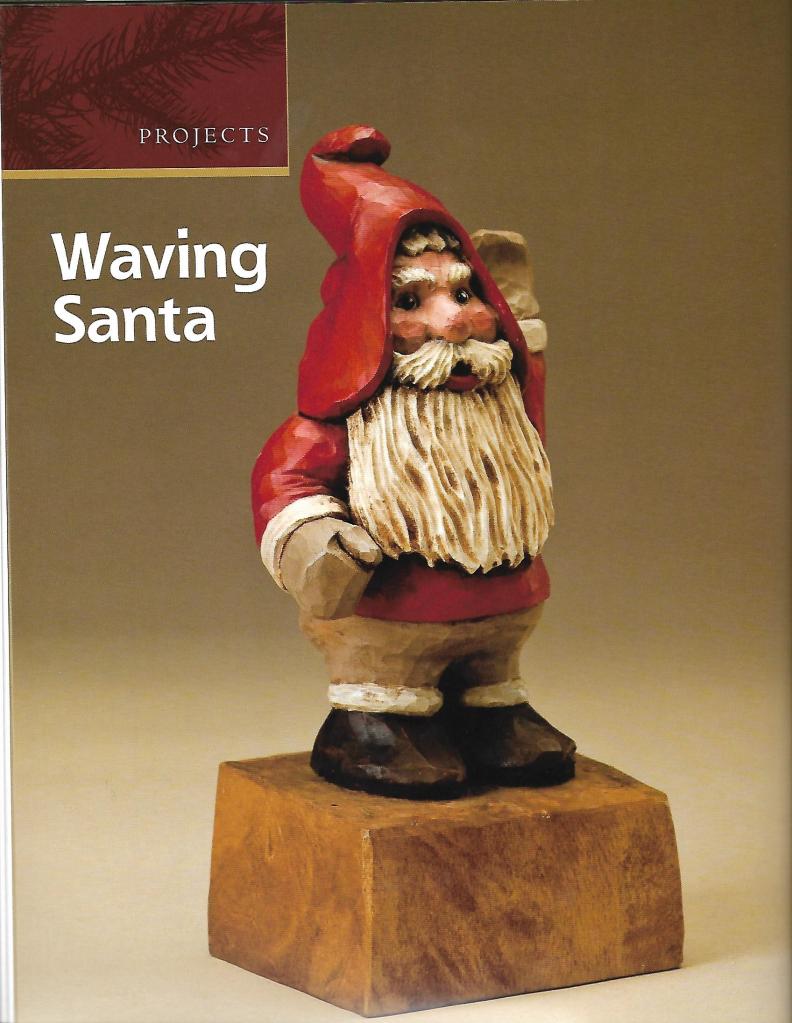
Ross Oar was a well-known wood carver who also designed some great hybrid carving/traditional pocket knives. In his book Ross takes the reader step-by-step through two fun projects…a ‘Christmas Gnome’ and a ‘Wee Santa’. Along the way, he mentions what tools he is using for each step, and also inserts little bonus carving tips between the steps which I found very helpful.
Over half of the book is dedicated to a gallery of more than 25 finished projects with patterns for each one. The projects are separated into groups…..Beginner, Intermediate and Masterclass.
Sample Project
Sample Project
Sample Project
Pick up a copy of “Carving Wooden Santas Elves & Gnomes” while there’s still time. I highly recommend it! Your family and friends will be thrilled to receive any one of the Santa projects from inside. They’re fun to carve and you’ll be proud to give them away!
Readers’ Comments
We are very short on comments today….there are only three. I guess everyone must be busy doing their Halloween and Christmas carving.
Our first comment comes from Dean in response to our discussion on BLO vs. Mineral Oil. Dean writes:
“Bob, I recently switched to mineral oil from BLO. I find it does a comparable job of sealing wood prior to painting or staining. It doesn’t seem to absorb as quickly so I do give it more time dry and wipe it off some before painting. Doug Linker did a video on different sealants that is a good comparison. I recommend it.”
Thanks for the comment, Dean! I think mineral oil is a very good alternative to BLO. Since it is food grade safe there is practically no chance that it will yellow. Plus it has no odor and is safer to use.
I would like to see that Doug Linker video. If possible, can you please provide us with the link to it? Thanks!
Our next comment comes from John Tuttle from Vancouver, WA along with a photo of the fantastic Halloween Witch he carved. John forgot to include it with the other photos of his Halloween carvings he sent in last time:
Tall Witch carved by John Tuttle
That’s quite an awesome witch you carved, John! Thanks for sending it in. I always love receiving reader’s carving photos. It looks pretty tall. What are the dimensions?
Our last comment comes from Lawrence Varner who responds to my list of woodcarving suppliers. Lawrence writes:
“Woodcraft is my typical go to.
Thanks for doing this.
Lawrence V”
Thank you for bringing that to my attention, Lawrence. I have just added it to the list. Woodcraft has stores in many locations in 35 states across the United States. You can go online at woodcarft.com to find a store near you or shop right online from their website.
I Need Your Help!
Perhaps everyone missed my request for you all to send requests for the kind of articles and information you would like to see in future posts of Wood Chip Chatter. Your input is so important toward helping me continue to keep things going. So let me hear what you have to say!
In order to stir up some interest and to give me a feel for who my readers are I’m conducting a survey: Send in a message telling me if you are a beginner or intermediate (plus) carver. Send your name…last name not necessary, just an initial is good. You can put where you’re from, if you like…not necessary but it will add interest to the survey. Most importantly tell me whether you’re a beginner or intermediate carver (be honest). I will post the results in a later blog. This will be very helpful because it will tell me what kind of material I should be researching and posting. Thanks in advance for your participation!
After a great deal of thought I have made the difficult decision to publish my blog just once a week. Look for the posts to come out on Fridays. I want to keep Wood Chip Chatter upbeat and informative and the extra time in between will allow me to do more research on woodcarving topics that are of interest to all of you. It will also allow all of you more time to think of and send in more questions and comments each week which we desperately need. And finally, it will allow me a little more time to get back to doing some of the other things in life that I enjoy…such as wood carving!
Let the chips fly! Tell your wood carving friends and spread the word about Wood Chip Chatter, and don’t forget to click the ‘Comment’ button at the bottom of the page to send in your questions and comments so we can keep Wood Chip Chatter active and keep the conversations going!
And remember, we need your photos! I’m sure you all have some terrific carvings to share, and photos of your carvings will help to liven up the blog’s appearance and make it more interesting. Perhaps we can start a carvers photo section! Email your photos to carverbobk@woodchipchatter.com
Gladly we have had many new subscribers join our group over the past several weeks and to you I want to say thank you. I am very grateful you have decided to join our Wood Chip Chatter family and hope you will find my blog informative and interesting.
About two months ago I posted a list of woodcarving suppliers which you can find if you go back to my August 7, 2021 post. However, for your convenience and for the benefit of others who might like to see it again I am going to re-post it here.
This is by no means a complete list and I’m sure there are many other woodcarving suppliers that are not listed here. If anyone knows of any other suppliers that are not on the list please send them in and I will add them. They can even be knife makers or wood suppliers. We would love to hear from you to make our list even longer.
In the near future I will be posting a list of all of my personal suppliers (woodcarving and otherwise). This will be quite a comprehensive list which I’m sure everyone will find useful, so stay tuned.
I received a good number of questions and comments this time which I’m really pleased to see! It’s your questions, comments and photos that make Wood Chip Chatter alive and interesting. They are so important and I could not run this blog without them. That said, I’m asking all of you to continue sending in your questions and comments and to also send in your requests for the kind of articles and information you would like to see in future posts of Wood Chip Chatter. I try to make Wood Chip Chatter about you, my readers, so your input is very crucial in helping me continue to keep things going. So let’s hear what you have to say!
Our first question today comes from Rick Carver who has a question about using mineral oil on his carvings:
“Hi Bob, I know that most carvers talk about using BLO or Walnut oil on their carvings before painting, but I’m wondering if you have any experience or comments about using mineral oil as an alternative. I don’t like BLO because of the yellowing issue that people talk about over time. I’ve heard mineral oil mentioned few times but that’s about it. I’ve tried mineral oil and the fact that it has no odor and is easy to clean up makes it a great option it seems. Are there any negatives to mineral oil or reasons not to use it?”
Thanks for writing in, Rick! Very good question. Although I do not have any personal experience with using mineral oil, I have also heard of more and more carvers using it on their carvings. Because of the yellowing issue, as well as the odor and combustibility concern I stopped using boiled linseed oil (BLO) a couple of years ago, and have been encouraging my readers to do the same.
Unlike BLO, mineral oil is a colorless, almost tasteless, oily, water insoluble liquid used mainly as a lubricant, in the manufacture of cosmetics, and in medicine as a laxative. By definition one would assume that mineral oil would not yellow the same way BLO does. However, because it contains mixtures of hydrocarbons obtained from petroleum distillation I could not confidently say (although I doubt) it won’t yellow over time.
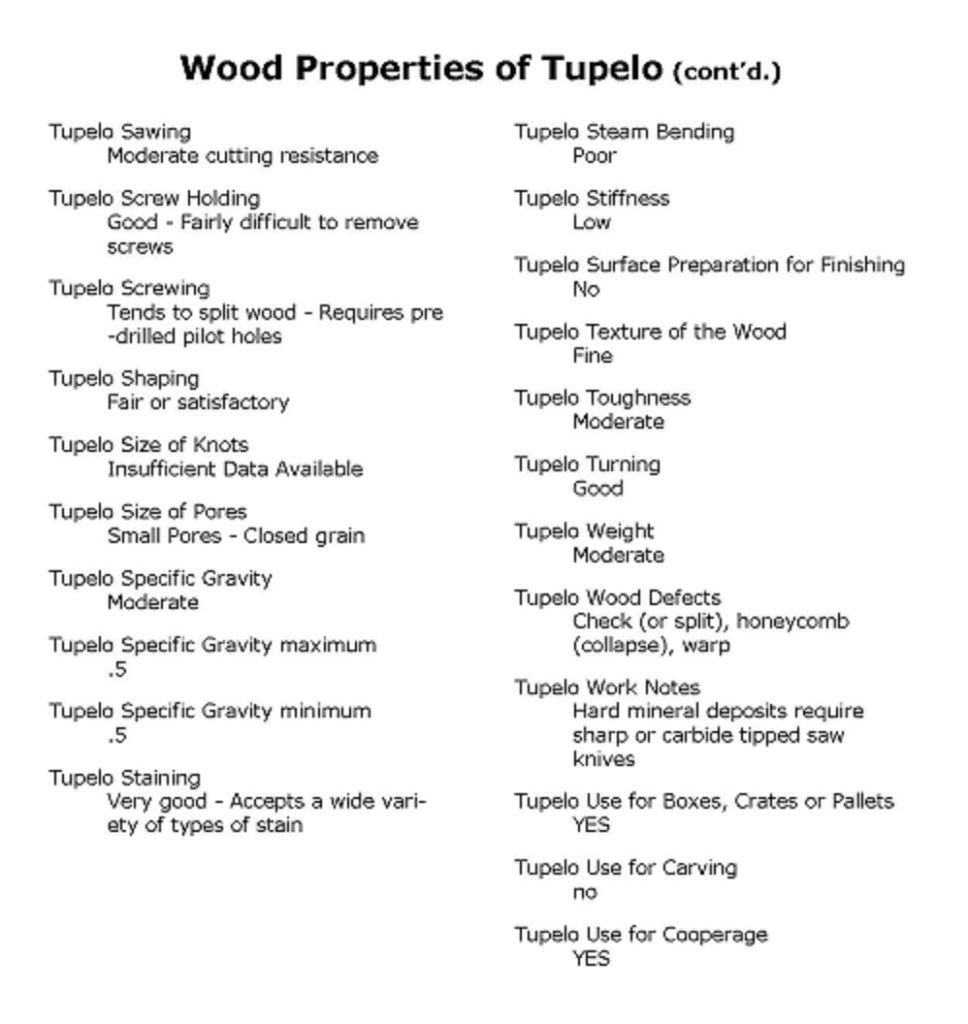
Our next comment comes from rricecarver who enjoyed reading my article on Tupelo:
“Bob,thanks again for what you do and thanks again for the free knowledge!! I liked the Tupelo article, while all this time I thought duck carvers used Tupelo.”
Thank you for your kind comment! As you have read, although tupelo is a favorite wood of duck and bird carvers it also has many other uses.
Our next comment is actually a photo of some of John Tuttle’s fantastic Halloween carvings:
“Bob…..Wife just got all these out for the upcoming holiday so thought share”
Halloween carvings by John Tuttle
Thanks so much for the great photo, John! Those Halloween carvings are terrific! The witch is especially “wicked” and the spools are cool!
Our next question comes from Liam Anon from Dublin, Ireland who is looking for a good wax to finish his carvings with. Liam has also send in two photos of a great looking little Gnome he recently carved. Liam writes:
“Hi Bob,
Thanks for creating and hosting the Wood Chip Chatter blog, I’m thoroughly enjoying and learning from the various posts I’ve read so far…keep them joke cartoons coming
My question for you, and/or the other subscribers relates to waxing and buffing.
I enjoy carving little guys and many of these have beards. I usually brush them with walnut oil which I think improves their look, and also helps display the grain in the wood which I really like to see. However, I would like if the finish had a waxed look and feel but don’t know how to achieve this. I’ve included an example of a little guy with a beard that I would like have a waxed look and finish.
Are there wax products that can be easily brushed onto carvings, and what might some of these be?
How should one go about buffing carvings that are not smooth, and preferably buffing by hand as opposed to using a buffing wheel? How does one get into the groves when buffing?
Thanks in advance for your answer, and for those from other subscribers on the blog, they’ll be much appreciated.
Wishing you well, and looking forward to more new posts on your blog
Kind regards
Liam (from Dublin, Ireland)”
Little Gnome by Liam Anon – front view
Little Gnome by Liam Anon – side view
Thanks for writing in and for the carving photos, Liam! That’s a great little carving you’ve done. The cuts are very crisp and clean. To answer your question, there is a wax that I use and highly recommend called Howard FEED N WAX. It’s a soft wax made from a mixture of beeswax and orange oil. I apply it with a tooth brush and scrub it into all the nooks and crannies, then let it sit for about 20 minutes. After that I wipe it down with a soft cloth (like an old tee shirt) and finally buff it with a horsehair shoe brush. It gives my carvings a nice soft luster which I really like. I don’t know if it’s available in Ireland so you may have to buy it online. Most woodcarving suppliers carry it.
I’m sure some of you use other wax products on your carvings and we would love to hear from you with any suggestions you may have.
Our final comment today comes from Wayne Whiting in response to my remarks the other day about giving credit where credit is due. Wayne writes:
“While I agree that credit should be given where it’s due, I disagree that I was too ashamed to admit that I copied someone’s idea. As a new carver, I was simply unaware this should be done. When posting on social media to friends who have no idea who Doug Linker is, I gave no credit. When posting to the FB page Beginners Wood Carving, I gave credit as the majority of carvers there are familiar with his work. Not an excuse, just ignorance. Moving forward I will always give credit, so thanks for bringing it to my attention!”
Thank you for your response, Wayne, your point is very well taken and I actually think you hit the nail right on the head. I may have used the wrong word, “ashamed”, in my remark about carvers copying others’ work. However, at the time I was thinking of those carvers who really should know better…and there are a lot of them out there.
I completely overlooked the thousands of totally new beginners who still need to learn so much about what the carving world is all about. The way it should work is that it doesn’t matter whether it’s Doug Linker, myself, Gene Messer or any other wood carver you imitate, or whether or not your audience is familiar with that carver, the originator of the design should always be mentioned.
I’m glad we’re both on the same page now!
Let the chips fly! Tell your wood carving friends and spread the word about Wood Chip Chatter, and don’t forget to click the ‘Comment’ button at the bottom of the page to send in your questions and comments so we can keep Wood Chip Chatter active and keep the conversations going!
And remember, we need your photos! I’m sure you all have some terrific carvings to share, and photos of your carvings will help to liven up the blog’s appearance and make it more interesting. Perhaps we can start a carvers photo section! Email your photos to carverbobk@woodchipchatter.com
TUPELO, WATERNyssa aquatica (Nyssa – a water nymph; aquatica – of the water)
This species is known by many different names, some of the most prominent being BAY POPLAR, GUM, GRAY GUM, HAZEL PINE, OLIVETREE, PAW PAW GUM, SOUR GUM, SWAMP TUPELO, TUPELO, TUPELO GUM, WHITE GUM and YELLOW GUM.
This tupelo grow in a long, narrow belt around one hundred miles wide, running down from southern Illinois through the Mississippi Valley to Texas, across the Gulf states and up along the Atlantic coast as for north as Virginia. The name of this wood stems from the fact that it grows best in freshwater swamps, along the edges of lakes and streams. Generally it is a fairly small tree – 50 to 75 ft. in height with an average diameter of around 2-1/2 ft.
The heartwood is a light brownish to a yellowish brown and sometimes nearly white in color. The bark is roughened by small scales, furrowed longitudinally and of dark brown color. This wood has to be worked with care, as it is difficult to produce lumber that will stay flat. It has a natural tendency to twist and rquires unusual attention in drying.
Water tupelo is a weak wood, soft and light in weight. It is a poor woo for craftsmen to work with, as it glues very poorly and has to be worked with considerable care. This wood is used for paper pulp, caskets, cheaper furniture and veneers. It is a favorite veneer for the manufacture of tobacco or cigar boxes, tupelo serving as a core with a thin veneer of cedar on either side.
Comments & Questions
Our first comment today comes from Alison Lamazza from Mahwah, NJ who writes:
“This is a great post, Bob! This happens all the time in the fine art world as well. Wish more people would respect others’ work enough to give them the simple courtesy of a tag – it matters! Thank you for sharing!”
Thanks for your response, Alison! I’m sure it happens everywhere. In my opinion, I think it’s because people are too ashamed to admit that they copied from someone else.
Alison is a free lance artist who sells her work through her Etsy shop called h2ostudio. Check out her fantastic work, and if you like to cook you might like to follow Alison’s blog called crockpotsandcoffeecups.com. She is a graduate of the Culinary Institute and is an amazing cook.
Our next comment comes from Dean Stewart with an answer and explanation to my question about how he makes his wood rings:
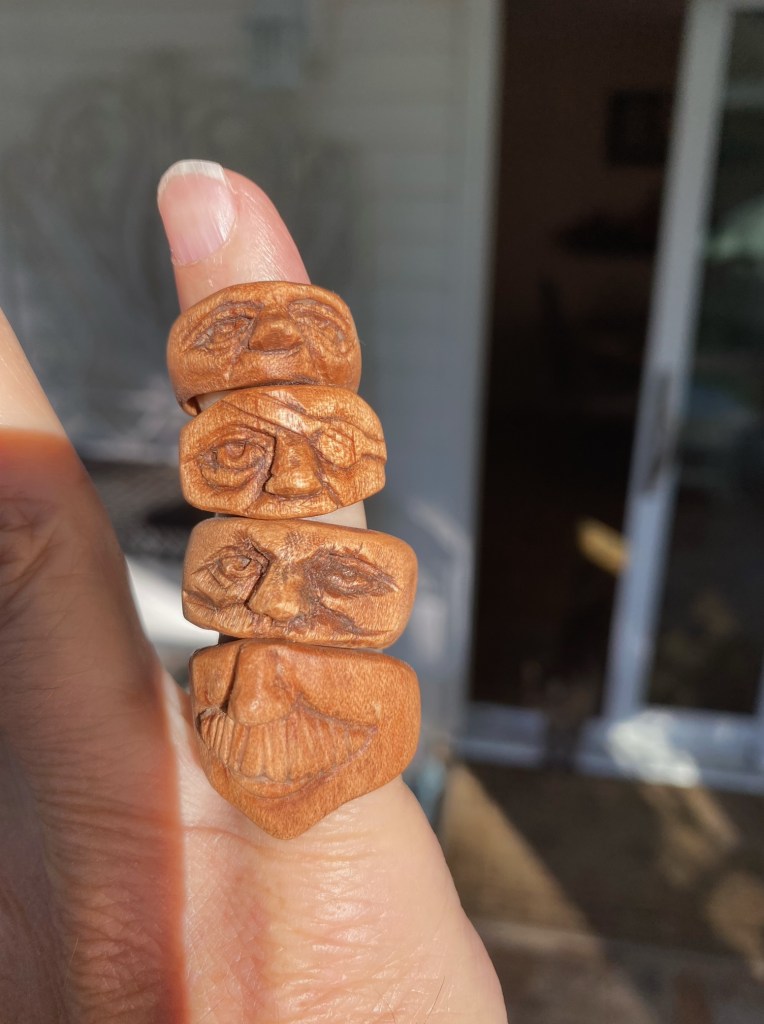
“Bob, A follow up on the rings. First credit where credit is due. The idea for these came from an instagram post by Hamed Eskandary @eskandary_wood. He is an amazing artist. Check out his work.
The rings started by drilling a 5/8 inch hole into a 1 1/4 by 1 1/4 4 inch block of wood thru the end grain. That serves as the beginning of the finger hole. Cutting end grain takes a sharp bit. Next you can cut a slice off about 1/2 thick to become a ring. For some of them, though, I started carving the top of the ring before cutting it. that way I had a “handle”. I carved the faces off the edge of one corner. After is was mostly done, I rounded the rest of the outside of the ring. To size the ring you can do a couple of things. One is trace the inside of a ring that fits and measure it. It is also possible to find conversion charts on the internet that convert ring sizes into circle diameters. Once I knew the size I used a Dremel and a sanding drum to expand the interior of the ring to size and sand it smooth at the same time. Be careful not to sand away to much and weaken the band. Larger rings may require a larger blank.
I experimenting right now with making a jig for my scroll saw to let me cut blanks in a rough ring shape before carving to save some time.
Try one Bob, they don’t take long and they will fire your imagination.”
Thanks so much, Dean, for that detailed explanation! I really appreciate your response and I am definitely going to try making a few!
Out next question comes from Bob who is looking for a source for good basswood eggs:
“Where can I buy basswood eggs that aren’t hard? I have some but they are hard as rock.thankgou”
Bob, you need to make sure you buy good basswood eggs made from quality northern basswood. There are several woodcarving suppliers that carry good basswood eggs. Here are just a few that I use and can recommend:
This is a Wayne Shinlever rough out I bought from Smoky Mountain Woodcarvers. I don’t think it’s available any longer. I’m selling it for $5 plus shipping.
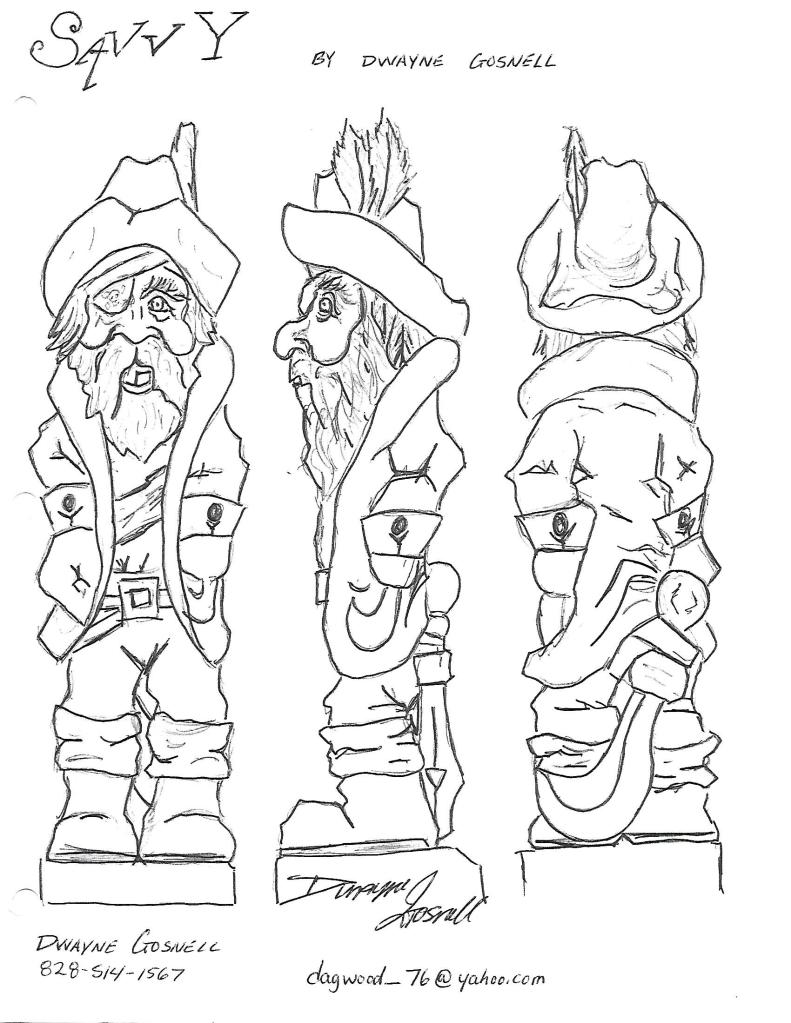
Pirate rough out – $5
This is a Dwayne Gosnell rough out which is 7-1/2″ tall and sells new for $16 plus shipping. I’m selling this one for $5 plus shipping.
Let the chips fly! Tell your wood carving friends and spread the word about Wood Chip Chatter, and don’t forget to click the ‘Comment’ button at the bottom of the page to send in your questions and comments so we can keep Wood Chip Chatter active and keep the conversations going!
And remember, we need your photos! I’m sure you all have some terrific carvings to share, and photos of your carvings will help to liven up the blog’s appearance and make it more interesting. Perhaps we can start a carvers photo section! Email your photos to carverbobk@woodchipchatter.com
Keep a sharp edge and keep on carvin’!
Last night I slept like a baby. I woke up three times, wet myself twice and cried myself back to sleep.
It happens over and over again where a carver makes a carving from a pattern he/she got from someone else, posts it on social media and basically calls it his own. It’s happened to me loads of times. While I’m always flattered that someone likes my work enough to copy it, the original design is mine and I should be given credit for it.
If you bought a rough out from another carver, mention that carver who designed it. Even if you cut someone else’s pattern out on your bandsaw, mention the person who designed the pattern. Or if you take a class with an instructor; mention that instructor who you took the class from. Just a simple mention of a person’s name. It’s that easy.
I see this topic debated on social media all the time. We all tend to borrow and mix ideas from each other, and many carvers like to take other carver’s patterns and change them up to be their own. That’s terrific, but they should still say that their carving was “based on an original design by so and so.”
When you copy another carver’s work you are not just borrowing his design, you are using many hours of his design work, failures, frustration and experimentation. Give a carver credit where credit is due.
“Pumpkin Mash” from a Pat Moore roughout carved by Bob Kozakiewicz
Readers’ Comments
Our first comment today comes from Dean Stewart along with a photo of the spectacular face rings he has been carving lately:
“Here’s a pic of my recent set of wooden face rings. All are Maple except the third one which is basswood. They were sealed with mineral oil then stained with burnt umber oil paint with a finish of clear paste wax.”
Wood rings carved by Dean Stewart
Those are magnificent, Dean! Thanks for sharing them! I’ve always wanted to try to make some rings. How do you go about it? How do you size them? Is the finger hole drilled out or do you carve it out? Tell us a little about your process.
Our next comment comes from Cory Rower with an explanation in response to my question last time on how he likes his BeaverCraft and Flexcut knives. Cory writes:
“The two knives in the pictures are my two favorites that I own. The Beavercraft I had won in a giveaway and when I got it I thought I was going to hate it because of the handle but it’s actually really comfortable. I use it mainly for roughing out. The other knife is Flexcuts Detail knife. It is probably my number one favorite carving knife I own. The blade stays sharp a little longer on the Flexcut Detail knife I will say. The other thing I like about Flexcuts Detail knife is that the tip isn’t super thin so you don’t have to worry to much about the tip breaking off unless you are really hard on your tools.”
Thanks for your reply, Cory! The Flexcut knives are very popular and I know of many carvers who use them. The BeaverCraft knives are relatively new to the US market but seem to be gaining in popularity, possible for the low price.
I can see why you would use the BeaverCraft for rough out work and the Flexcut for your major carving work. If you look carefully at the blades on both knives you will notice that the BeaverCraft blade has a very steep angle on its cutting edge. The Flexcut has a shallower angle. A steep angle blade is not designed for carving detail-type work whereas the shallow angle blade slices through the wood more easily allowing the carver to make finer cuts.
Rough Outs For Sale!
Over the years I have collected many various rough outs, most of which I will never get around to carving. So I have decided to sell them at a discounted price to any of my woodcarving friends who are interested. I will be listing them here, one or two at a time, on every upcoming blog post going forward. Anyone who is interested in one (or more) can just send me a message and we will work out the details. Rough outs will be sold on a first come basis. I have the first two rough outs listed below:
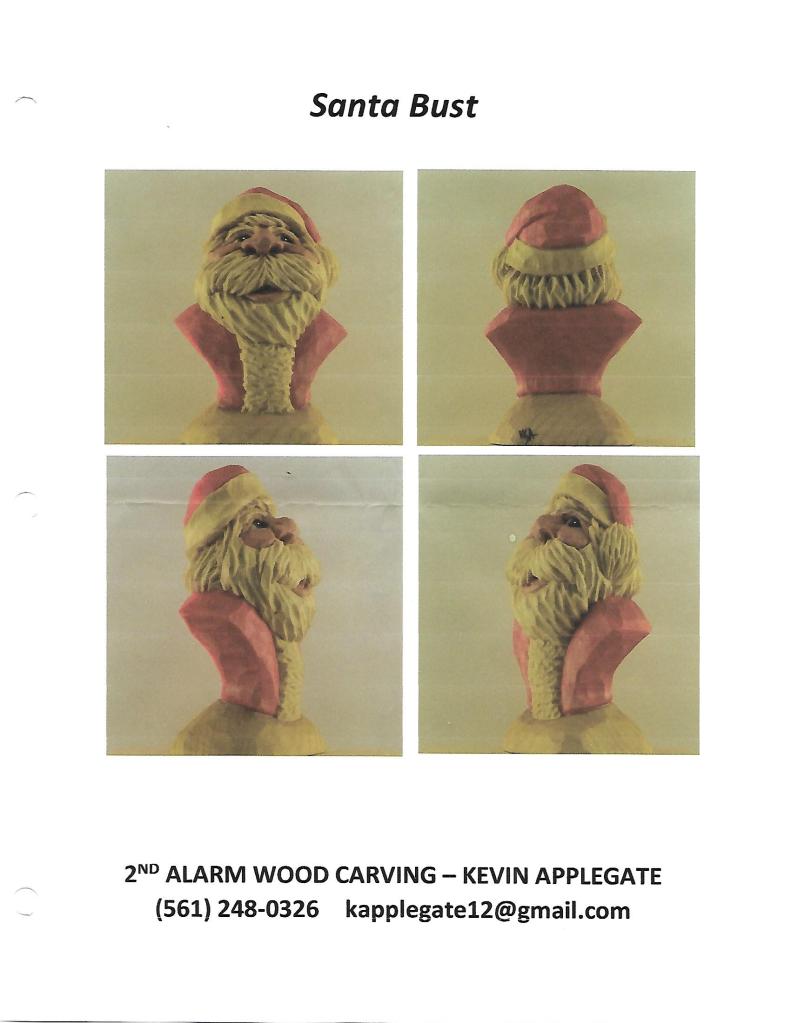
“Santa Bust”
Santa Bust Reference Sheet
This is a Kevin Applegate rough out which originally sells for $23 plus shipping. It’s 5-1/2″ tall. I’m selling it for $12 plus shipping. Rough out comes with the above reference sheet.
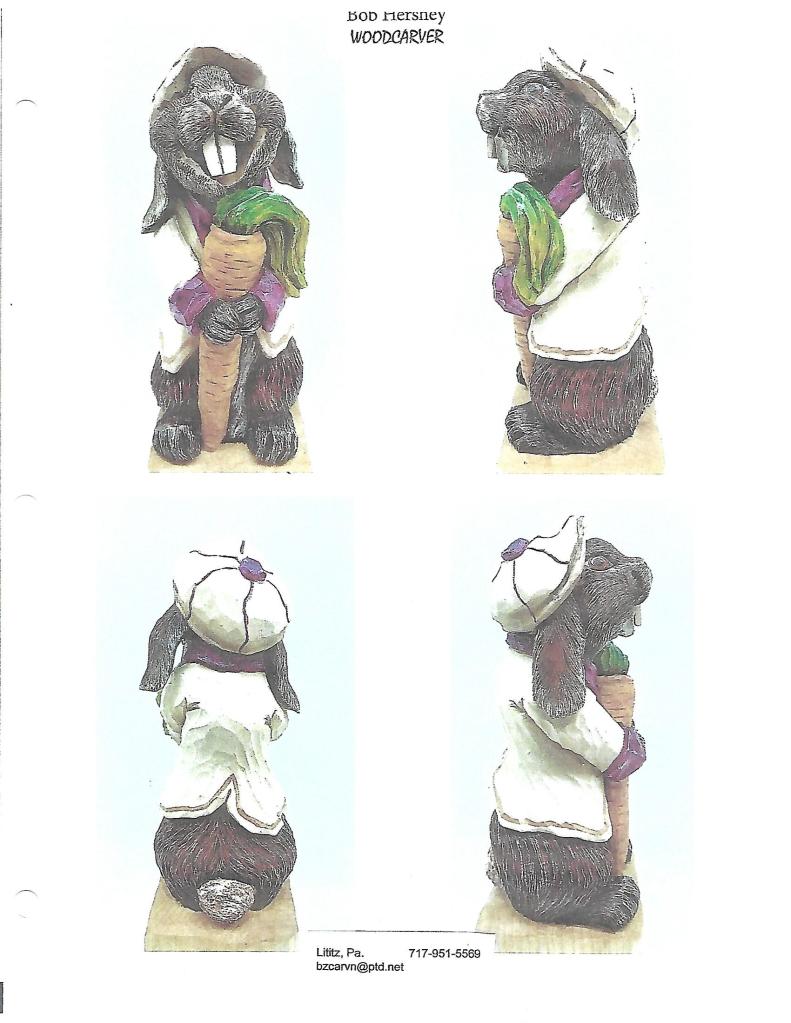
Rabbit With Carrot
Rabbit Reference Sheet
This is a Bob Hershey rough out which originally sells for $25 plus shipping and is 8″ tall. I have two of these rough outs available which I’m selling for $15 each plus shipping. Each rough out comes with the above reference sheet.
Let the chips fly! Tell your wood carving friends and spread the word about Wood Chip Chatter, and don’t forget to click the ‘Comment’ button at the bottom of the page to send in your questions and comments so we can keep Wood Chip Chatter active and keep the conversations going!
And remember, we need your photos! I’m sure you all have some terrific carvings to share, and photos of your carvings will help to liven up the blog’s appearance and make it more interesting. Perhaps we can start a carvers photo section! Email your photos to carverbobk@woodchipchatter.com
Below is a short picture tutorial on how to carve a head done by my good friend Roger Stegall, which is being posted here with Roger’s gracious permission. The tutorial does not go into much detail but the photos do give you some idea as to how Roger does it. Text explanations are provided by me.
Pattern – Side View
Pattern – Front View
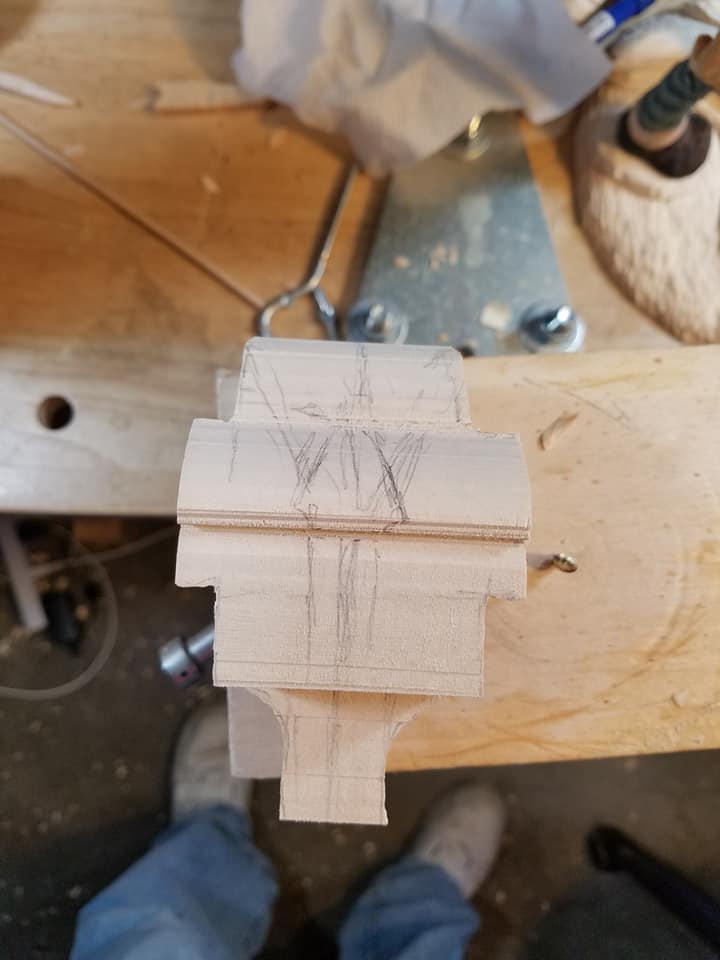
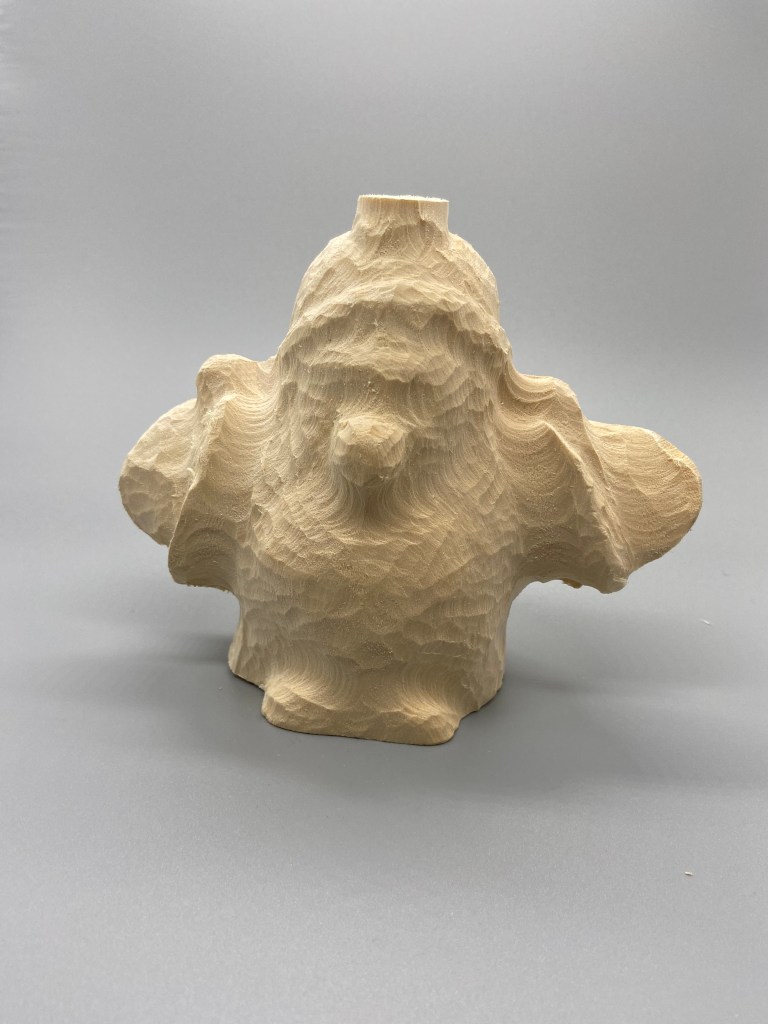
Draw the front and side view patterns on two adjacent side of the blank, then cut out both side on the bandsaw.
1. Right side view cut out
2. Front view cut out
3. Left side viewcut out
4. Back view cut out
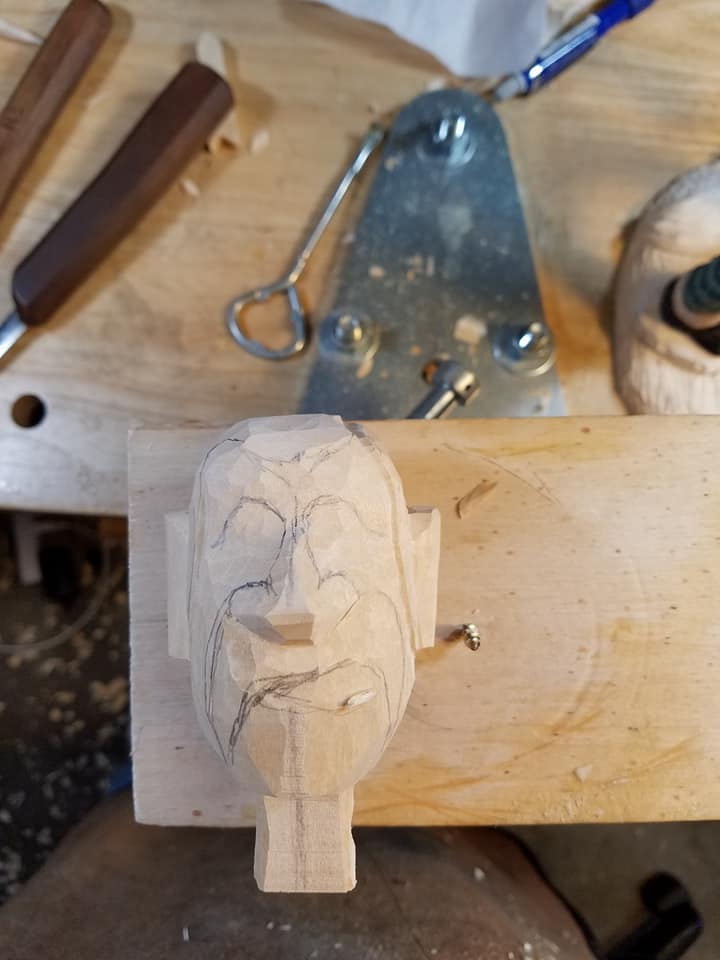
5. Head shaped, nose and ears carved
Use a rough out knife and a 5/8″ (14mm) #3 gouge to round off the top of the head and the chin. Round the outer corners of the face taper the face slightly from the front of the ears to the tip of the nose.
6. Jaw, bottom of hair and sideburns cut in
Use the same tools to cut in and shape the jaw. Cut in the hairline and sideburns with the rough out knife. Taper the ears from back to front.
7. Back view progress
8. Jaw and hairline shaped. Facial detail drawn on.
Use a pencil to draw on the facial detail.
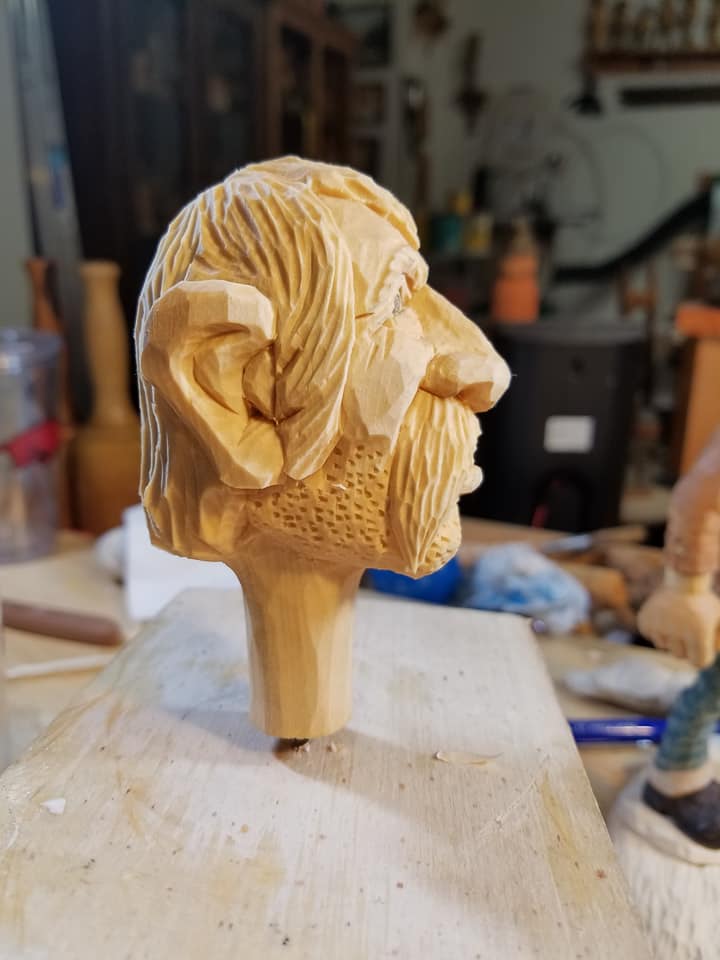
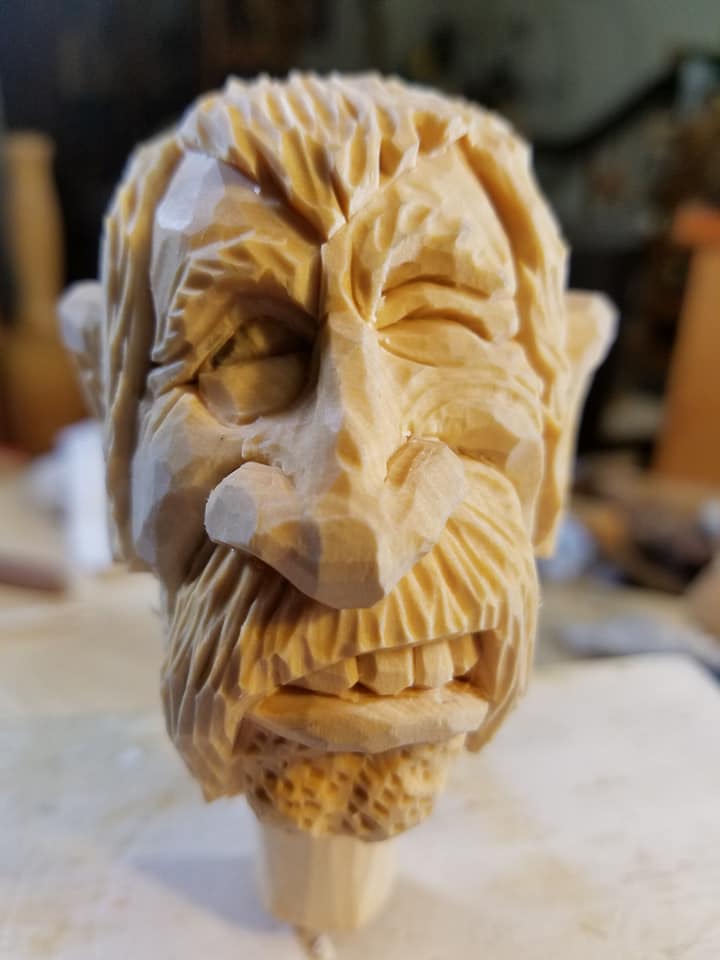
9. Finished face – front view
Use the following tools to carve the facial details:
Nose: #7 and #9 gouges
Eyes: Detail knife and micro V-tools
Eye brows: #9 gouge
Hair, sideburns and mustache: #9 gouges, various sizes
Ears: #6 gouges
Teeth: Detail knife
Beard stubble: 1/8″ (3mm) 70 degree V-tool
10. Finished face – right side view
11. Finished head – back view
12. Finished face – left side view
13. Finished face – close up
Questions & Comments
Our first question today comes from Robert Larsen in response to my book review on “EGG HEADS”. Robert asks:
“very nice carvings. I would like to know where i can buy basswood eggs. I bought some some time back but they are so hard to carve on. any good place to buy them? thanks”
The eggs you bought a while back, Robert, were probably made of southern basswood which is very hard to carve. You want eggs made of high-quality northern basswood which is much easier to carve.
There are several woodcarving suppliers that carry good basswood eggs. Here are just a few that I use and can recommend:
Our next comment, from Cory Rower comes with photos of the neat penguins he’s been working on:
“Here are a few carvings I have been working on. I worked on these two while on vacation last week. Definitely not perfect but two different Christmas penguins. They still need some paint but had fun making them.
Thank you again for the help about the wood and explaining it I appreciate it”
1. Penguin WIP by Cory Rower
2. Penguin WIP by Cory Rower
3. Penguin WIP by Cory Rower
Those penguins are coming along nicely, Cory. I’d like to see them when they’re finished. You’re welcome for the wood explanation. I’m glad I could clear things up for you.
I noticed in your first two pictures that you were using a BeaverCraft knife and a Flexcut knife. What differences do you find between the two and do you prefer one over the other? Tell us a little about your experiences with them.
Rough Outs For Sale!
Over the years I have collected many various rough outs, most of which I will never get around to carving. So I have decided to sell them at a discounted price to any of my woodcarving friends who are interested. I will be listing them here, one or two at a time, on every upcoming blog post going forward. Anyone who is interested in one (or more) can just send me a message and we will work out the details. Rough outs will be sold on a first come basis. I have the first two rough outs listed below:
“Hugs”
“Hugs” reference sheet
“Hugs” is a Jon Nelson rough out which is 4″ tall and sells new for $11 plus shipping. The one I have is a larger version (approx. 6″ tall) and I’m selling it for $5 plus shipping. The rough out also comes with the above reference sheet.
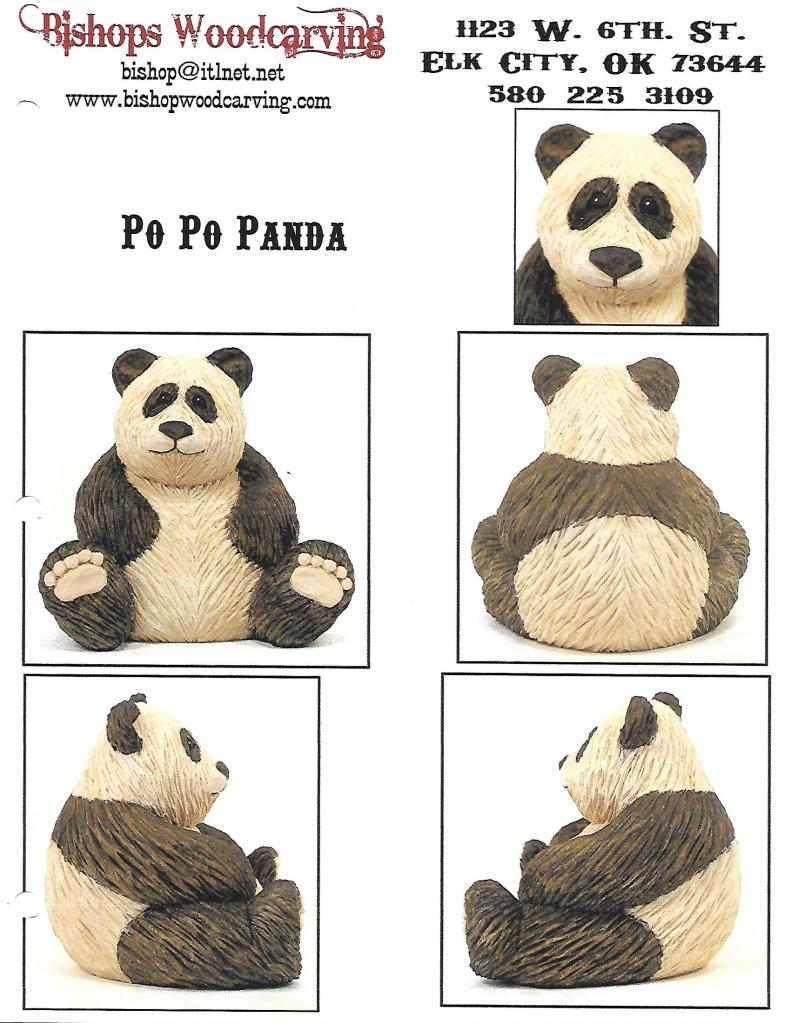
“Po Po Panda”
“Po Po Panda” reference sheet
“Po Po Panda” is a Bishop rough out which sells through Dwayne Gosnell Woodcarving. It sells new for $22 plus shipping. I am selling this rough out for $10 plus shipping. I have two of these rough outs available and each one comes with the above reference sheet.
Let the chips fly! Tell your wood carving friends and spread the word about Wood Chip Chatter, and don’t forget to click the ‘Comment’ button at the bottom of the page to send in your questions and comments so we can keep Wood Chip Chatter active and keep the conversations going!
And remember, we need your photos! I’m sure you all have some terrific carvings to share, and photos of your carvings will help to liven up the blog’s appearance and make it more interesting. Perhaps we can start a carvers photo section! Email your photos to carverbobk@woodchipchatter.com
Keep a sharp edge and keep on carvin’!
My mother-in-law phoned today and said, ‘Come quick, I think I’m dying’. I said, ‘Phone me back when you’re sure’.
During this post we continue that never ending discussion on stropping. Today, however, we learn some significant information from Del Stubbs on how to choose a strop and compound, and the correct way to strop your knife. In this section, Del also briefly introduces us to hones and honing your knife.
Stropping
Stropping is the most important form of sharpening. However, careless stropping can easily round and ruin a tool’s edge. The secret is careful stropping with good materials. A standard woodcarvers leather strop with good compound and good technique is all that is needed to keep most tools working well most of the time. We don’t recommend jewelers rouge (red compound) – it’s made for polishing soft metals. We have chosen to sell a stropping compound called White Gold because it works quickly and has a good consistency for applying to a strop, but there are many good carvers stropping compounds available, learning how to use well what you have is the main idea.
How to strop:
When stropping, lay the tool flat on the leather, polishing the whole surface with solid pressure. The tool’s edge will compress slightly into the softness of the leather – this will form the necessary microscopic bevel at the edge. Press firmly – using a few strokes in both directions should be enough to bring a slightly dull tool back to razor sharpness. For some people it helps to push firmly down on the tool with a finger as it is being stropped. Many knives are slightly flexible – this means that you must raise the handle slightly toward the end of the stroke to apply pressure to the tip. If this isn’t done to straight edge knives – they tend to get narrower in the middle – forming a convex shape.
Is your brand of stropping compound working well?
Try this: After applying a fresh coat of compound, the very first stroke of the tool should leave black streaks on the strop, and mirror polish on the tool. If it leaves only a dull grey color on the strop, the compound is too soft (not removing enough metal). If the tool is dull or scratchy looking, it is too course a compound.
If stropping isn’t working well for you, here are possible reasons:
A). The tool needs honing see next section).
Your compound is too slow cutting.
You are not able to press hard enough. In this case, raise the back edge of the tool very slightly off of the strop
– this will put all of the pressure on the edge.
If careful stropping rounds over the edge, then likely the strop is of too rough or too soft a material, or you’re raising the back too much – go to a harder or finer leather, hard cardboard (like a cereal box), or to smooth basswood as a strop. You should be able to press quite hard while stropping, without rounding the edge. It’s better to take a few strong and careful strokes than a lot of light careless ones.
Power Stropping?
There are various power strops on the market – just be sure they go slow, otherwise you are likely to bum the edge – power stropping produces a surprising amount of heat right at the edge.
Honing
The tools I produce are such that they rarely need honing! But when to hone?Hone when stropping no longer easily brings the tool back to razor sharpness, or when there is a nick to remove. If your hone cuts too slowly, you may raise the tool only slightly off the back if necessary (not more than half the thickness of the tool). This will help keep the edge thin. Stop honing either side when a very tiny burr is raised on the entire edge. Feel this burr by stropping the tool lightly backwards against a finger. Remove this burr, with a super fine hone, or with your strop, but use the strop for the finished edge.
Which Hone?
Fine diamond, ceramic, fine India, Arkansas, can all work well.Do not use a coarse carborundum bench stone, unless the edge is damaged badly. Don’t use a high speed grinder. They are too aggressive and hot. If your tool is badly damaged and needs lots of metal removal, a coarse diamond hone or water cooled slow speed flat grinder is all I would recommend. We have chosen to offer our customers a selection of fine diamond hones. These are not the horrible and overpriced coarse hones with holes – we found a set of superfine professional grade hones specifically for fine sharpening these kinds of tools. Especially the 1200 grit – it cuts fast yet so fine you may go direct to the strop afterwards. Many carvers have trouble with honing because they use too coarse or too slow cutting types of hones .
Consider the “Sharpening Simplified” video we offer, its camera work is not Hollywood, but the author really knows sharpening and presents it well.
Del Stubbs is the owner of Pinewood Forge, a maker of fine Scandinavian woodcarving knives & woodcarving supplies from Leonard, MN. Del makes some of the best woodcarving and spoon carving tools on the market, which are in very high demand. His Fine Leather and Ash Bench Strop ($19.00) is the best cow hide strop I have found anywhere…I own 3 of them! Check out Pinewood Forge at: http://www.pinewoodforge.com
Buffalo Skull Bolo by Bob Kozakiewicz
QUESTIONS & COMMENTS
Our first question (actually two questions) come from Cory Rower who writes:
“Hi! I just had a few questions if you don’t mind answering them. First question is where do you go to find cheap wood? I have looked all over online and eBay seems to be the cheapest route but was looking for some cottonwood bark or something different to carve. The second question isn’t exactly carving related but thought you might know the answer or know someone that does. My family the last couple years we make home made gifts as part of our Christmas presents. I was wanting to make a cutting board but do not own and clamps. I was wondering if you knew what would be the best/cheapest clamps that would do the job. If you don’t know that’s ok I have been doing alot of reading on it and everyone says something different about what type of clamps to use. Thanks for any information you are able to give. And thank you for doing this blog I enjoy reading them. -Cory Rower”
Thank you for writing in, Cory! I always appreciate receiving questions and comments from my readers. Your questions and comments are what help make Wood Chip Chatter informative and interesting.
To answer your first question, let me start by saying that “cheap” wood is a relative term. What might seem cheap (or let’s say inexpensive) to me my not be to you. I assume you’re talking about basswood so let me state, first of all that there are two types of basswood…northern basswood, and southern basswood. If you want good quality, easy to carve basswood, you only want to buy northern basswood. Northern basswood is cleaner, softer and easier to carve than southern basswood, which is generally cheaper in price. In my opinion, though it is worth the extra money to pay for northern basswood.
Craft stores and ebay are definitely NOT the places to look for quality basswood because 90% of the time you will get cheap, poor quality southern basswood. I buy all of my basswood from Heinecke Wood Products in northern Wisconsin. Heinecke is a lumber mill that handles northern Wisconsin basswood exclusively, and for my money it’s the best basswood you can buy anywhere. It’s the ONLY place where I will buy my basswood. I also know of 2 or 3 other woodcarving suppliers that carry quality basswood. Any of these suppliers will ship right to your door. Anyone who is interested in the phone number or web address for any of these suppliers is welcome to contact me at any time. Do any of our readers have any sources they like to use?
Now to get to your second question, Cory. Unfortunately, clamps are something I’m not familiar with at all. Since I only make small carvings I’ve never had any need for owning any clamps. Perhaps some of our readers can help out with this one. Anybody?
Our next questions come from Dean Stewart who is interested in stropping gouges. Dean writes:
“Well, Bob, Let’s keep the strop conversation going. I’d be interested in knowing what tips and techniques folks have for stropping gouges and other non-knife blades. Also any good thoughts on the idea of power stropping versus manual.”
Those are excellent questions, Dean, and ones I would certainly like to see some comments on. Personally, I am fine with sharpening and stropping (by hand) knives, but when it comes to gouges, I’m a total novice. In all the years I’ve been carving I could just never get the hang of sharpening and stropping gouges. And it seems to me that the carvers who use power for stropping always get a razor sharp edge, although since I don’t own any power equipment I can’t really speak to that.
So let’s hear from some of our sharpening experts out there! Can you offer us any tips and techniques?
Our next comment today comes from my friend Jakobo Santiago from the Canary Islands in response to my remarks about using old belts to make your own strops.
“Hi! I’m really surprised! It never entered my mind
“”I have been using old belts that have shrunken over the years!”” “”Old belts are great sources of leather for making your own strops. Generally the nap on the back side of belts is smooth and stiff.””
I have an old cow belt in a drawer. I’m going to try and send a photo
Thank you so much. you are fantastic”
Thank you for writing in once again, Jakob! I’m certain your old cow belt will make some excellent strops.
Let the chips fly! Tell your wood carving friends and spread the word about Wood Chip Chatter, and don’t forget to click the ‘Comment’ button at the bottom of the page to send in your questions and comments so we can keep Wood Chip Chatter active and keep the conversations going!
And remember, we need your photos! I’m sure you all have some terrific carvings to share, and photos of your carvings will help to liven up the blog’s appearance and make it more interesting. Perhaps we can start a carvers photo section! Email your photos to carverbobk@woodchipchatter.com