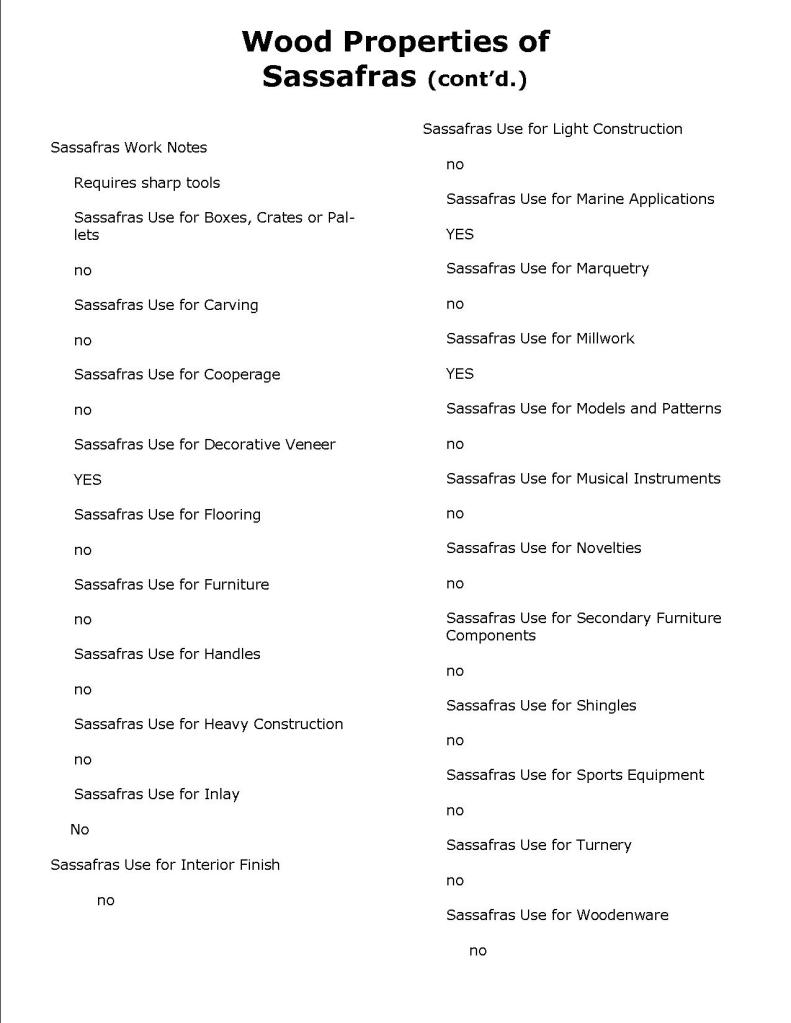
SASSAFRAS, also called Ague Tree, (species Sassafras albidum), North American tree of the laurel family (Lauraceae), the aromatic leaf, bark, and root of which are used as a flavoring, as a traditional home medicine, and as a tea. The roots yield about 2 percent oil of sassafras, once the characteristic ingredient of root beer.
The tree is native to sandy soils from Maine to Ontario and Iowa and south to Florida and Texas. It is usually small but may attain a height of 65 feet (20 m) or more. It has furrowed bark, bright green twigs, and small clusters of yellow flowers followed by dark blue berries. Sassafras has three distinctive forms of leaves, often on the same twig: three-lobed, two-lobed (or mitten-shaped), and entire.
Sassafras, one of the few economically important genera of the family, has two species in eastern Asia and one in eastern North America; oil of sassafras was once used medicinally, and Native Americans made a tea from the bark and twigs. The family is of great importance in the tropics for its valuable lumber, derived from many different species. Some of the wood remains fragrant for decades after it is cut.
Reader’s Comments
I received two very kind comments from my friends, Danial Sloane and Bill MacDougall last week that I want to share:
1. “Another great chatter Bob I will be putting the report on oils and such in my storage folder for reference. Enjoy your break all the best to you and your family….Danial”
2. “Bob, great job on these articles, thanks for all the extra work you do for us carvers out here in the real world, love all your work too!
Bill MacDougall Amherst, New York”
Thank you for your thoughtful words, Danial and Bill. They mean so much, and I’m always happy to hear that my readers are enjoying Wood Chip Chatter and finding it helpful.
I received a question from Rick about how to make glasses for caricatures. Rick writes:
“Hi Bob,
I don’t see eye glasses included very often on characters but I have some I would like to try that all need eye glasses and not sure how to approach this. I would greatly appreciate any ideas.
Attached are a couple of Peter Rabbit pics following Doug Linkers recent video. A fun carve.
Thanks
Rick Carver”
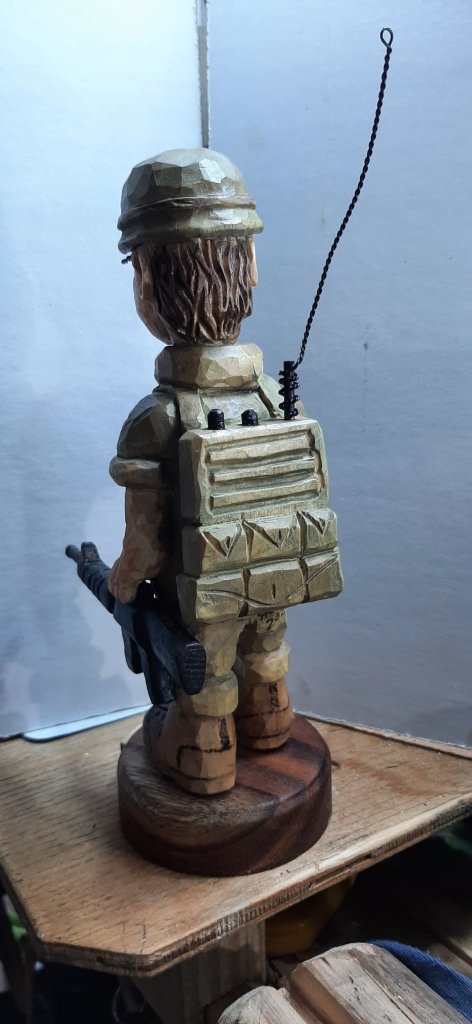
Rick’s Peter Rabbit
That was a good video Doug did on carving the Easter rabbit and you did a terrific of carving yours, Rick! A pair of glasses would look great on him but you’re right, you don’t often find carvers adding glasses to their caricatures. I did an article for WCI a while back that showed how to make glasses. I’ll pull some information from my notes and put it in the next blog. I’m sure a lot of folks would like to know how it’s done.
Photo Shop
“Photo Shop” is the section of Wood Chip Chatter where carvers can send in photos of their wood carvings for display. It’s your chance to show off your work…sort of a show and tell. The photos will only be displayed and no comments or critiques will be made. For critiques on your carvings send them in to the “Carver’s Corner.” Send your photos to carverbobk@woodchipchatter.com.
Our first two entries to the Photo Shop this week come from Kathy Savage, an excellent carver who sent in photos of the fireman she carved for her nephew. She saw it in a book and thought he would like it. I’m sure he did!
Kathy’s Fireman – Left side viewKathy’s Fireman – Front view
Kathy’s second carving is a terrific mama fox with her pup, which was a graduation gift for another nephew. I think I would like to be one of Kathy’s nephews!
Kathy’s Fox and Pup
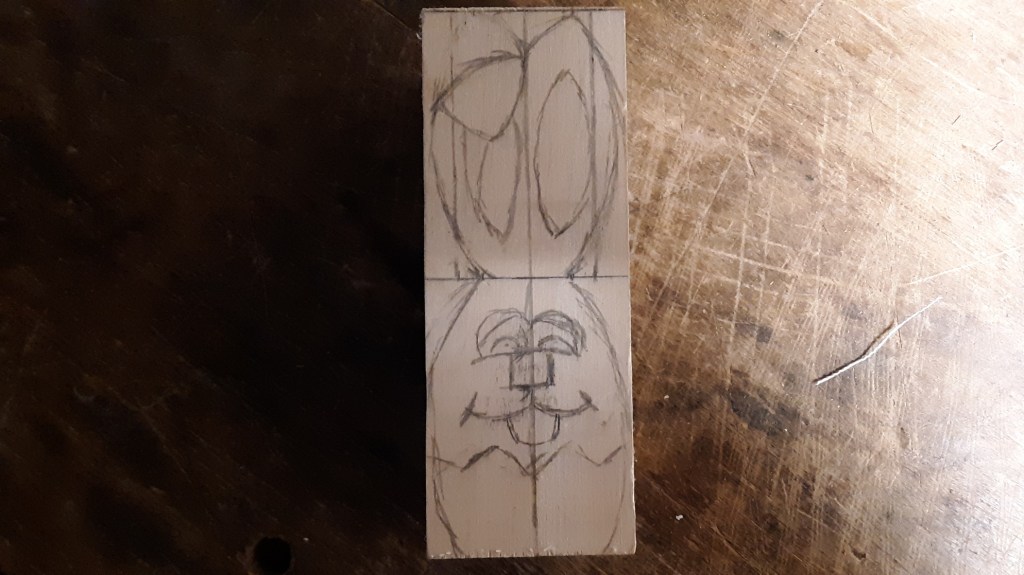
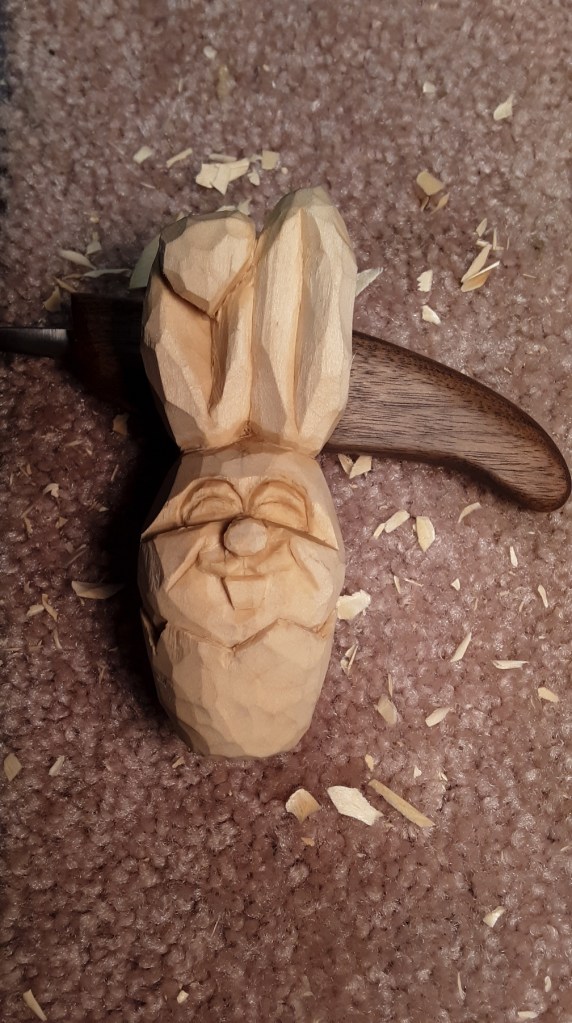
Our next two entries come from Terry Grimm. Terry just finished this Easter decoration and has sent in some Work-In-Progress (WIP) photos along with his finished carving:
Pattern drawn on blankReady for paintFinished bunny carving
Peter Rabbit came out very dapper looking. Nice job, and thanks for the WIP photos.
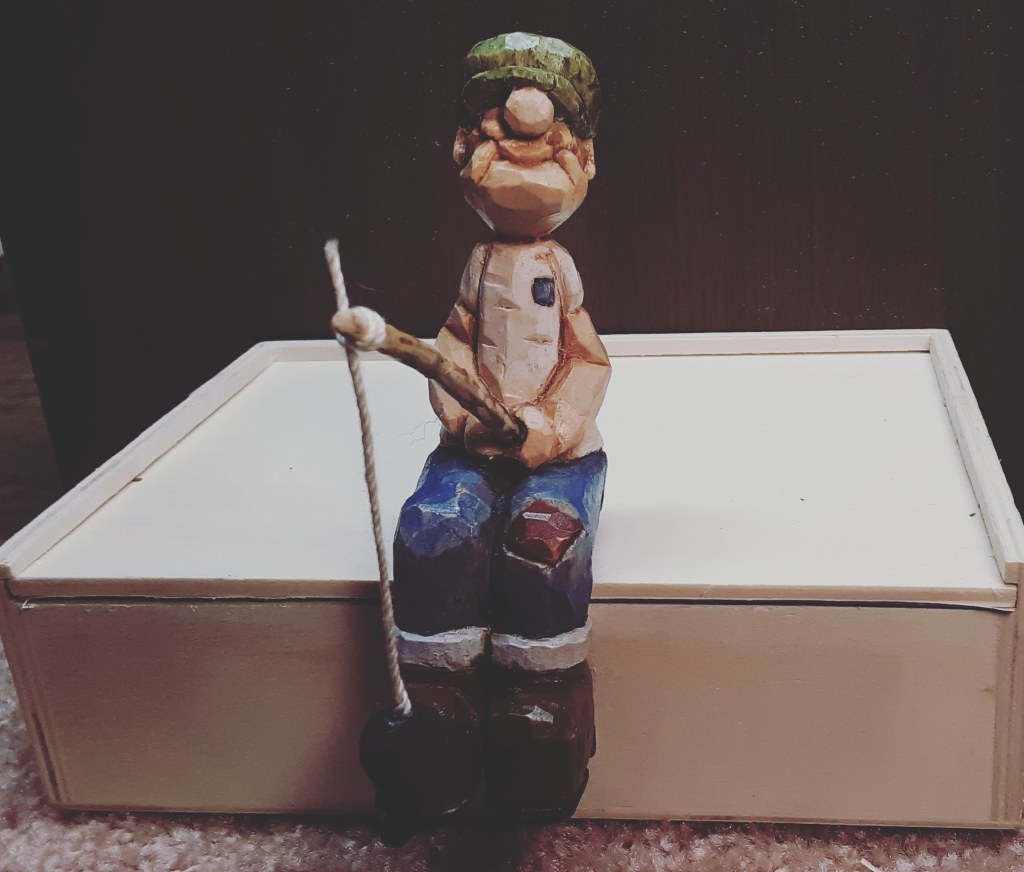
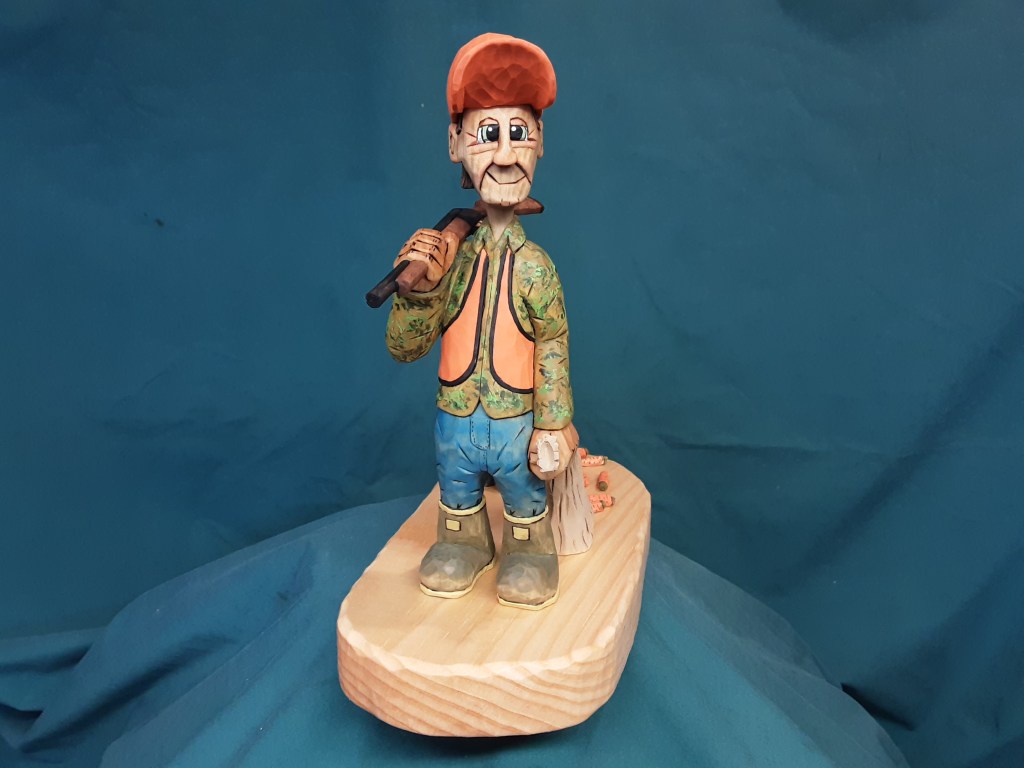
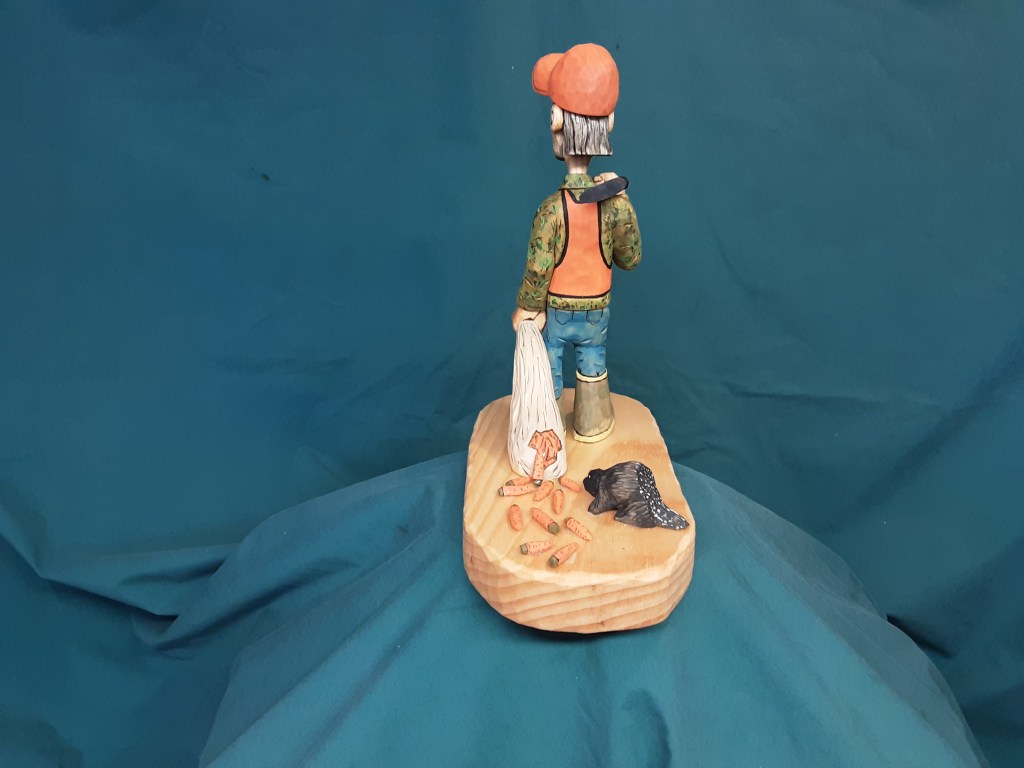
Terry’s next entry is a comical fisherman caricature he calls “Gone Fishing.”
Terry’s “Gone Fishing”
Thank you very much to Kathy Savage and Terry Grimm for your entries to the Photo Shop this week. Photo Shop photos are always greatly appreciated.
News & Announcements
Lancaster County Woodcarvers Zoom Meeting
(Informal meeting – Open to all)
Tuesday, May 3th, 2022 at 7PM
Zoom meeting: 417 966 8402
The International Association of Woodcarvers has upcoming Zoom meetings on the following Saturdays at 3PM EST with special guest presenters. Check them out…
Zoom: 310-460-3575
Schedule:
4/30 – Open Forum Meeting
5/7 – Ken Kuhar
5/14 – Dana Kababik – Carving Junkies
5/21 – Dillon Goodson
NOTE: Beginning in June, through August meetings will be held only once per month. These will still be live presentations or demonstrations. The dates for these meetings are yet to be announced.
The following is a Glossary of terms of wood finishes, solvents and the components that go into their chemical makeup. Although this is a bit of a chemistry lesson (I’m a retired chemist), I put this list together to give you an idea of the kinds of substances you are applying to your wood carvings.
Acrylic Paint – a fast drying paint made up of pigment suspended in acrylic polymer emulsion and plasticizers, silicone oils, defoamers, stabilizers or metal soaps. Most acrylic paints are water-based but become water-resistant when dry.
Alcohol – especially ethyl alcohol, that has been denatured: used chiefly as a solvent. Ethyl alcohol is highly flammable.
Danish Oil – a wood finishing oil, often made of tung oil or polymerized linseed oil. Because there is no defined formulation, its composition varies among manufacturers. Danish oil is a hard drying oil, meaning it can polymerize into a solid form when it reacts with oxygen in the atmosphere. It can provide a hard-wearing, often water-resistant satin finish, or serve as a primer on bare wood before applying paint or varnish.
Drying Oil – an oil that hardens to a tough, solid film after a period of exposure to air at room temperature. The oil hardens through a chemical reaction in which the components crosslink by the action of oxygen.
*Lac – a resinous substance deposited on the twigs of various trees in southern Asia by the female of the lac insect (Kerria lacca): used in the manufacture of varnishes, sealing wax, etc.
Lacquer – any of various quick-drying, resinous varnishes, especially a resinous varnish obtained from a Japanese tree, (Rhus verniciflua), used to produce a highly polished, lustrous surface on wood or the like. Lacquer is dissolved in lacquer thinner, which is a highly flammable solvent typically containing butyl acetate and xylene or toluene.
Linseed Oil – a colorless to yellowish oil obtained from the dried, ripened seeds of the flax plant (Linum usitatissimum). The oil is obtained by pressing, sometimes followed by solvent extraction. Linseed oil is a drying oil, meaning it can polymerize into a solid form. Owing to its polymer-forming properties, linseed oil can be used on its own or blended with combinations of other oils, resins or solvents as an impregnator, drying oil finish or varnish in wood finishing, as a pigment binder in oil paints, as a plasticizer and hardener in putty, and in the manufacture of linoleum. Oiled wood may be yellowish and is likely to darken with age.
Mineral Oil – any of various colorless, odorless, light mixtures of higher alkanes from a mineral source, particularly a distillate of petroleum, as distinct from usually edible vegetable oils. Most often, mineral oil is a liquid by-product of refining crude oil to make gasoline and other petroleum by-products. This type of mineral oil is a transparent, colorless oil, composed mainly of alkanes and cycloalkanes, related to petroleum jelly. It has a density of around 0.8–0.87 g/cm3 (0.029–0.031 lb/cu in).
Mineral Spirits – a clear, volatile distillation product of petroleum, used as a common organic thinner for paints and varnishes. Also known as white spirit, mineral turpentine, turpentine substitute, and petroleum spirits.
Polymer – a compound of high molecular weight derived from the combination of many smaller, low molecular weight molecules (monomers). A product of polymerization.
Polymerization – the process of reacting monomer molecules together to form large polymer chains of three-dimensional networks. In the case of drying oils such as linseed oil this process takes place as the oil dries on your carving.
Polyurethane – varnish made with synthetic drying oils that is typically a hard, abrasion-resistant, and durable coating. Popular for hardwood floors but are considered by some wood finishers to be difficult or unsuitable for finishing furniture or other detailed pieces. Polyurethane is comparable in hardness to certain alkyds but generally forms a tougher film. Compared to simple oil or shellac varnishes, polyurethane varnish forms a harder, decidedly tougher and more waterproof film.
Resin – a solid or highly viscous substance of plant or synthetic origin that is typically convertible into polymers. Resins are usually mixtures of organic compounds.
Shellac (varnish) – a varnish made by dissolving shellac in (usually) alcohol or a similar solvent.
Shellac – lac* that has been purified and formed into thin sheets, used for making varnish.
Tung Oil – also known as China wood oil, is a drying oil obtained by pressing the seed from the nut of the tung tree (Vernicia fordii). Tung oil hardens upon exposure to air (through polymerization), and the resulting coating is transparent and has a deep, almost wet look. Used mostly for finishing and protecting wood, after numerous coats, the finish can even look plastic-like.
Turpentine – any of various oleoresins derived from coniferous trees, especially the longleaf pine, (Pinus palustris), and yielding a volatile oil and a resin when distilled. Used mostly as a thinner for paints and varnishes.
Varnish – a preparation consisting of resinous matter, as copal, rosin or lac, dissolved in an oil (oil varnish) or in alcohol (spirit varnish) or other volatile liquid. When applied to wood, metal, etc., it dries and leaves a hard, more or less glossy, usually transparent coating.
Walnut Oil – oil extracted from walnuts, (Juglana regia). The oil contains polyunsaturated fatty acids, monosaturated fatty acids, and saturated fats. Walnut oil is composed largely of polyunsaturated fatty acids (72% of total fats), particularly alpha-linolenic acid (14%) and linolenic acid (58%), oleic acid (13%), and saturated fats (9%). Walnut oil was one of the most important oils used by Renaissance painters. Its short drying time and lack of yellow tint make it a good oil paint base thinner and brush cleaner.
Wax – a solid, yellowish, non-glycerin substance allied to fats and oils, secreted by bees (also called beeswax), plastic when warm and melting at about 145o F, variously employed in making candles, models, casts, ointments, etc.
SAFETY NOTE ABOUT WOOD FINISHES
Because of flammability concerns, many product containers list safety precautions for storage and disposal for varnishes and drying oils as they are flammable, and materials used to apply the varnishes may spontaneously combust. Many varnishes contain plant-derived oils (e.g. linseed oil), synthetic oils (e.g. polyurethanes) or resins as their binder in combination with organic solvents. These are flammable in their liquid state. All drying oils, certain alkyds (including paints), and many polyurethanes produce heat (an exothermic reaction) during the curing process. Thus, oil-soaked rags and paper can smolder and ignite into flames, even several hours after use if proper precautions are not taken. Therefore, many manufacturers list proper disposal practices for rags and other items used to apply the finish, such as disposal in a water filled container.
There were no Reader’s Questions or Comments nor were there any entries to the Carver’s Corner submitted this week.
Photo Shop
“Photo Shop” is the section of Wood Chip Chatter where carvers can send in photos of their wood carvings for display. It’s your chance to show off your work…sort of a show and tell. The photos will only be displayed and no comments or critiques will be made. For critiques on your carvings send them in to the “Carver’s Corner.” Send your photos to carverbobk@woodchipchatter.com.
I’m very pleased to see we have several entries to the Photo Shop this week! Your photos are always greatly appreciated and we love to see what you’ve been carving.
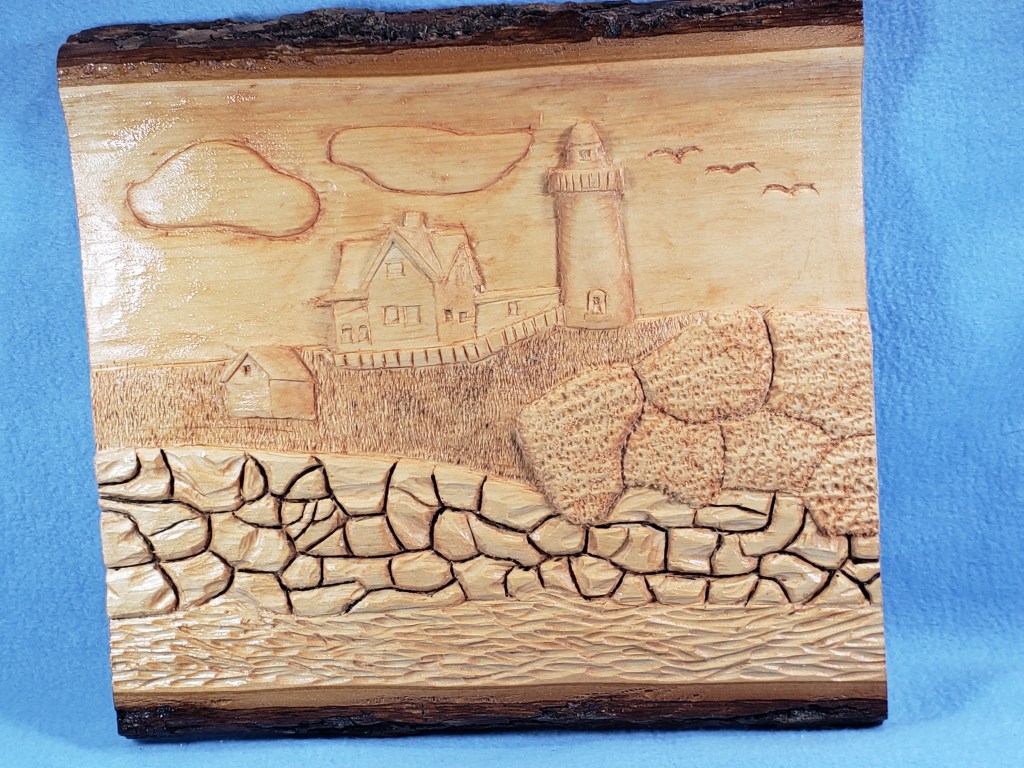
Our first entries to the “Photo Shop” this week were sent in by Kathy Savage who wrote:
“thought I would send a few
these were Christmas gifts for 2 nieces
the German Shephard was carved from a photo of her dog that unfortunately passed over the rainbow Bridge a month before I gave it to her
Kathy Savage”
Kathy’s German ShephardKathy’s Lighthouse Relief
Wow, those are magnificent carvings, Kathy! I especially like the German Shephard carving. It’s very realistic. Thank you so much for sending them. That’s so sad to hear about your niece’s dog, though.
Our next “Photo Shop” entry comes from my good friend, Wayne Smith, from Nova Scotia, Canada. Wayne sent in some photos of one of his signature “South Shore Rednecks” carvings:
“Hi Bob, you said you’d like to have a few photos for your blog’s photo shop section. Since I carve mainly SSRN’s ( South Shore Rednecks) and Christmas ornaments, I figured I’d send you some pics of my most recently finished character and save the Santa’s for sometime closer to Christmas.
I look forward to your blog, but understand as we approach summer most carving communities tend to slow up a bit, so every 2 weeks is fine. Maybe next fall when we’ve got all our gardening and other chores taken care of you can go back to a weekly schedule.
Wayne”
Thanks, Wayne! I sure do appreciate the photos and I always love seeing your South Shore Rednecks.
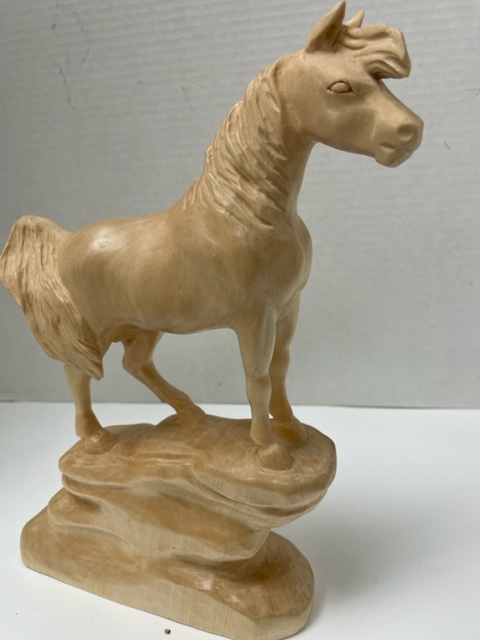
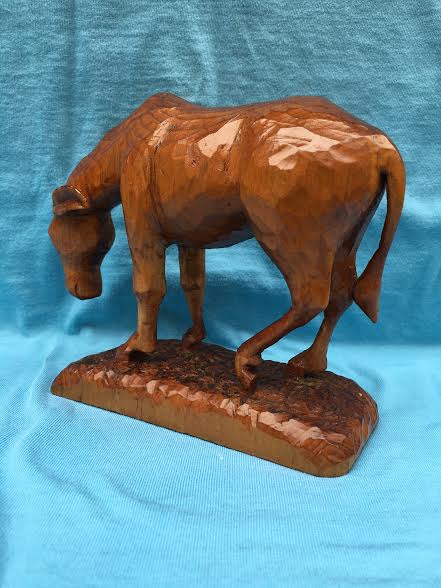
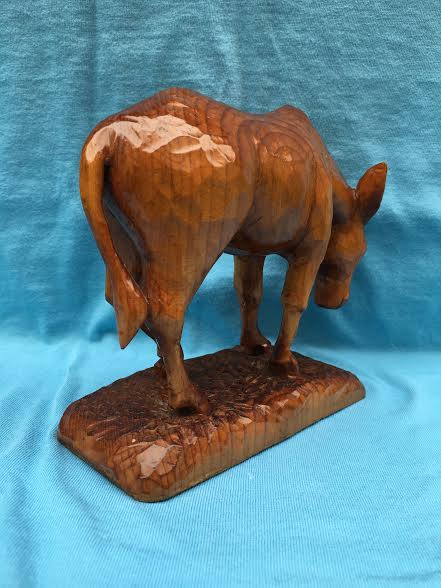
Next we have a photo of a spectacular horse carving by Dick Bonewitz, from Carmel, IN:
“This is a horse I carved in a class with Janet Cordell as the instructor. It was at the Ozark Woodcarving Seminar, which is an excellent seminar. The horse is from a basswood roughout, sanded to 400 grit and sealed with 3 coats of spray lacquer.
Thanks for publishing your newsletter. Please show this one in the next addition
Dick Bonewitz
Carmel In”
Dick’s Horse
Wow, Dick, that’s fantastic! Thanks so much for sending it. Much appreciated!
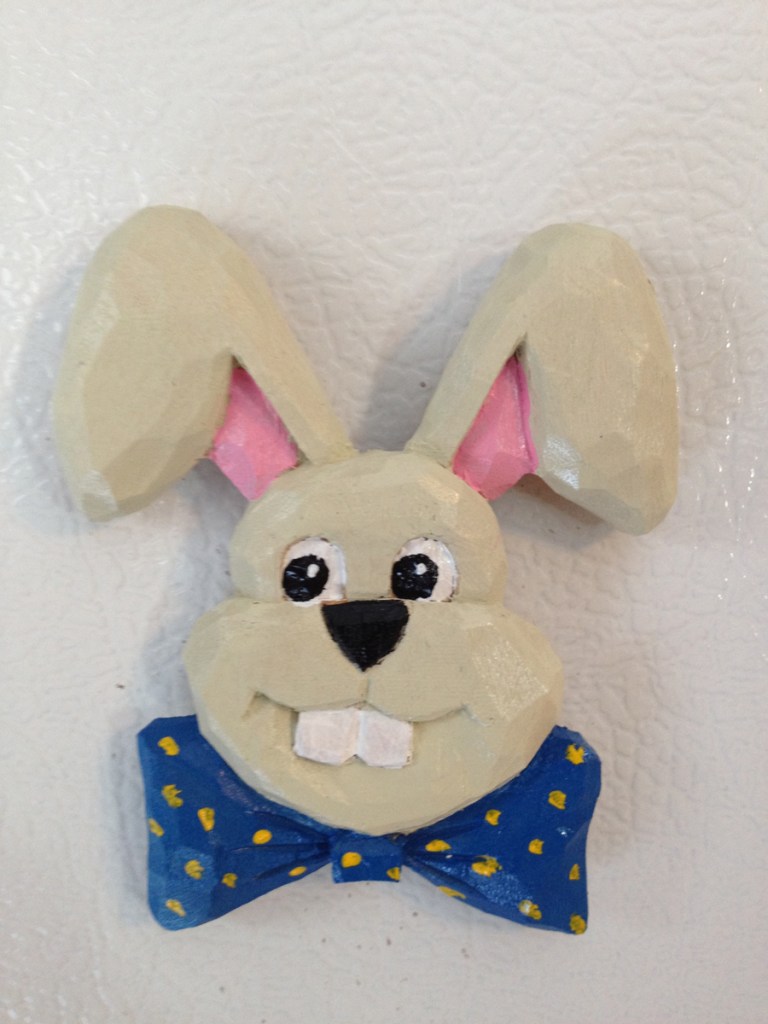
Free Pattern
Here is a Bunny Rabbit fridge magnet I designed which can also be carved as a sweater or lapel pin. Although this is not really a pattern it’s easily traceable to make your own pattern. It’s a quick and easy carve and makes a great filler for the kids’ Easter Baskets.
Bob’s Bunny Fridge Magnet
News & Announcements
I will be taking a much needed vacation over the Easter break so there will be no Wood Chip Chatter on April 15 & 22. The next Wood Chip Chatter blog will be posted on Friday, April 29.
I want to wish everyone a very Blessed, Safe and Happy Easter!
Upcoming Shows for Spring, 2022
April 23 – Westby, Wisconsin. Carve In 6@ Bekkum Memorial Library, 206 N. Main St., 10am to 4pm. Free admission. Contact John Sutton (608) 634-4396, lbarnfarms@gmail.com; or Bekkum Library (608) 634-4419.
April 30 – May 1 –Fargo, North Dakota. 45th Annual Red River Valley International Wood Arts Festival; Sat. 10-5, Sun. 10-4; Admission: $3.00, Children under 12 free, $7.00 Family rate; For more information: http://www.rrvwoodcarvers.org or contact Show Director, Rhonda Smith 218-839-4259
.May 6–8 – Missoula, Mont. Montana State Woodcarvers Show & Sale; Missoula County Fairgrounds. $4 admission. Sat: 9 -3 ; Sun: 11-5. Tom Collins (406) 529-0239; tomcollins875@gmail.com.
May 7 – Inverness, FL. Nature Coast Carving Club of Citrus Co. show and sale. at 6298 E. Gospel Island Road, Admission $2, Open 9 am-3 pm. Email: naturecoastwcc@gmail.com.
May7–8 – Mountain Home,Ark. North Arkansas Woodcarvers’ show/sale at Baxter Count y Fairgrounds. Sat 10-5; Sun 10 -4. Free admission. Contact: Sandy (870) 431-8070; webmaster @northarkansaswoodcarvers.org. Visit website: http://www.northarkansaswoodcarvers.org.
May 21-22 –Greeneville, Tennessee. Evergreene Woodcarvers Iris Festival Woodcarving Show; First Presbyterian Church in Greeneville. Woodcarvers of all skill levels are invited to compete. For more information please message us on Facebook.
May 21-22 – Sacramento, Calif. Capital Woodcarvers host 50th show at Scottish Rite Center, 6151H St. Sat. 9-5, Sun. 9-4. Alison Cook (916) 485-7893; crystal53@hotmai l.com.
June 11-18 – Maquoketa, Iowa. The Affiliated Wood Carvers present 54th International Woodcarvers Congress at Jackson County Fairgrounds. Website: woodcarverscongress.org.
The International Association of Woodcarvers has upcoming Zoom meetings on the following Saturdays at 3PM EST with special guest presenters. Check them out…
Zoom: 310-460-3575
Schedule:
4/9 – Joe You
4/16 – Chris Hammack
4/23 – Brett Andrews
4/30 – Cecilia Schiller – Cranklady
5/7 – Ken Kuhar
5/14 – Dana Kababik – Carving Junkies
INTERNATIONAL ASSOCIATION OF WOODCARVERS
COME JOIN US!!!
The Jersey Hills Wood Carvers (JHWC) club is a small but growing group of wood carvers sharing their time, knowledge and joy of woodcarving. The JHWC generally meets from 7:00 pm to 9:00 pm on the 1st, 3rd and 5th Thursday of each month (when school is in session) at the Jefferson Township High School wood shop classroom.
Membership is “FREE” and open to anyone interested in woodcarving regardless of their ability.
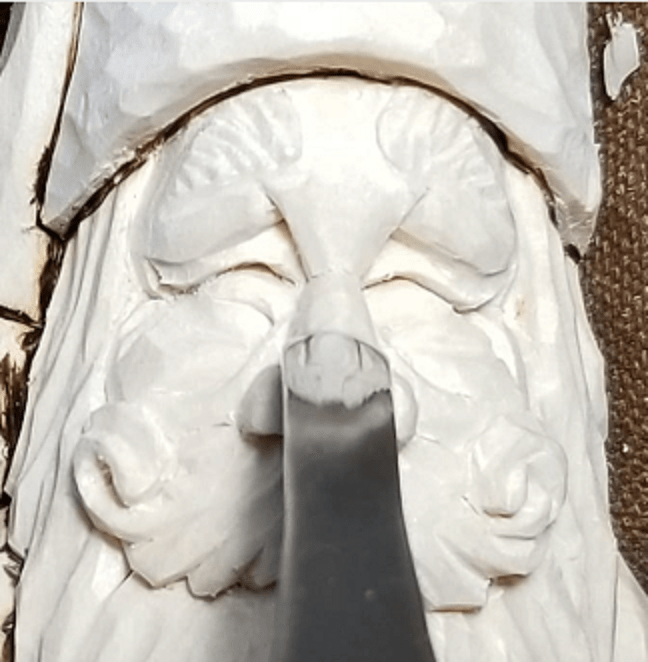
Last week I posted Part 1 of a photo nose tutorial done by my good friend, Tony Harris from Tennessee. Tony is an excellent carver who creates his own Santa ornaments and was gracious enough to share his expertise with us on how he carves noses. Because of the number of photos in this tutorial I have broken it into two parts of 8 photos each. Part 2 consists of Photos 9-16.
Part 2
Sharp tools are important. Before you begin, make sure your tools are sharp. Keep them sharp as you go with periodic stropping.
Photo 9. Use an inverted #7 gouge to round off and shape the bridge of the nose.
Photo 9
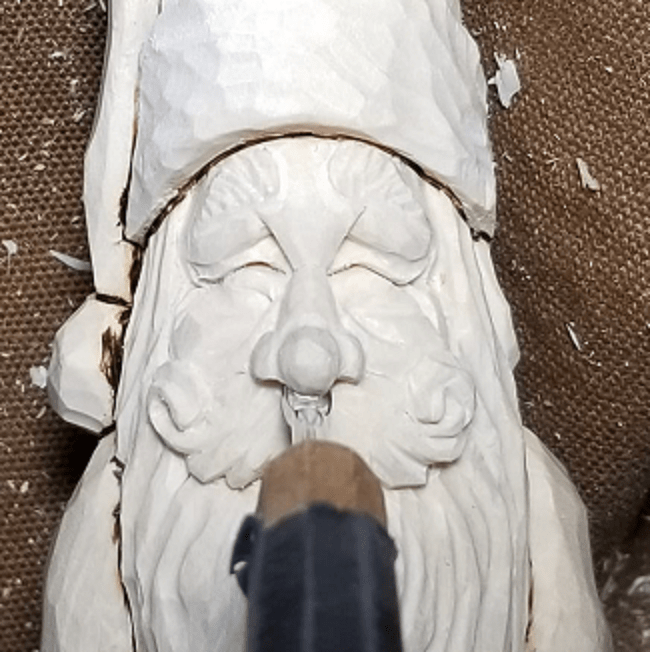
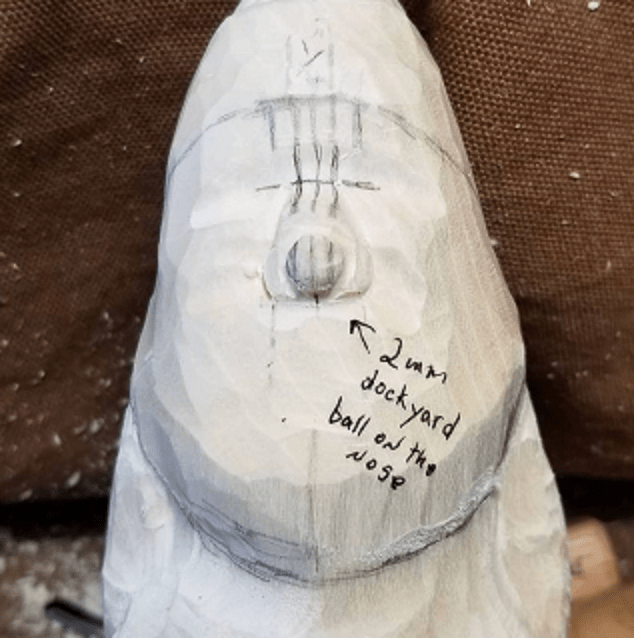
Photo 10. Use a 2mm Dockyard gouge to re-form the ball on the tip of the nose.
Photo 10
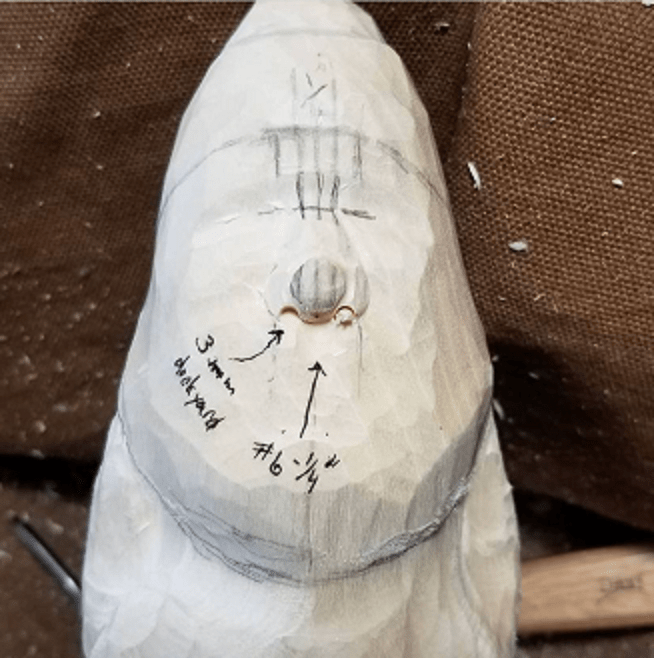
Photo 11. Deepen the nostrils with the 3mm Dockyard gouge.
Photo 11
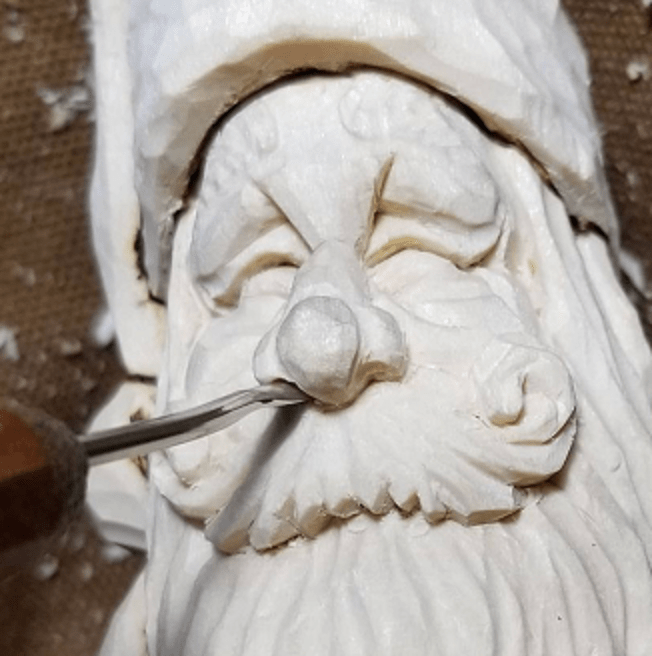
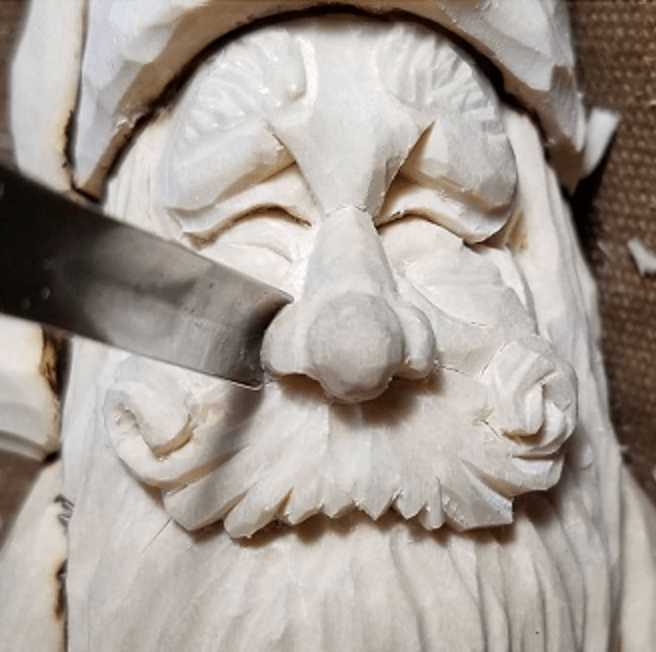
Photo 12. Use the 1/4″ #6 gouge to define the bottom tip of the nose.
Photo 12
Photo 13. Use the #6 gouge around the outside of the nostrils to clean up around the nose.
Photo 13
Photo 14. Finished carving. Front view.
Photo 14
Step 15. Finished carving. Right side view.
Photo 15
Photo 16. Finished carving. Left side view.
Photo 16
NOTE: Substitute alternate tool sizes and shapes as necessary according to the size of your project.
Questions & Comments
I got some very much appreciated comments and compliments this week from Jim Shay who said:
“Great articles this week Bob. Will follow the tutorial Carving a Nose. I too struggle with them. Always ends up much smaller than in the beginning stages due to cleaning up my inferior cuts. Thanks for your continued excellent work with Wood Chip Chatter Jim Shay”
Thank you so much for your kind words, Jim! It’s comments like yours that keep me moving forward when I feel like my blog efforts are just not working. It’s knowing there are folks like you who look forward to reading Wood Chip Chatter every week.
Next we have a question from Dick Bonewitz from Carmel, IN who wants to know what is the best bench top dust collector for power carving. Dick writes:
"I have a question about dust collection when power carving. Specifically, what personal bench top collector Is the best ? There are several brands available at different price points and features.
Thanks
Dick Bonewitz
Carmel In"
Well, Dick, that’s actually an impossible question to answer because there is no one correct answer. If you ask 10 different people you will probably get 10 different answers. There are many factors that must be considered when any carver is looking for a bench top dust collector. For example, there are price, size, quality and power (cfm) just to name some top considerations.
A dust collector priced at $500 is going to be of much better quality than one priced at $300, but if you’re on a tight budget and can only afford the $300 unit, then that one might be the best one for you. On the other hand, someone with a bigger budget might choose the $500 unit for its better power, size and quality.
Here’s something else to consider. Take my situation as an example. My workbench is only 5′ long by 18″ deep. Let’s say I’m looking at two dust collectors…one draws 1000 cfm and is 18″ long, the other is 12″ long but only draws 500 cfm. I would love to have the more powerful unit but it’s too big for my workbench. So even though the 1000 cfm model is better I have to settle for the smaller, less powerful unit, considering that one as the best one for my needs.
Basically, it comes down to personal needs and preferences. There are a lot of good bench top dust collectors out there. Don’t knock yourself out looking for the best one…it doesn’t exist. Look for one that fits your needs and budget, and buy it from a reputable dealer who will stand behind their product. The same thing holds true for any tool or equipment you buy.
Heath sent in a comment just to say:
“Thanks for the great nose tutorial.”
You’re welcome, Heath! I hope everyone found it helpful. I’m always trying my best to keep Wood Chip Chatter informative and interesting every week.
Free Pattern
News & Announcements
Beginning on April 29 Wood Chip Chatter will be published every other Friday.
39th Annual Showcase of Woodcarvings
CPCC Main Campus
1128 Elizabeth Ave. Charlotte, NC 28204
April 2 & 3 10am to 4pm
150 Carvers Vendors Seminars
FREE Admission FREE Parking
The International Association of Woodcarvers has upcoming Zoom meetings on the following Saturdays at 3PM EST with special guest presenters. Check them out…
Zoom: 310 460 3575
Schedule:
4/2 – Steve Tomashek
4/9 – Joe You
4/16 – Chris Hammack
4/23 – Brett Andrews
4/30 – Cecilia Schiller – Cranklady
5/7 – Ken Kuhar
5/14 – Dana Kababik – Carving Junkies
INTERNATIONAL ASSOCIATION OF WOODCARVERS
COME JOIN US!!!
Lancaster County Woodcarvers Zoom Meeting
(Informal meeting – Open to all)
Tuesday, April 5th, 2022 at 7PM
Zoom meeting: 417 966 8402
Unfortunately, we had no contributions to the Carver’s Corner or the Photo Shop this week so Wood Chip Chatter appears rather empty.
WOOD CHIP CHATTER NEEDS YOUR PHOTOS!!!
I’m sure you all have some terrific carvings to share in my “Photo Shop” section. Photos of your carvings liven up the blog’s appearance and make it more interesting. Also, my “Carver’s Corner” is a great way to get constructive critiques on your carvings so you can learn where to improve on your next ones. When sending in photos please specify whether you want them for display in “Photo Shop” or if you want me to critique them in the “Carver’s Corner.” Send your photos in to carverbobk@woodchipchatter.com.
KEEP THE CHIPS FLYING!!!
Send in your questions and comments so we can keep Wood Chip Chatter active and keep the conversations going! Effective discussions are one of the best ways to learn about the topics that interest you. Remember, there’s no such thing as a dumb question. Plus we would all love to learn about the unique tips, techniques and products YOU use in your woodcarving process. Send your questions and comments to carverbobk@woodchipchatter.com.
This week I am introducing Part 1 of a photo nose tutorial done by my good friend, Tony Harris from Tennessee. Tony is an excellent carver who creates his own Santa ornaments and was gracious enough to share his expertise with us on how he carves noses. Because of the number of photos in this tutorial I have broken it into two parts of 8 photos each. Part 2 will follow next week.
Part 1
Sharp tools are important. Before you begin, make sure your tools are sharp. Keep them sharp as you go with periodic stropping.
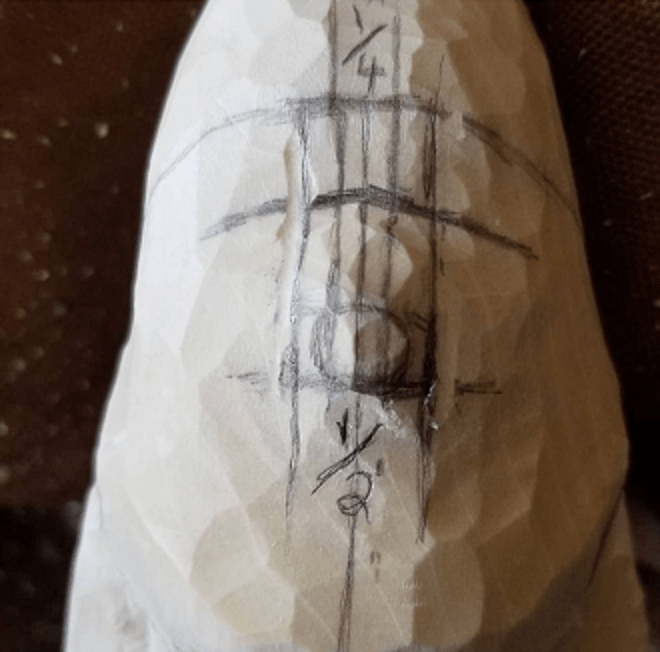
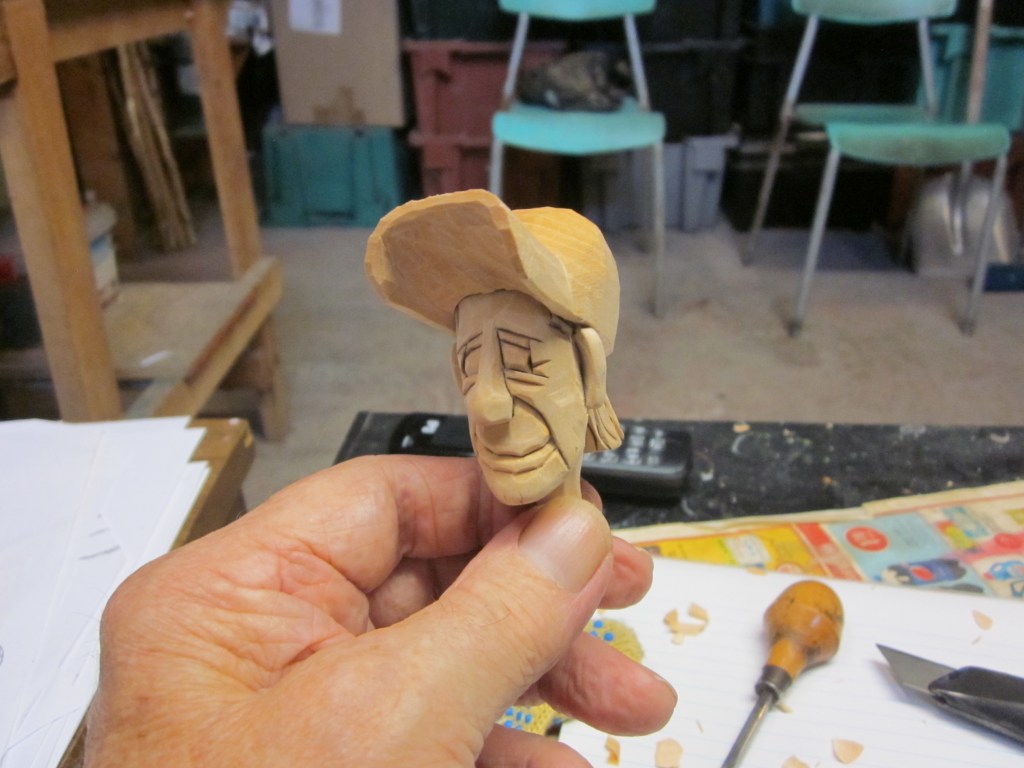
Step 1. Draw 4 perpendicular vertical lines each 1/4″ apart. Mark the hat brim and bottom of the nose, then draw a horizontal line approximately half way between the hat brim and the bottom of the nose.
Photo 1
Step 2. Use a #9 gouge to scoop out two eye sockets and to scoop out around the bottom and sides of the nose. Pay attention to the reference marks in the photo.
Photo 2
Step 3. Stab a #6 gouge straight into the outer edges of where the outer wings of the nose will be. Cut back to these cuts with the same tool.
Photo 3
Step 4. Use a 2mm Dockyard gouge to form the ball on the tip of the nose. Use a small #9 gouge to carve away the side of the nose up to the eye sockets.
Photo 4
Step 5. Use a 1/4″ #6 gouge to carve the bottom tip of the nose. Then use a 3mm Dockyard gouge to carve the nostrils.
Photo 5
Step 6. Soften all the sharp edges with a detail knife. Then draw the face layout for reference.
Photo 6
Step 7. Side view.
Photo 7
Step 8. Deepen the eye sockets and the sides of the nose.
Photo 8
NOTE: Substitute alternate tool sizes and shapes as necessary according to the size of your project.
Part 2 of Tony’s Nose Tutorial will follow next week. Stay tuned!
Questions & Comments
Our first question this week comes from Selena Werdon from Reno, Nevada. Selena wants to know the best way to transfer patterns onto basswood eggs. Selena writes:
“I struggle with how to transfer a pattern to a basswood egg. I love the patterns in Lori Dickie’s Quick & Cute Carving Projects book and would like to know the easiest way to align them on the eggs. Keep up the good work on Wood Chip Chatter!”
That’s a great question, Selena! It’s a problem many carvers must struggle with. Because of the curved surface of the egg it is easier to transfer the pattern on section at a time.
I did some research, and after speaking with Donna Spiker, who carves gorgeous basswood eggs, this is what I found out:
Copy or trace your pattern onto a piece of tracing paper then turn it over and trace the pattern on the back side of the paper with a soft pencil. Place your pattern (right side out) against your egg and trace it onto the egg, one section at a time. A pencil, pen or stylus can be used for this. Adjust the pattern as necessary as you go. Cutting the pattern into two or three pieces helps facilitate application of the pattern. Finally, go over your tracing with a fine marker, like a micron 05 fine line marker.
Carver’s Corner
“Carver’s Corner” is the section where you can send in photos of your carvings to have them critiqued by me and get my truthful opinions on what you did right and where you might improve next time. It’s an excellent opportunity to improve your carving skills! Send your photos to carverbobk@woodchipchatter.com.
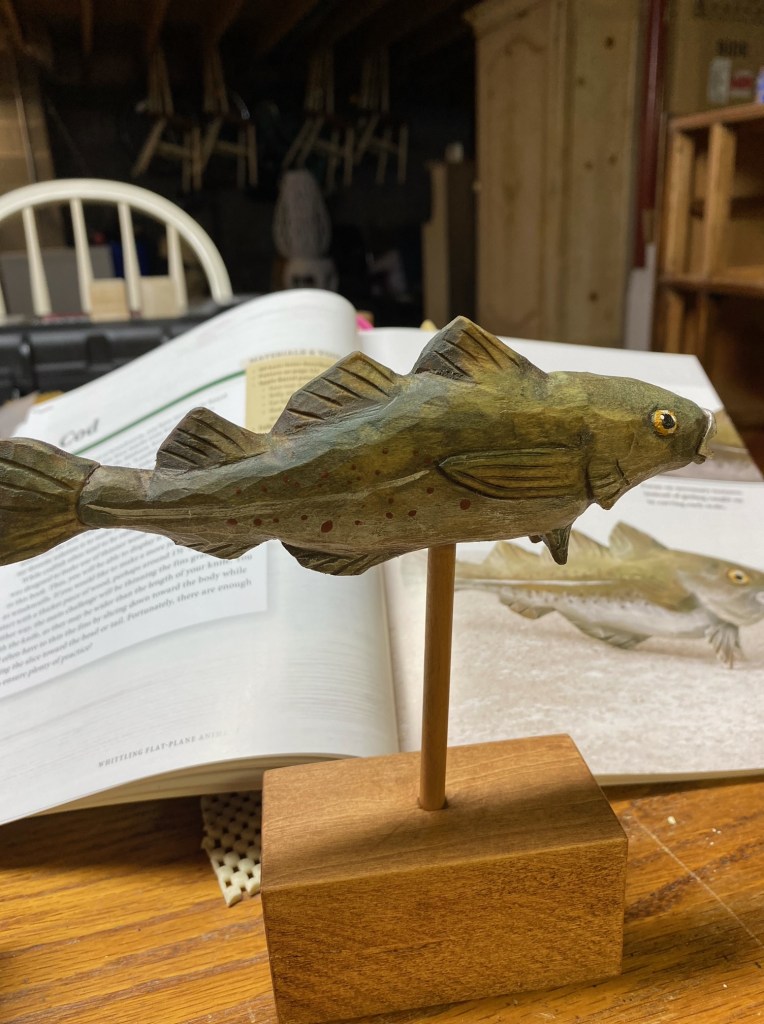
Dean Stewart finished his Cod Fish carving and sent it in for this week’s “Carver’s Corner.”
“Here is my Cod Fish finished. Add it to the carvers corner of you need a photo to discuss.”
Dean Stewart’s Cod – Left side viewDean Stewart’s Cod – Right side view
Thanks for sending in your photos, Dean! As I said last time, I doesn’t look too much like flat plane but boy it sure turned out awesome! To me, it’s a perfect replica of a Cod…right down to the shape, the colors, and the markings. Fantastic job on the eyes! I honestly thought they were glass eyes. I really like it…nice work!
Bill Reifsteck sent in a comment with an interesting observation about Dean Stewart’s Cod Fish carving. Bill says:
“Regarding the fish, flat plane would probably look better on a folk art style fish…”
I think you’re absolutely right, Bill. I definitely agree.
Photo Shop
“Photo Shop” is the section of Wood Chip Chatter where carvers can send in photos of their wood carvings for display. It’s your chance to show off your work…sort of a show and tell. The photos will only be displayed and no comments or critiques will be made. For critiques on your carvings send them in to the “Carver’s Corner.” Send your photos to carverbobk@woodchipchatter.com.
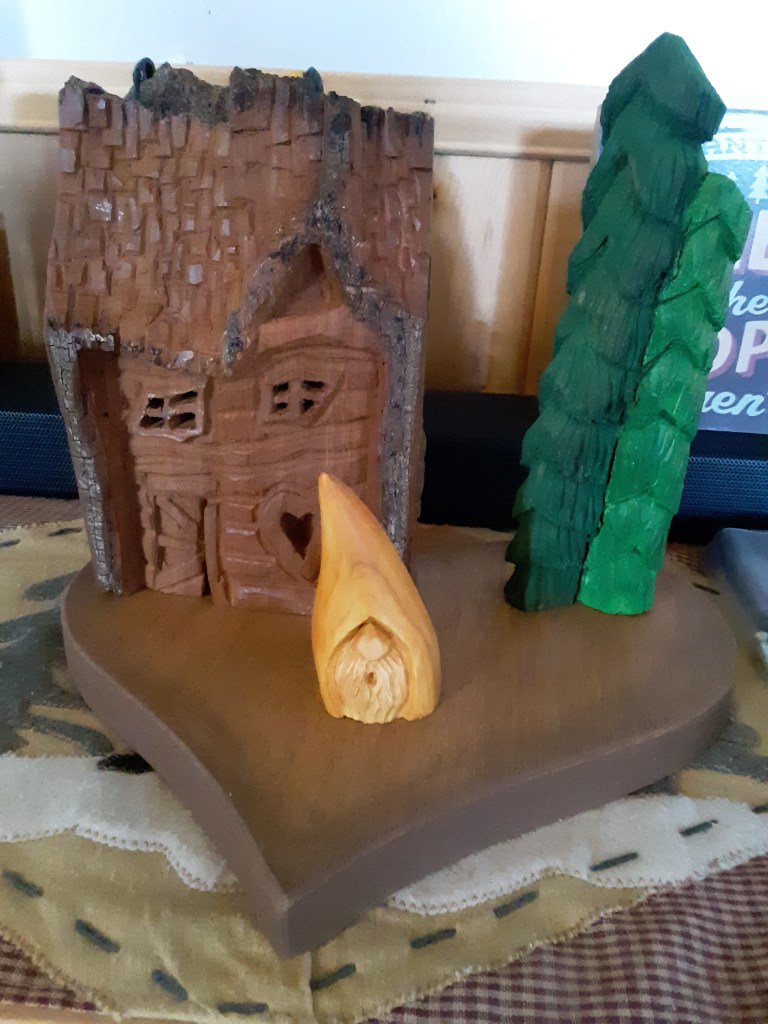
Our first entry to the “Photo Shop” this week comes from Mary Reifsteck who carved a beautiful cottonwood bark castle:
Excellent job, Mary! I like all the stone work you carved, and the base you added.
Our next entry is from Nicky Foley who carved two outstanding Santa ornaments:
Nicky Foley’s Santa ornaments
Amazing job, Nicky! Great facial detail.
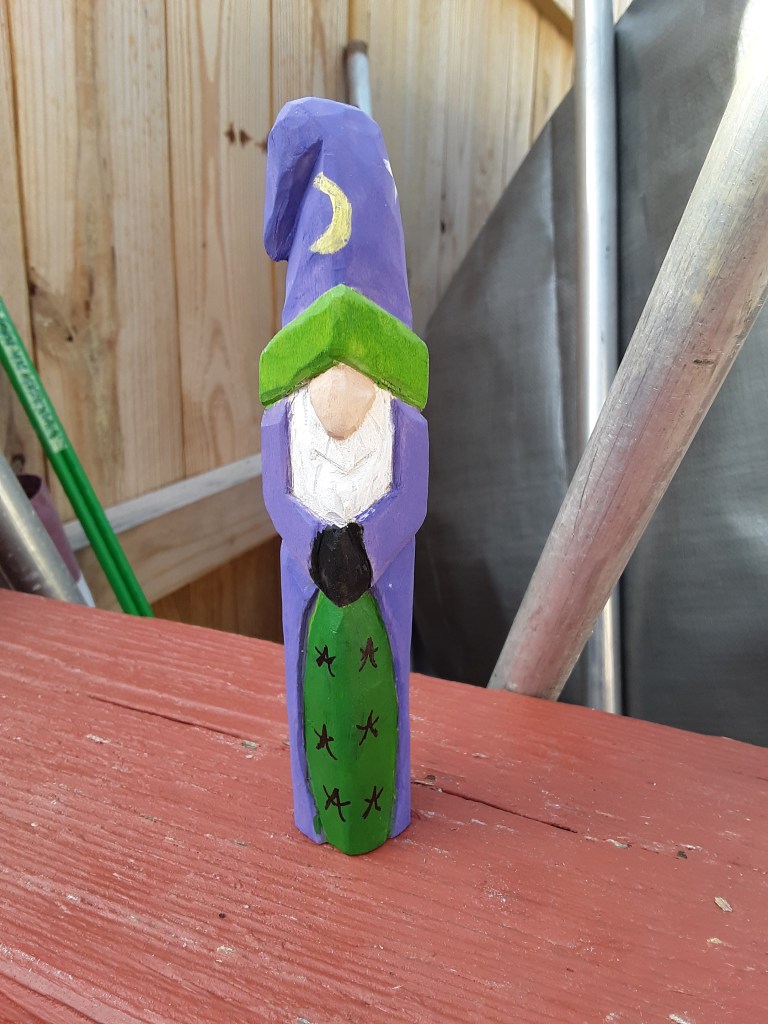
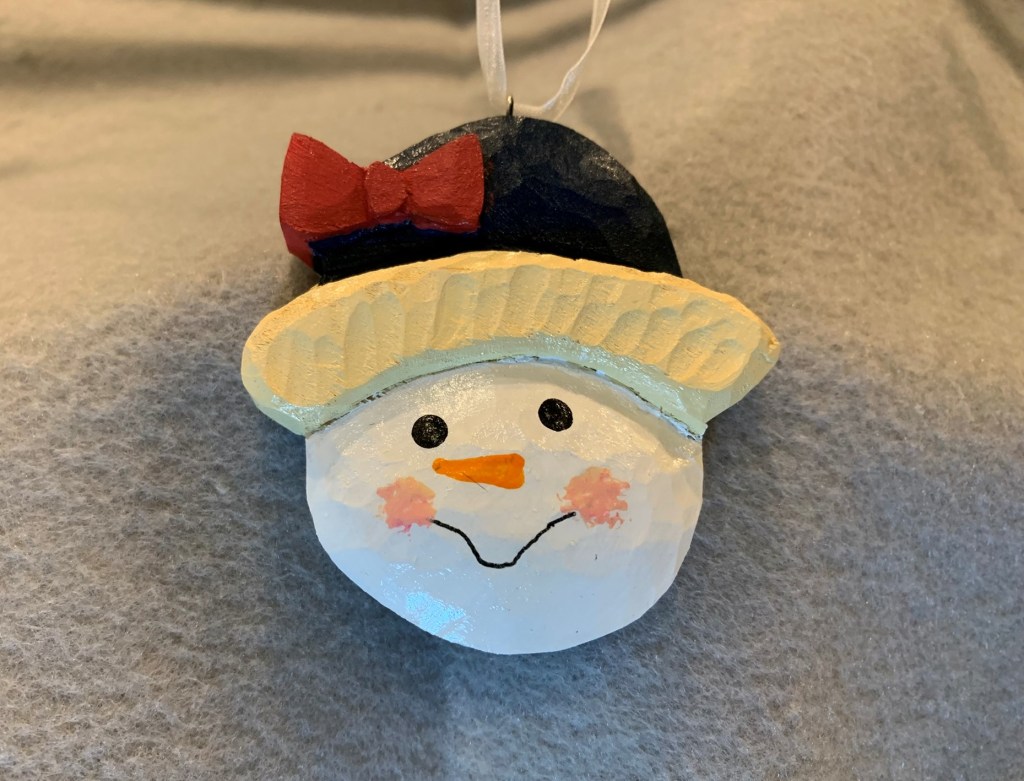
Next we have two entries from my good friend, Phyllis Stone from Pennsylvania. Phyllis carved a Quick Wizard from my article in Woodcarving Illustrated 2017 Spring issue #79, and a Simple Snowman ornament that she personalized from my article in Woodcarving Illustrated 2021 Winter issue #97.
Nice job, Phyllis! I like how you personalized the snowman’s hat.
Free Pattern
News & Announcements
The International Association of Woodcarvers has upcoming Zoom meetings on the following Saturdays at 3PM EST with special guest presenters. Check them out…
Zoom: 310-460-3575
Schedule:
3/26 – Cam Merkle – Razortip
4/2 – Steve Tomashek
4/9 – Joe You
4/16 – Chris Hammack
4/23 – Brett Andrews
4/30 – Cecilia Schiller – Cranklady
5/7 – Ken Kuhar
5/14 – Dana Kababik – Carving Junkies
INTERNATIONAL ASSOCIATION OF WOODCARVERS
COME JOIN US!!!
WOOD CHIP CHATTER NEEDS YOUR PHOTOS!!!
I’m sure you all have some terrific carvings to share in my “Photo Shop” section. Photos of your carvings liven up the blog’s appearance and make it more interesting. Also, my “Carver’s Corner” is a great way to get constructive critiques on your carvings so you can learn where to improve on your next ones. When sending in photos please specify whether you want them for display in “Photo Shop” or if you want me to critique them in the “Carver’s Corner.” Send your photos in to carverbobk@woodchipchatter.com. Thanks!
KEEP THE CHIPS FLYING!!!
Send in your questions and comments so we can keep Wood Chip Chatter active and keep the conversations going! Effective discussions are one of the best ways to learn about the topics that interest you. Remember, there’s no such thing as a dumb question. Plus we would all love to learn about the unique tips, techniques and products YOU use in your woodcarving process. Send your questions and comments to carverbobk@woodchipchatter.com. Thanks!
Keep a sharp edge, and keep on carvin’!
Funny Bone
If 4 out of 5 people suffer from diarrhea, does that mean 1 out of 5 people enjoy it?
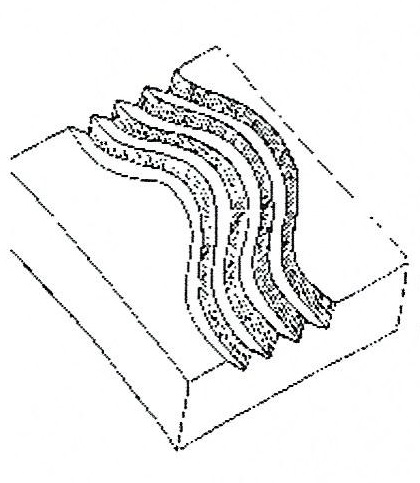
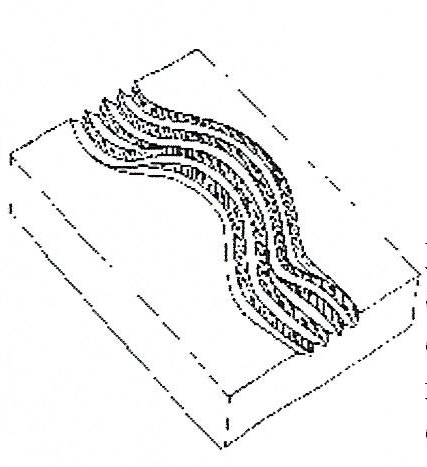
The following techniques will add life to your carvings. This discussion pertains to carving long flowing hair that might be found on a mountain man, or on a woman, but it will work equally well on short hair and/or beards and mustaches, such as on Santas and wood spirits. A V-tool is often the tool of choices, however, a deep U-gouge will also work. The U-gouge will give a softer look and is especially effective on a woman’s hair. If you use a U-gouge, experiment with different sizes. A small U-gouge (the size depends on the size of the carving) will result in a busy look. More experienced carvers do not mix V- and U-cuts on the same piece.
FOUR STEPS TO CARVING HAIR
1. Make long sweeping S-cuts (Fig. 1). A common mistake when carving hair is the use of long straight cuts. Try to avoid this approach. With sweeping S-cuts your carving will take on much more character. Make the direction change in your S-cuts severe. Start by drawing an S on your carving. If it doesn’t look like an S then the lines are too straight.
Figure 1. Parallel or Serpentine Cuts
2. Change lanes periodically (Fig. 2). Pretend you are on a freeway during rush hour. Begin your S-cut adjacent to a previous cut then, after a short distance, merge into the previous cut. Use this technique frequently to add interest to your carving. Be careful not to create a repeating pattern when merging cuts.
Figure 2. Changing Lanes
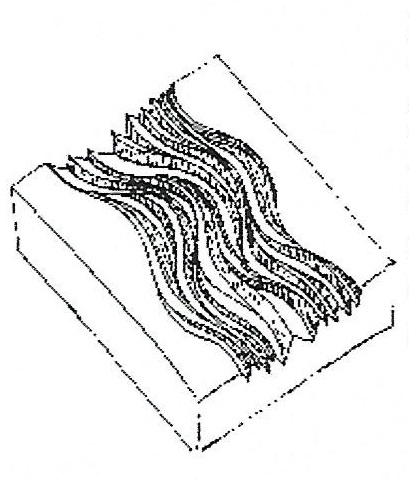
3. Begin some cuts between previous cuts (Fig. 3). For example, when carving long flowing hair use the above techniques first. Start your long sweeping S-cuts at the bottom and work toward the top. After you have four or five cuts, with some lane changing, start a new cut between two previous cuts. You can incorporate lane changing with these cuts as well. Repeat this process as needed with successive cuts beginning nearer the bottom or closer the top. Avoid making a repeating pattern.
Figure 3. Begin Between Previous Cuts
4. Deepen some areas (Fig. 4). After you have carved most or all of the hair using the above techniques, go back over some areas to deepen the flow. This will create locks in the hair. WARNING: Be careful not to develop a distinct pattern doing this. Random placement of the deepened areas will make it look more natural. Also, be sure to carve the entire surface. Try to remove all flat spots between hair strands.
Figure 4. Deepen Some Areas
Once you master the above tips you will probably be quite happy with the results. But if you want to obtain spectacular results, you might try carving spiral curls (Fig. 5).
Figure 5. Hair With Spiral Curls
Questions & Comments
Our first comment this week comes from joebnv responding to last week’s article on “How to Make Dirt.” Joe comments:
“Like the idea of adding color to the 50/50 mix”
We have a question this week from Dean Stewart about how Tony Harris carved the hair on his cowboy last week. Dean asks:
“Can Tony maybe explain how he carved that cowboy’s hair. I’ve never seen anything like that. Its amazing!”
That’s a great question, Dean, and it truly does look amazing. I spoke to Tony and asked him about the hair. This is what he told me:
“I just draw different sizes of circles all over the area giving it a look of a bunch of grapes. Then start with a 5/32″ (4mm) 45° V- tool to cut out the drawn lines/circles. After that I use a detail knife to deepen the corners where the circles touch each other. Then use a 1/8″ (3mm) #11 gouge to dip out the centers of the circles. After that I’ll use a 2mm Dockyard gouge to give random cuts from the dipped out parts to give it the texture.”
The paint process Tony used was a 3-step approach with all Ceramcoat paints. First, he applied a coat of egg shell white. Next, hippo gray was tapped into the deep parts between the “clumps” of hair. Finally, after the paint was completely dried, he dry brushed black over the entire area to give the hair a salt & pepper look.
Our next question comes from Dick Bonewitz from Carmel, Indiana. Dick wants to know about using lacquer before painting.
"Have you ever used spray lacquer to seal a carving before painting? What are your thoughts on it
Thanks
Dick Bonewitz
Carmel Indiana"
Dick, I have never used spray lacquer to seal a carving before painting and don't recommend it. Lacquer is a sealer that dries hard and contains polymers which are basically components of plastic. When you paint over polymers the paint doesn't soak into the wood the way you want it to. You don't want to paint over plastic or a hard finish. You want your paints to soak into the wood.
When you seal your carving with an oil such as Walnut Oil or Mineral Oil you don't have that problem because those oils react much slower as they dry. They don't polymerize as quickly the way some other oils, lacquers and varnishes do, which allows the paint to soak into the wood before the oil is completely dry.
Carver’s Corner
“Carver’s Corner” is the section where you can send in photos of your carvings to have them critiqued by me and get my truthful opinions on what you did right and where you might improve next time. It’s an excellent opportunity to improve your carving skills! Send your photos to carverbobk@woodchipchatter.com.
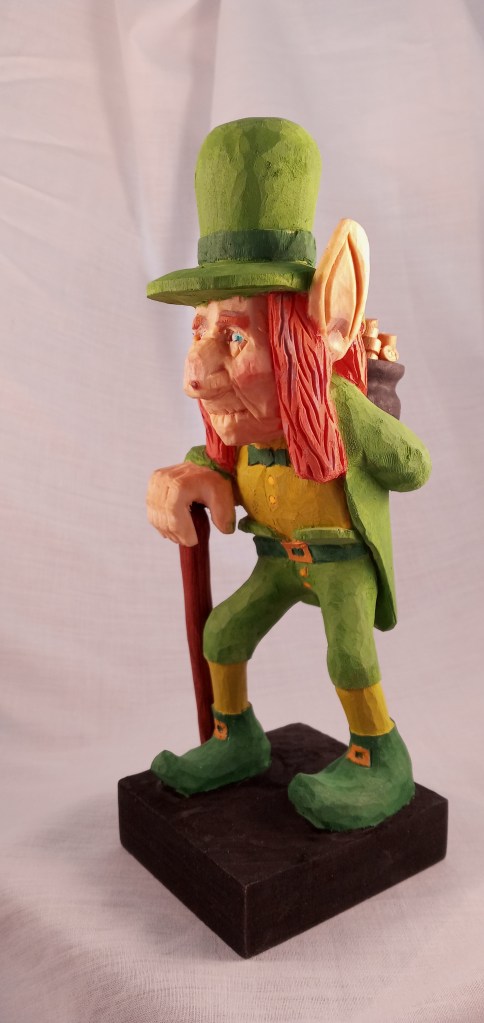
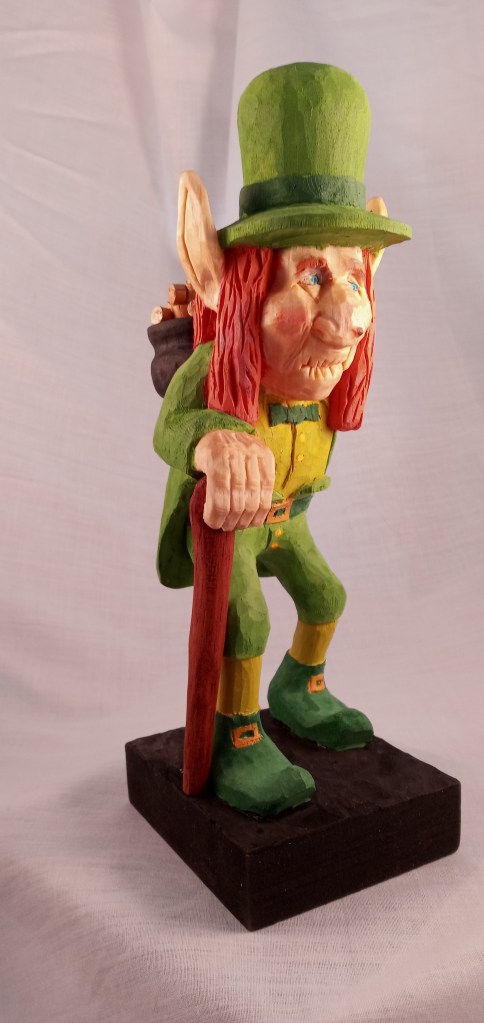
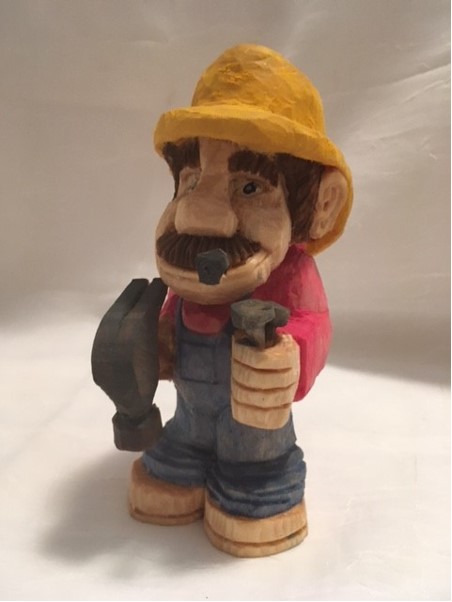
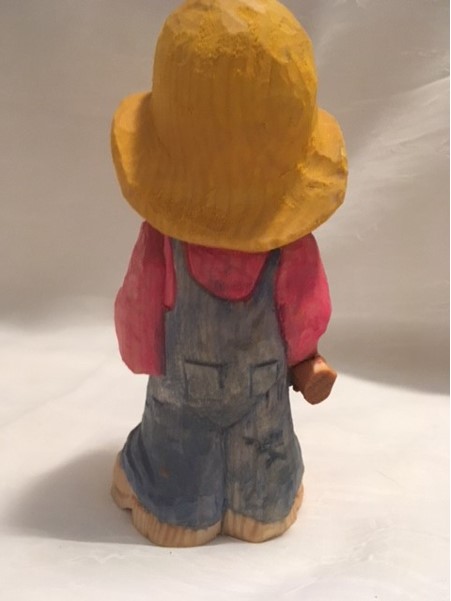
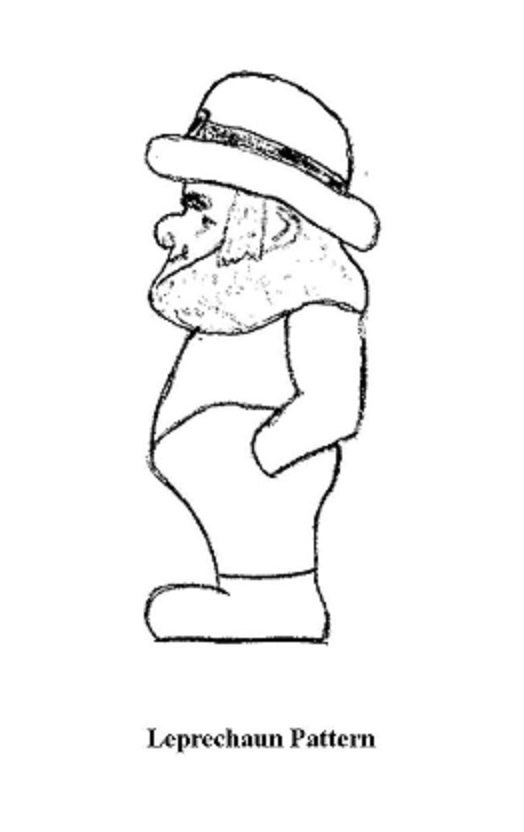
Our first entry to the “Carver’s Corner” this week comes from Michael Mahar who carved an amazing Leprechaun from a Gary Falin roughout. Michael writes: “From a Gary Falin rough out. Gary helped me working on the face at the Renegade Woodcarvers Roundup this past fall.”
I think it’s a very good carving overall, Michael. There are just two main areas that come into my mind as I look at the carving….creases and paint colors. The clothing has no creases or wrinkles. They look too stiff and flat. The use of a gouge to add wrinkles to the pants, jacket and shirt to create shadows will bring depth and life to the carving. Study some pieces of real clothing (even your own) to see all the peaks and valleys that exist and see what I mean. I would also make some cuts/creases across the tops of the shoes.
The other thing, and this is really a matter of personal preference is color choice. I feel there is too much green in the carving(that’s just me). Personally, I would make the hat band and belt black, and maybe also the short belt on the back of the jacket. Again, these are just personal preferences.
Your Leprechaun is a carving you should definitely be proud of.
Our next entry comes from Mike Dize who carved this cool one-snowman barbershop quartet.
“I gave this to my Dad who loved singing in the Barbershop Chorus. I figure….why should the snowman be limited to only one head when he has four round parts to him? He can be a quartet all by himself.”
Hoosier Snowman Quartet by Michael Dize
That’s a really cool carving, Mike…a very novel idea, and quite creative too!
I looked very carefully at your Snowman Quartet and can’t really find anything major to be changed or done differently. If I have to say, perhaps I would have ‘squished’ the balls down together just a bit more. Also, don’t make straight cuts on your mustaches. Use “S” and “C” cuts to give them more character.
I like all the different faces, which are cool snowman faces, and you did a great job on the different mouth’s and eyes. It’s a terrific carving that I’m sure your Dad loved.
Next we have three different carvings Tracy Czajkoski would like to have critiqued:
“Hello Bob,
Love your Wood Chip Chatter and appreciate your effort to put out great articles.
Loved the “HOW TO MAKE DIRT” and can’t wait to try.
Thanks for sharing your carved mule from years ago. I think it’s pretty fabulous!
I would like a couple of my carvings critiqued on Carver’s Corner.
I’ve been carving for 4 years. I live remote and work full time, so it’s hard to get to club meetings for
help and feedback. I learn a lot watching the demo’s on International Association of Woodcarvers, You Tube and magazines.
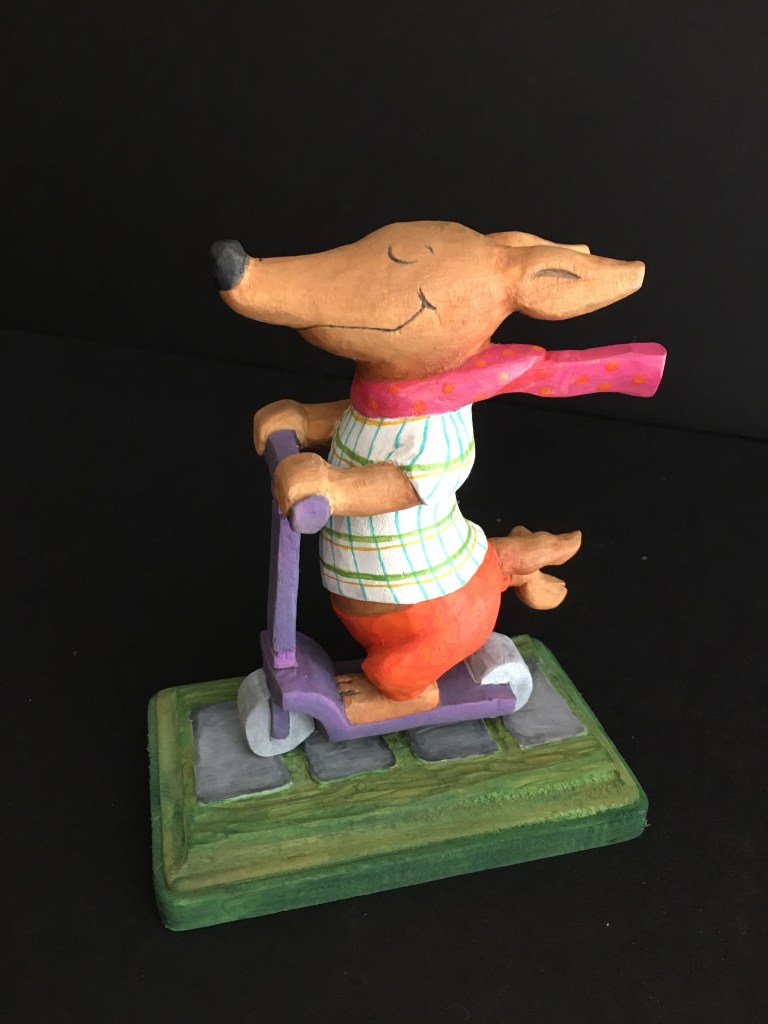
I’m going to attach my: DOG ON A SCOOTER, DAD DOG and CAT ON LOG carvings.
Critique away! I love them, but also feel they can and need to be elevated somehow. More character….something. That’s where you all come in, because I don’t know how. I got one critique from a respected woodcarver who felt my 3D carvings are more like “2D and a half” (and I get what he’s saying) but he never followed up with how to make them more dynamic.
Perhaps my cuts need to be much deeper for more shadow?
Will they pop with antiquing, which I haven’t tried.
I have since learned to carve “hair and fur” which could have helped here.
All feedback welcome. I know that’s how you get better.
Thank-you!
Tracy Czajkoski”
Thank you for sending in some photos of your work, Tracy. I'm happy to critique them. I've never heard of "2D and a half" so I don't know what your other woodcarver friend is referring to. They are nice carvings and appear to be original, but there is something about them that does not look quite right. I think your own critique is a good start though. Deeper cuts to create nice shadows are always recommended, Use a gouge to simulate creases and wrinkles in the clothing to add "life" and make your carvings look more "dynamic." Antiquing will help in some cases, but only if you've made deep cuts in the carving for the antique to sink into. Be very careful with antique! A poor antique job will ruin a perfectly good carving. Experiment on scrap wood first. Deeper cuts and better shadows will give more dimension to your carvings and give them the 3D appearance you're looking for.
If you're going to carve animals, learning to carve hair/fur is a good idea although it's not necessary on all animal carvings (for example, my mule from last week).  You can also create a lot of hair/fur using a wood burner.  Many carvers combine carving and wood burning on the same carving.

Personally, I would also do less sanding, for two reasons.  First, because I hate sanding!  Second, because you want to leave the facets from the knife marks which help give a woodcarving (particularly a caricature) its character.  Lastly, go thinner with your paints.  Thin them to a watery consistency and apply them in layers.  It's better to paint with several thin coats of paint, and build up the color, than to apply one thick coat.
I think you're doing very well with your carvings, Tracy. The concepts are unique and whimsical. The overall execution is good, and each carving shows a lot of "motion."
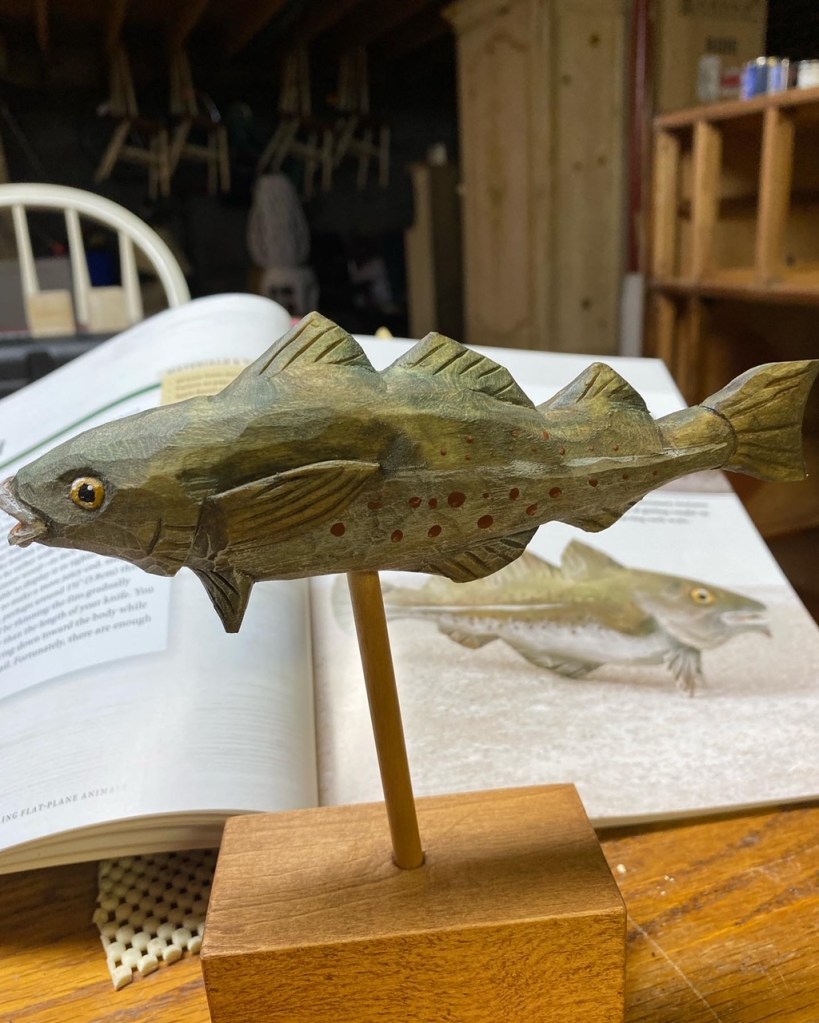
Our final entry to the "Carver's Corner" this week comes from Dean Stewart who carved a flat plane fish from James Miller's book. Dean writes:
"Bob,
Here’s a picture for the Carvers Corner. This work in process fish is from James Miller’s Flat Plane carving book. I have one question. Does it look like a flat plane carving? I struggle with the concept and I think I use too many cuts."
Flat Plane Fish Carved by Dean Stewart
I‘ve never seen a flat plane fish before so I can’t say I know what one should look like. However, it does look like you have too many cuts in there, and you’ve rounded off the figure too much. I struggle with the same problem and have never been able to grasp the concept of flat plane carving. I think the key to flat plane carving is to make long, straight cuts, and not round off the corners of those cuts. A good flat plane carving has a lot of angles on it and it is not particularly smooth. I also think a fish is a harder subject to carve in the flat plane style.
Photo Shop
“Photo Shop” is the section of Wood Chip Chatter where carvers can send in photos of their wood carvings for display. It’s your chance to show off your work…sort of a show and tell. The photos will only be displayed and no comments or critiques will be made. For critiques on your carvings send them in to the “Carver’s Corner.” Send your photos to carverbobk@woodchipchatter.com.
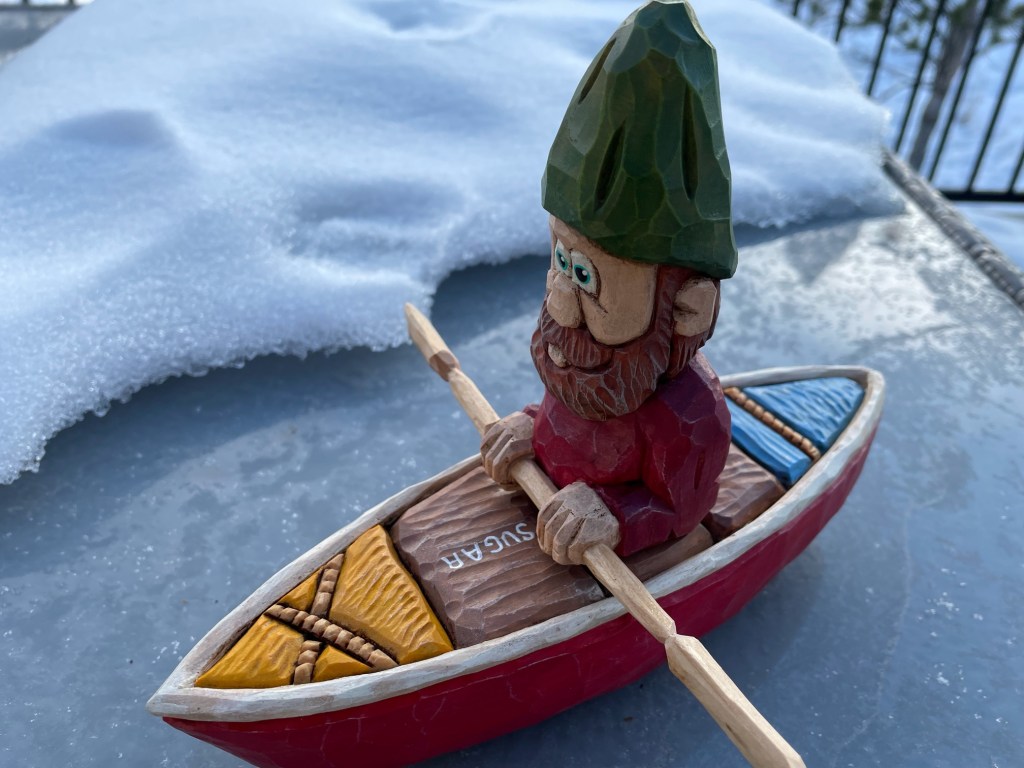
Our first entry to the “Photo Shop” this week comes from Heath Paull who carved a really cool Gnome in a kayak. Heath writes:
“Heavily Doug Linker inspired, gnome ready or some spring deliveries.
Heath”
Excellent carving, Heath! Clean work and nice detail.
“Thanks! Happy to contribute in some way.
Really enjoying your newsletter, thanks for all the hard work and sharing.
H”
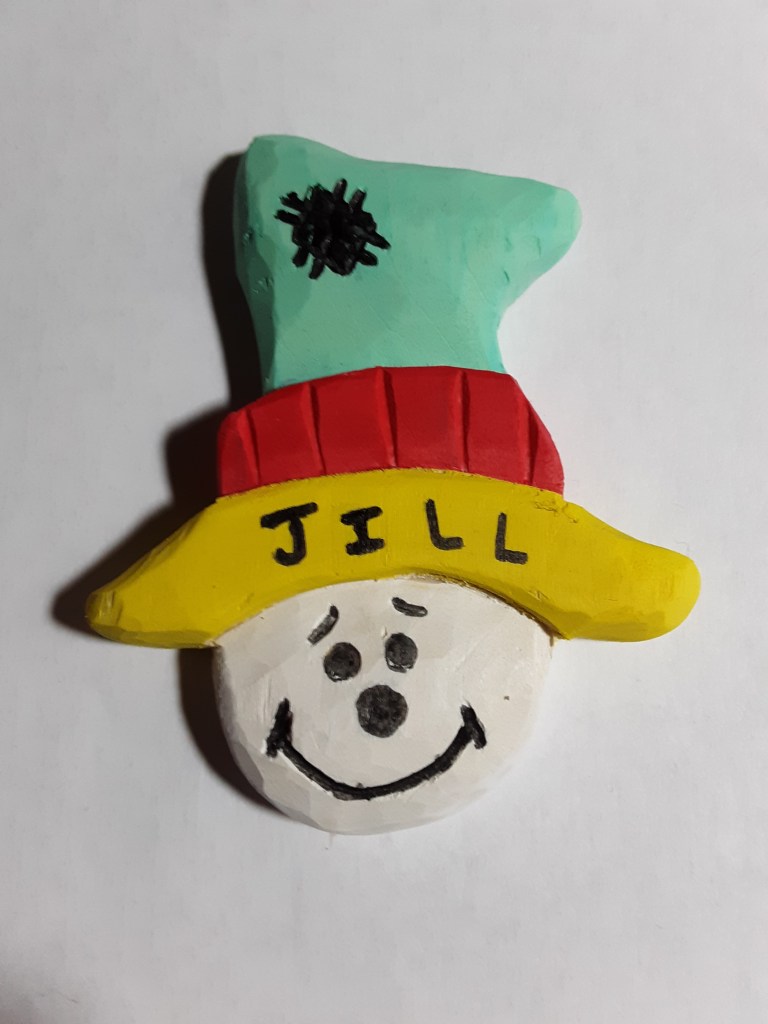
Our next entry comes from Jim Johnson of Michigan who made a nice modification to my ‘Simple Santa Ornament’ from my article in the Woodcarving Illustrated 2021 Winter Issue #97.
“Bob – I took your ‘Simple Snowman Ornament’, and modified it to be a snow lady for my granddaughter. I think it turned out pretty well.
Since you said the traffic had slowed down, I thought I would send this.
I enjoy your blogs – thanks for doing this.
Jim Johnson – Michigan”
Jim Johnson’s Snow Lady
I love it, Jim! It’s a great change up to my original. Thank you so much for sending it in! I greatly appreciate your contribution and I’m glad you’re enjoying Wood Chip Chatter.
Next, we have photos of two carvings Tim Sisko carved of “Hammerin’ Hank” from Kevin Applegate roughouts. “Hammerin’ Hank” is featured in the current 2022 Spring issue of Woodcarving Illustrated:
“Bob, attached are several photos of the carvings I recently completed from roughouts by Kevin Applegate. Hammerin’ Hank was featured in Woodcarving Illustrated Spring issue 2022. I would appreciate your critique of them and if you would like to they could be used in your “Photo Shop “
Thank you for your input.
Tim Sisko”
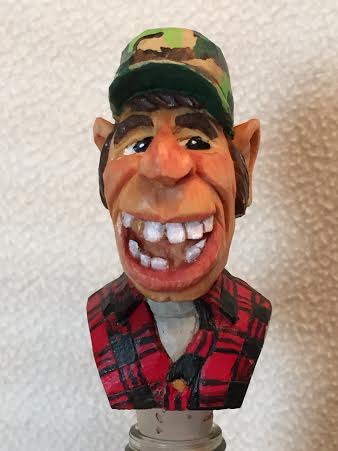
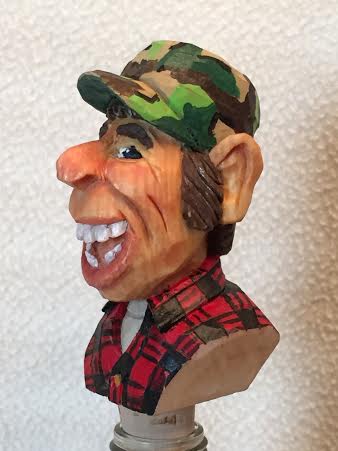
Tim Sisko’s “Hamerin’ Hank” with Yellow ShirtTim Sisko’s “Hamerin’ Hank” with Red Shirt
Thanks for the photos, Tim! I always appreciate getting them. Both of your carvings are fantastic, and look very much like the original carved by Kevin Applegate. They are well carved with clean cuts, and well painted. There are just a couple minor observations I made, though, that you might want to keep in mind for next time:
Make the bridge of the nose just a bit narrower and push it back into the face a little bit more. The bridge of the nose should be pushed further back into the face than the nostrils.
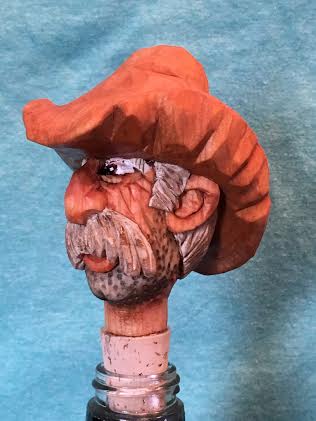
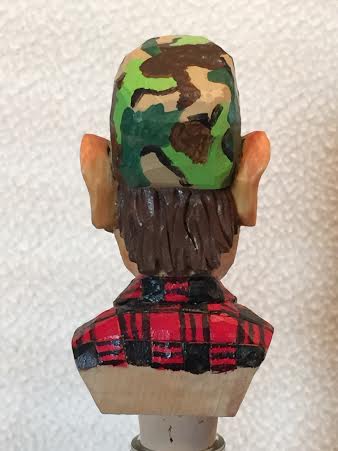
The hair flow on the sideburns is incorrect (flows in the wrong direction). The hair should go from the upper right to the lower left on the right sideburn, and from the upper left to the lower right on the left sideburn, if the makes any sense (refer to the two photos below).
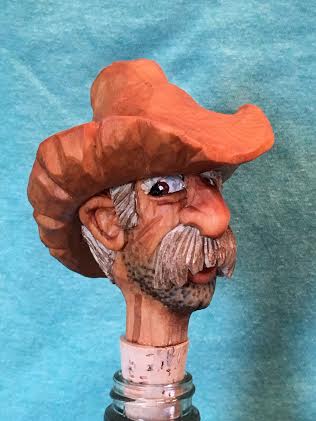
“Louisiana Luke” Bottle Stopper – Right Side“Louisiana Luke” Bottle Stopper – Left Side
In reality, the eye brows don’t touch the sideburns, although these are caricatures where ‘anything goes’ so they look good the way they are.
Overall your carvings are terrific. The carving work and painting are both well done, and I particularly like the way you carved the hammers.
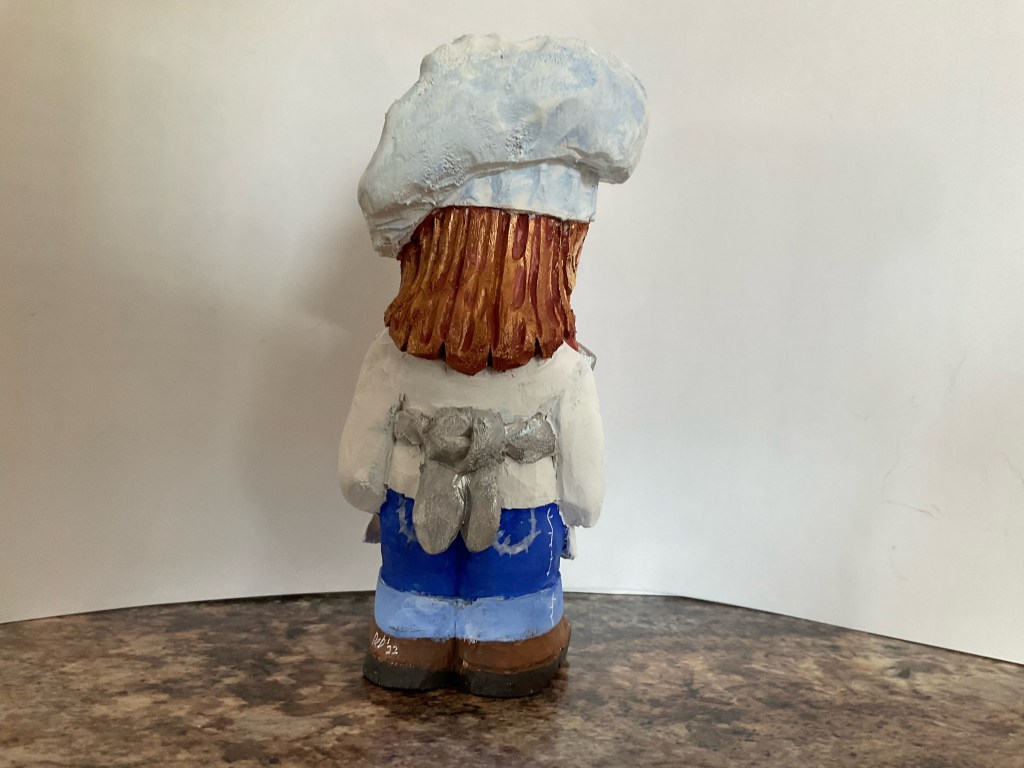
Finally we have an amazing Chef Santa carved by Wayne Arrowsmith and painted by his good friend, Deb. Wayne writes:
"Good morning Bob,
I am attaching pics of my Chef carving. It’s a “Scott Carvings” rough out that I purchased and then once carved I handed it over to a good friend who wanted to paint it for me. Yes it was supposed to be a Chef Santa but Deb put her own creative spin on the painting.
Thank you for the well written article from last week on making dirt. Very informative!"
Chef Santa – Front ViewChef Santa – Left Side ViewChef Santa – Back View
Thanks for the photos, and the kind words about my article from last week. Both are greatly appreciated. Your Chef Santa looks terrific! You and Deb make a great team!
News & Announcements
WOW! I’m blown away by the overwhelming amount of contributions to Wood Chip Chatter this week! I appreciate it more than you know. It’s contributions like these that drive the engine which makes Wood Chip Chatter work. I hope more and more of you will continue to contribute as we go forward. Thank you so much for your support!
Lancaster County Woodcarvers Show
It was a real pleasure to meet and chat with so many of you at the Lancaster County Woodcarvers Show last weekend. It’s always nice to finally match a face with a person you’ve been corresponding with over the internet for so long.
Despite the blizzard-like conditions on Saturday the show was a giant success. Even in the snow storm on Saturday 150 guests managed to make it to the show, and on Sunday with much nicer weather 400 guests came in.
The carving competition on Saturday was also a big success and I’m humbled to say that I managed to win 4 ribbons, which included 2 First Place awards. The carving seminars which went on throughout the show were very well attended, and there were some terrific prizes handed out as door prizes as well as in the silent auctions. If you missed the show this year, make plans to be there next year (March 11 & 12)! This Blog ran kind of long so perhaps I will be able to put some show photos in next week’s Blog.
The International Association of Woodcarvers has upcoming Zoom meetings on the following Saturdays at 3PM EST with special guest presenters. Check them out…
Many times when you make a carving (particularly a small one) you want to put it into a diorama, or little scene with added accessories such as docks, fences, and other little carvings to go with it. If your scene is going to be set on the ground you will probably want to use some kind of sand or dirt to make it look more realistic. The tutorial below shows you how to make realistic looking dirt which will really add to your diorama’s authenticity.
How to Make Dirt
1. Take a cup of coffee grounds, add 1/4 cup white fluffy beach sand. Mix completely while it is dry.
2. Mist spray very lightly, do not let it clump. Fluff up the mix.
3. Using a teaspoon, place the mix where you need on your carving.
4. Next mist lightly to settle it down to get it ready for the glue mix.
5. Mix 50/50 Elmer’s white glue and water. Mix, do not shake, you do not want bubbles in it.
6. Take a few drops of burnt sienna acrylic paint and mix. It should look like chocolate milk.
7. Take an eye dropper or pipette and drop the glue on the “new earth”, and make sure you do not allow it to get beyond the edge of your dirt.
8. Let dry overnight.
The great thing is you can come back and add more dirt if needed and it will glue in place very well. The coffee will stain the sand and you get a pretty good representation of the real thing.
Reader’s Comments
There are no comments or questions from our readers this week.
Carver’s Corner
“Carver’s Corner” is the section where you can send in photos of your carvings to have them critiqued by me and get my truthful opinions on what you did right and where you might improve next time. It’s an excellent opportunity to improve your carving skills! Send your photos to carverbobk@woodchipchatter.com.
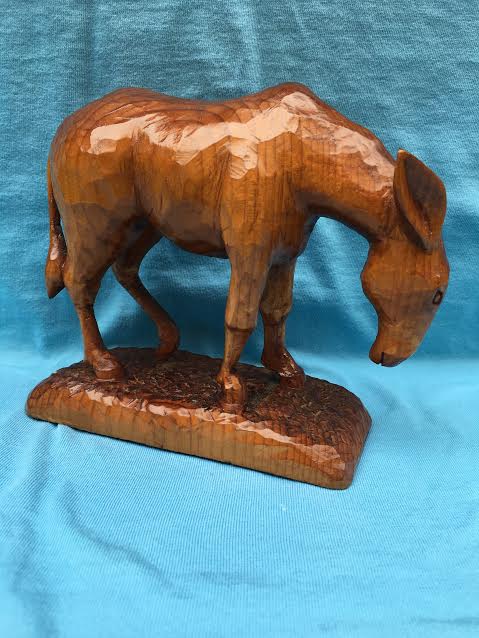
Since we don’t have any entries to the “Carver’s Corner” again this week I’m sharing some photos of a mule I carved about 50 years ago when I first started out in wood carving. I hope you like it.
Photo Shop
“Photo Shop” is the section of Wood Chip Chatter where carvers can send in photos of their wood carvings for display. It’s your chance to show off your work…sort of a show and tell. The photos will only be displayed and no comments or critiques will be made. For critiques on your carvings send them in to the “Carver’s Corner.” Send your photos to carverbobk@woodchipchatter.com.
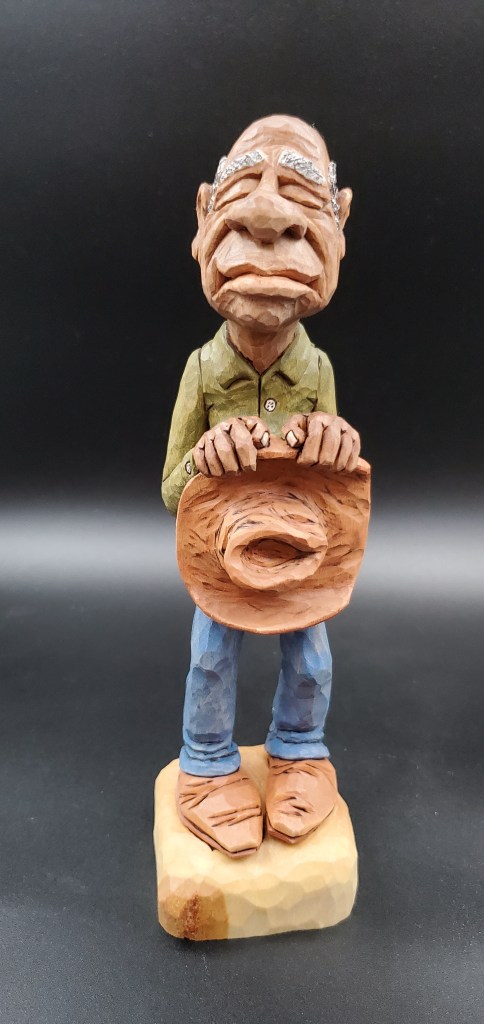
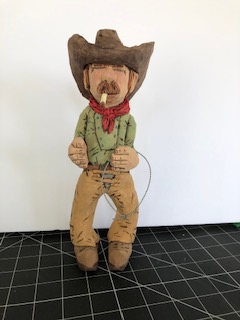
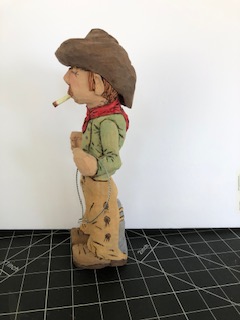
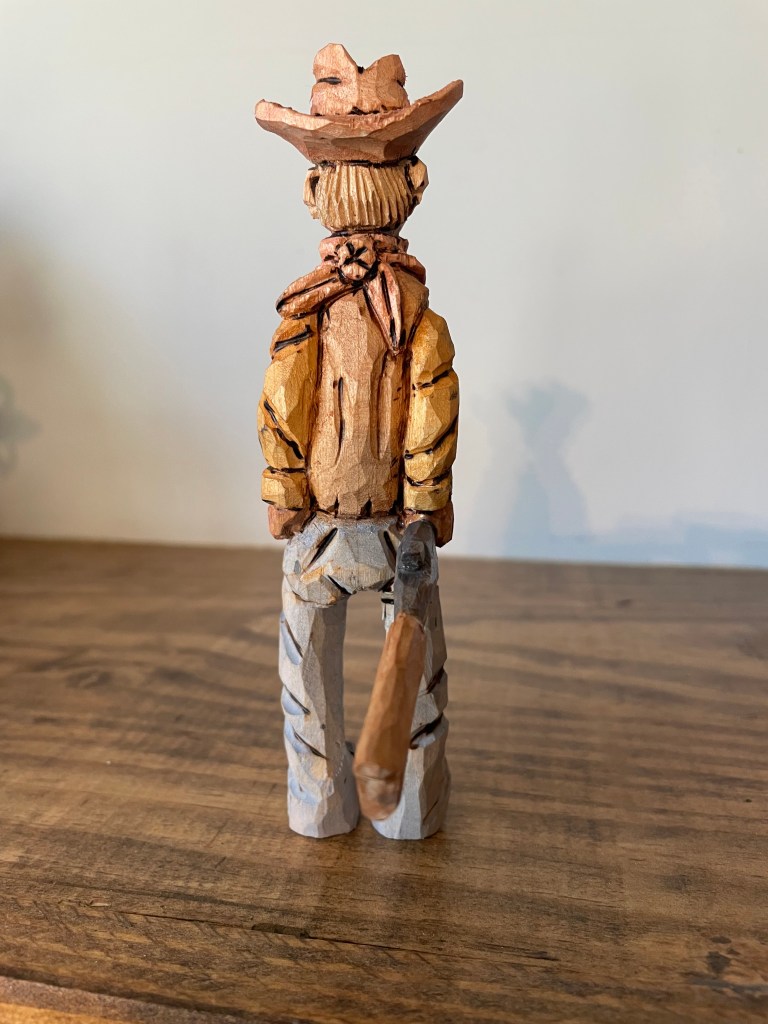
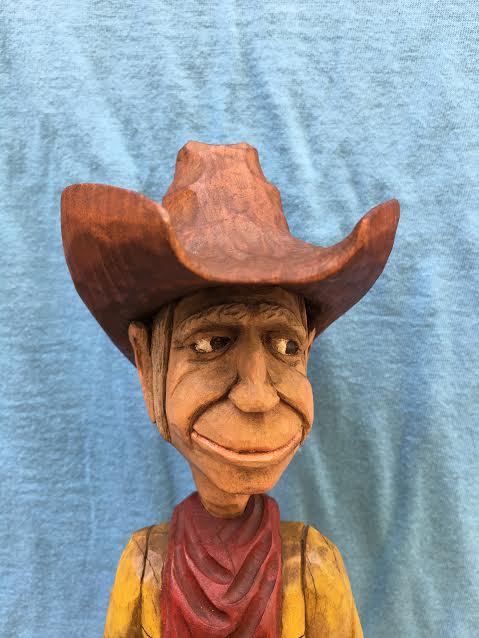
This week we have an entry to the “Photo Shop” from my good friend, Tony Harris, of a praying cowboy he recently carved.
That’s an exceptional job you did on that carving, Tony! The detailed carving and coloring are spot on! Great work, my friend!
Free Pattern!
News & Announcements
THIS WEEKEND!!!
The Lancaster County Woodcarving & Wildlife Art Festival at Millersville University, Millersville, PA. March 12 & 13; Sat. 10 to 5, Sun. 10 to 4. Located in the Student Memorial Center, 101 Shenk Lane on your GPS (the entrance is across the street from this address). Masks are optional but not required as previously announced. I will be at Tables 67 & 68, so stop by and chat for awhile!
The International Association of Woodcarvers has upcoming Zoom meetings on the following Saturdays at 3PM EST with special guest presenters. Check them out…
Zoom: 3104603575
Schedule:
3/12 – Roger Beane
3/19 – Ray Meyer
3/26 – Cam Merkle – Razortip
4/2 – Steve Tomashek
4/9 – Joe You
4/16 – Chris Hammack
4/23 – Brett Andrews
4/30 – Cecilia Schiller – Cranklady
5/14 – Dana Kababik – Carving Junkies
INTERNATIONAL ASSOCIATION OF WOODCARVERS
COME JOIN US!!!
The Jersey Hills Wood Carvers (JHWC) club is a small but growing group of wood carvers sharing their time, knowledge and joy of woodcarving. The JHWC generally meets from 7:00 pm to 9:00 pm on the 1st, 3rd and 5th Thursday of each month (when school is in session) at the Jefferson Township High School wood shop classroom.
Membership is “FREE” and open to anyone interested in woodcarving regardless of their ability.
Contributions to “Carver’s Corner” and “Photo Shop” have wistfully slowed to a crawl. I’m sure you all have some terrific carvings to share. Photos of your carvings not only liven up the Blog’s appearance but they are a huge part of what makes Wood Chip Chatter interesting.
“Carver’s Corner” is a great place to get constructive critiques on your carvings so you can learn where to improve on your next ones. “Photo Shop” is a great place to show off your work!
Your questions, comments and photos are what Wood Chip Chatter is all about. They are all a vital part of what makes this Blog what it is. Send them in to carverbobk@woodchipchatter.com and let’s keep the wood chips flying!
Research shows that tree species now growing in North America existed long before the country was inhabited by man: maples as long ago as sixty million years; and poplars, oaks, pines, elms and possibly other trees grew here during the Ice Age. Greenland is named because of its trees, to differentiate from Iceland, which is almost without trees.
There are about 180 different species of trees in the United States that may be ranked as commercially important, although only relatively few species of wood are ordinarily readily available except in large cities.
The individual states of the United States have long recognized the importance of trees, and each state has selected a particular tree with which to identify itself. This has been done by acts of the state legislatures, by garden clubs, by vote of the people, or, in some cases, because it is the most prominent or most valuable tree growing in the state. New York State took the lead in 1889 in selecting the sugar maple as its official tree, and was followed by the other states.
Below, the states are listed alphabetically with the common name of the tree:
STATECOMMON NAME
Alabama – Longleaf pine
Alaska – Sitka spruce
Arizona – Blue paloverde
Arkansas – Shortleaf pine
California – California redwood
Colorado – Blue spruce
Connecticut – White oak
Delaware – American holly
District of Columbia – None (although sycamore and black cherry are mentioned on some lists)
Florida – Cabbage palmetto (cabbage palm)
Georgia – Live oak
Hawaii – Kukiu (candlenut)
Idaho – Western white pine
Illinois – Bur oak
Indiana – Tulip tree (yellow poplar)
Iowa – American black walnut
Kansas – Cottonwood
Louisiana – Southern magnolia
Maine – Eastern white pine
Maryland – White oak
Massachusetts – American elm
Michigan – Eastern white pine
Minnesota – Red pine (also called Norway pine)
Mississippi – Southern magnolia
Missouri – Dogwood
Montana – Ponderosa pine
Nebraska – American elm
Nevada – Singleleaf pinyon pine (aspen is also sometimes referred to as the state tree)
New Hampshire – White birch
New Jersey – Northern red oak
New Mexico – Pinyon pine
New York – Sugar maple
North Carolina – None (although yellow poplar is sometimes mentioned)
North Dakota – American elm
Ohio – Buckeye
Oklahoma – Eastern redbud
Oregon – Douglas fir
Pennsylvania – Eastern hemlock
Rhode Island – Red maple
South Carolina – Cabbage palmetto
South Dakota – Black Hills spruce
Tennessee – Tulip tree (yellow poplar)
Texas – Pecan
Utah – Blue spruce
Vermont – Sugar maple
Virginia – Dogwood
Washington – Western hemlock
West Virginia – Sugar maple
Wisconsin – Sugar maple
Wyoming – Balsam poplar (sometimes referred to by the general name “cottonwood”)
Source: “Know Your Woods” by Albert Constantine Jr.
Reader’s Comments
I‘m happy to see we have a good number of reader’s comments and questions this week. As you know, it’s your contributions, like these that help make Wood Chip Chatter the informative Blog it is.
Our first comment this week comes from Heath about last week’s Blog on “Cleaning Paint Brushes.” Heath writes:
“Great info on cleaning brushes, thanks!”
I‘m glad it was helpful, Heath!
Our next comment comes from my friend Stephen Campbell about an older Blog on “Human Face & Body Proportions.” Stephen says:
“Thanks for the anatomy charts. I’ve always had problems with proportion and alignment such as eyes.”
You’re welcome, Stephen! I hope many other readers found it helpful as well.
Stephen also commented on how much he enjoying carving Gnomes lately:
“Hey Bob!
I have fancied carving gnomes since I painted a male gnomes with my grandsons in Wichita at a Hobbie shop there. I liked your article about a female gnomes and will try to carve one. Maybe a grandma gnomes!
I really enjoy your Wood Chip site!”
Gnomes are fun subjects for wood carvers.There are lots of ways you can change them up and female Gnomes add more carving options. I‘m glad you’re enjoying Wood Chip Chatter!
This next entry is from my good friend Phyllis Stone who want to tell us about the Christmas tree ornaments he little group carves each year:
“Hi Bob,
A small carving group I’m in, in Lancaster, in conjunction with the Lancaster County Woodcarvers, carve ornaments every year and decorate a small Christmas tree. We then donate the tree to our local hospice and the patients and family are given the opportunity to take an ornament and keep it as a remembrance. It’s been very popular for the last 12 years. I think between the 2 groups we carve about 100 or so ornaments each year.
It might be something other groups might be interested in doing. Oh, hospice always gives us the tree back so we don’t forget to carve ornaments the following year.
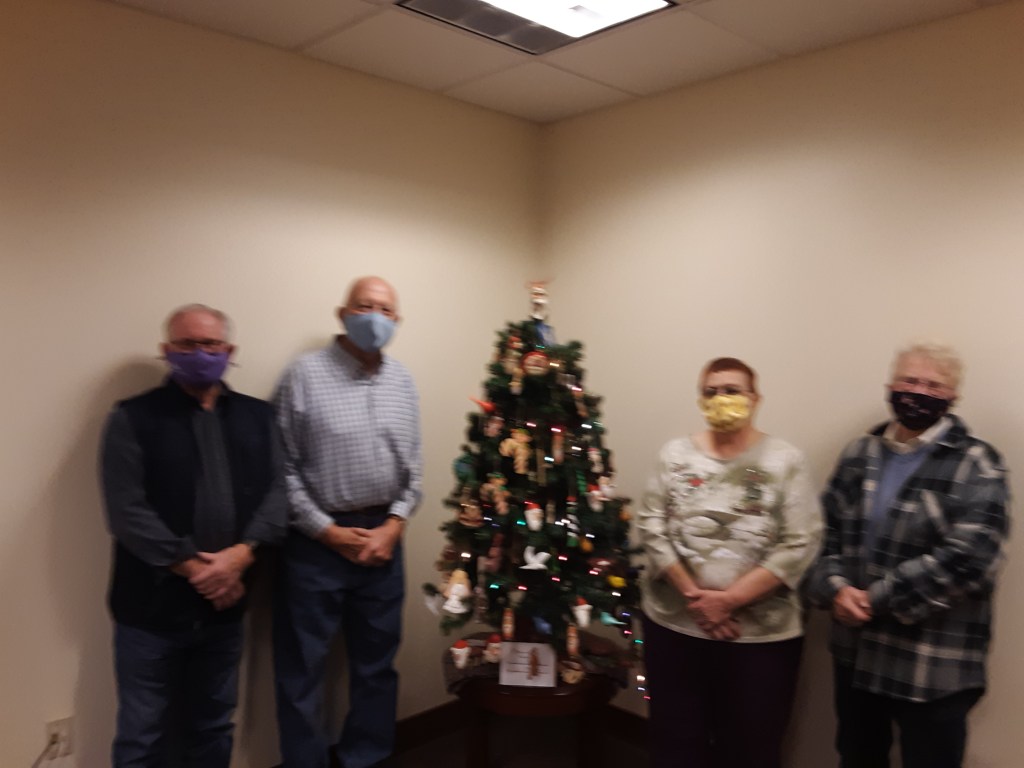
The picture is just of a few of us that go deliver the tree and decorate it on site.”
Phyllis’s Group’s Christmas Tree
What a fun activity for any wood carving club or small group to do, and for an especially good cause right before the holidays. Unfortunately, your picture is blurry but we get the idea. Kudos to you and your group of carvers!
Our last entry comes from Robert Nesbitt in response to last week’s Blog on “Cleaning Paint Brushes.” Robert writes:
“Bob, Another great lesson on care and cleaning of paint brushes. I also use the Master’s product and clean the brushes as you described. Like you I try to use good brushes as well, so my question to you is what brand to you prefer? I also have been finishing my carvings with the mineral oil process as you wrote about. I need to get some photos out to you as well. Regards, RJ Nes Carver”
Thank you for your kind comment, Robert! It is much appreciated.
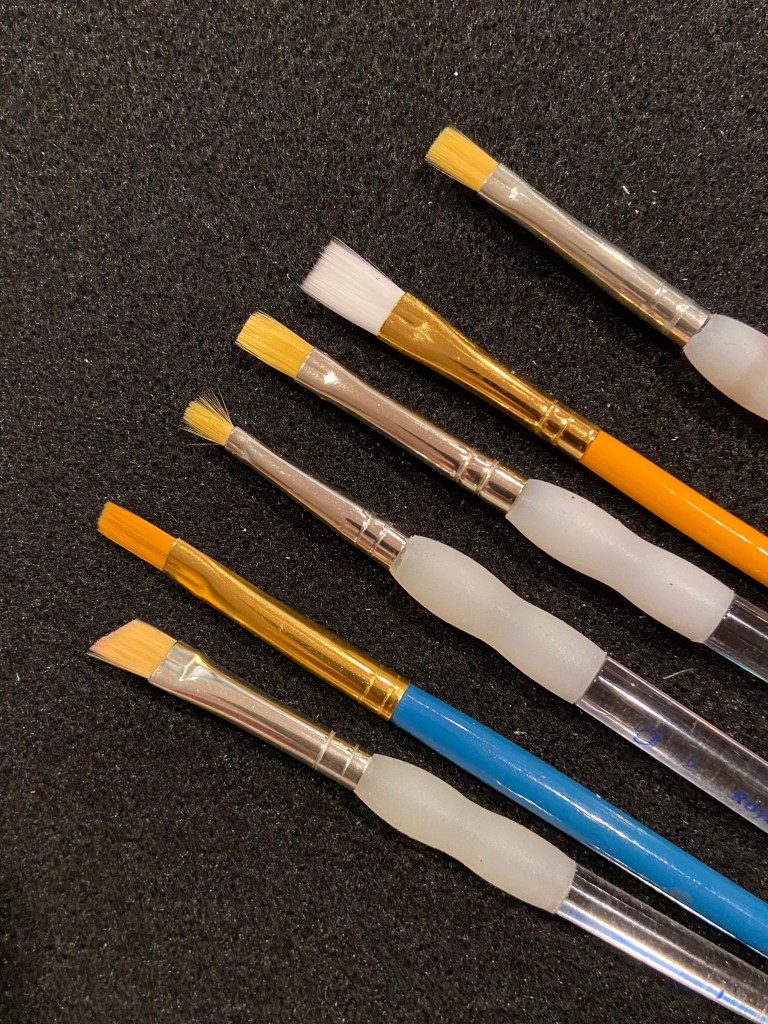
The brushes I use are kind of middle of the road in price. You don’t need real expensive brushes as wood tends to be rough on them, but I don’t like the really cheap ones that often come in packaged sets. My favorite brand of brush is “Royal & Langnickel”, which I get in the craft store (Michael’s).
Royal & Langnickel paint brushes
These brushes have synthetic (polyester) hairs, which are the best kind to be used with acrylic paints, and come with a clear plastic, comfortable soft-grip handle. They are available in many sizes and shapes such as shader, liner, spotter, round, etc.
Some natural hair brush brands I’ve used are “Golden Natural” and “Simply Simmons”, but the natural hair brushes don’t hold up as well as the synthetic ones and tend to get ratty quickly.
Carver’s Corner
“Carver’s Corner” is the section where you can send in photos of your carvings to have them critiqued by me and get my truthful opinions on what you did right and where you might improve next time. It’s an excellent opportunity to improve your carving skills! Send your photos to carverbobk@woodchipchatter.com.
Since we don’t have any entries to the “Carver’s Corner” this week I thought I would just show you one of my elf ornament carvings, “Lars”, which was a top ribbon winner in both, regional and national competitions. I hope you like it.
“Lars”
Photo Shop
“Photo Shop” is the section of Wood Chip Chatter where carvers can send in photos of their wood carvings for display. It’s your chance to show off your work…sort of a show and tell. The photos will only be displayed and no comments or critiques will be made. For critiques on your carvings send them in to the “Carver’s Corner.” Send your photos to carverbobk@woodchipchatter.com.
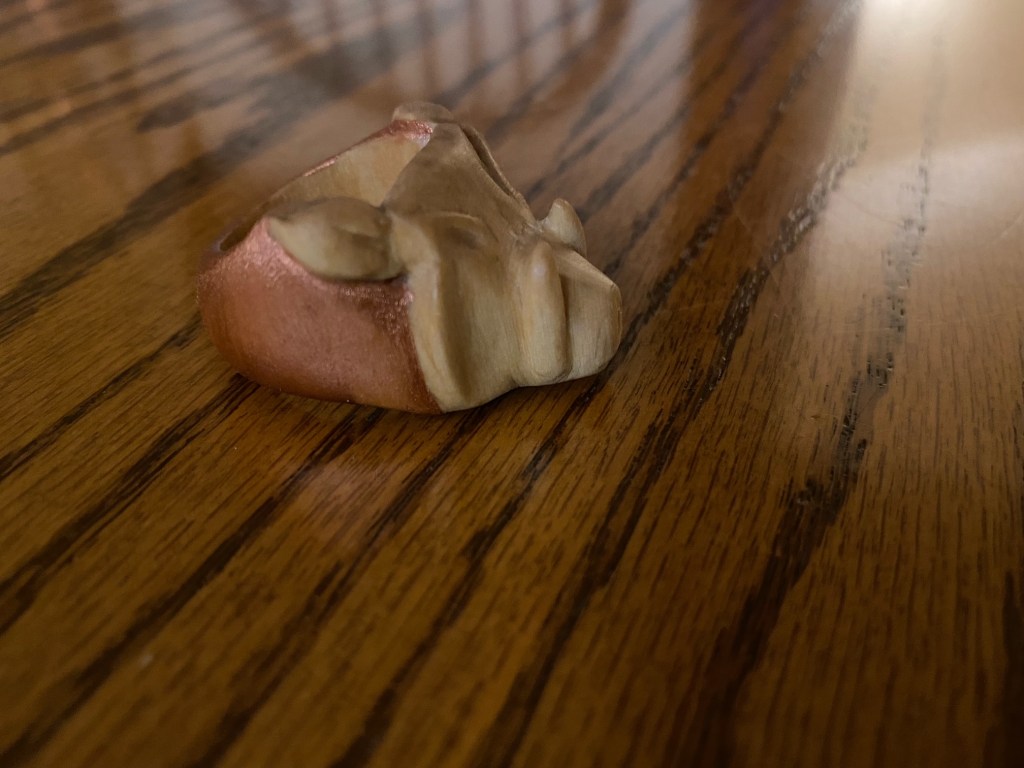
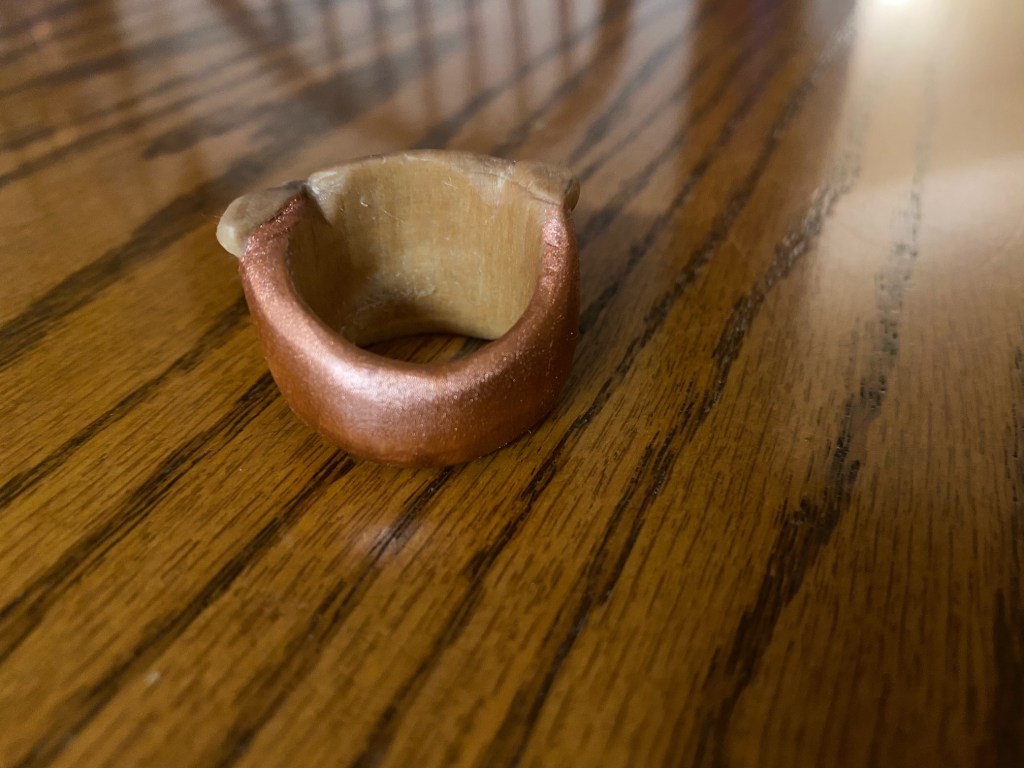
Our first (only) entry to the “Photo Shop” this week comes from Dean Stewart who carved a beautiful ring for a friend. Dean writes:
“Bob
This boar carving is a ring. It’s a gift for a medieval re-enactor. The boar is their insignia. I originally intended to paint it but I didn’t think I could give it the look I wanted so the face stayed natural and the band is painted copper. Prior to painting is was coated in mineral oil. Once painted and dry it was finished with Howard’s Feed and Wax.”
Dean’s Boar Ring – front viewDean’s Boar Ring – side viewDean’s Boar Ring – back view
It looks great, Dean! Nice detail in such a small carving. I’m sure you friend appreciated it.
News & Announcements
I would like to welcome all the new folks who became Wood Chip Chatter subscribers in the past month. I’m happy you have decided to join and experience all the unusual, fun and interesting information that will come your way every week.
Welcome aboard and thank you for subscribing!
Announcing that I will be at the Lancaster County Woodcarving & Wildlife Art Festival at Millersville University, Millersville, PA. March 12 & 13; Sat. 10 to 5, Sun. 10 to 4. Located in the Student Memorial Center, 101 Shenk Lane on your GPS (the entrance is across the street from this address). Masks are optional but not required as previously announced. I will be at Tables 67 & 68, so stop by and chat for awhile!
The International Association of Woodcarvers has upcoming Zoom meetings on the following Saturdays at 3PM EST with special guest presenters. Check them out…
Zoom: 3104603575
Schedule:
3/5 – Rich Schneider
3/12 – Roger Beane
3/19 – Ray Meyer
3/26 – TBD
INTERNATIONAL ASSOCIATION OF WOODCARVERS
COME JOIN US!!!
WOOD CHIP CHATTER NEEDS YOUR PHOTOS!!!
I’m sure you all have some terrific carvings to share in my “Photo Shop” section. Photos of your carvings help to liven up the blog’s appearance and make it more interesting. Also, my “Carver’s Corner” is a great way to get constructive critiques on your carvings so you can learn where to improve on your next ones. When sending in photos please specify whether you want them for display in “Photo Shop” or if you want me to critique them in the “Carver’s Corner.” Send your photos in to carverbobk@woodchipchatter.com. Thanks!
KEEP THE CHIPS FLYING!!!
Send in your questions and comments so we can keep Wood Chip Chatter active and keep the conversations going! Effective discussions are one of the best ways to learn about the topics that interest you. Remember, there’s no such thing as a dumb question. Plus we would all love to learn about the unique tips, techniques and products YOU use in your woodcarving process. Send your questions and comments to carverbobk@woodchipchatter.com. Thanks!
I tend to use somewhat more expensive paint brushes when I paint my carvings. I just like the way they work. But whatever kind of brushes you use, if you’re like me you go through paint brushes as fast as the water you wash them in. Here are a few tips on cleaning your brushes and preserving them to get longer life out of them:
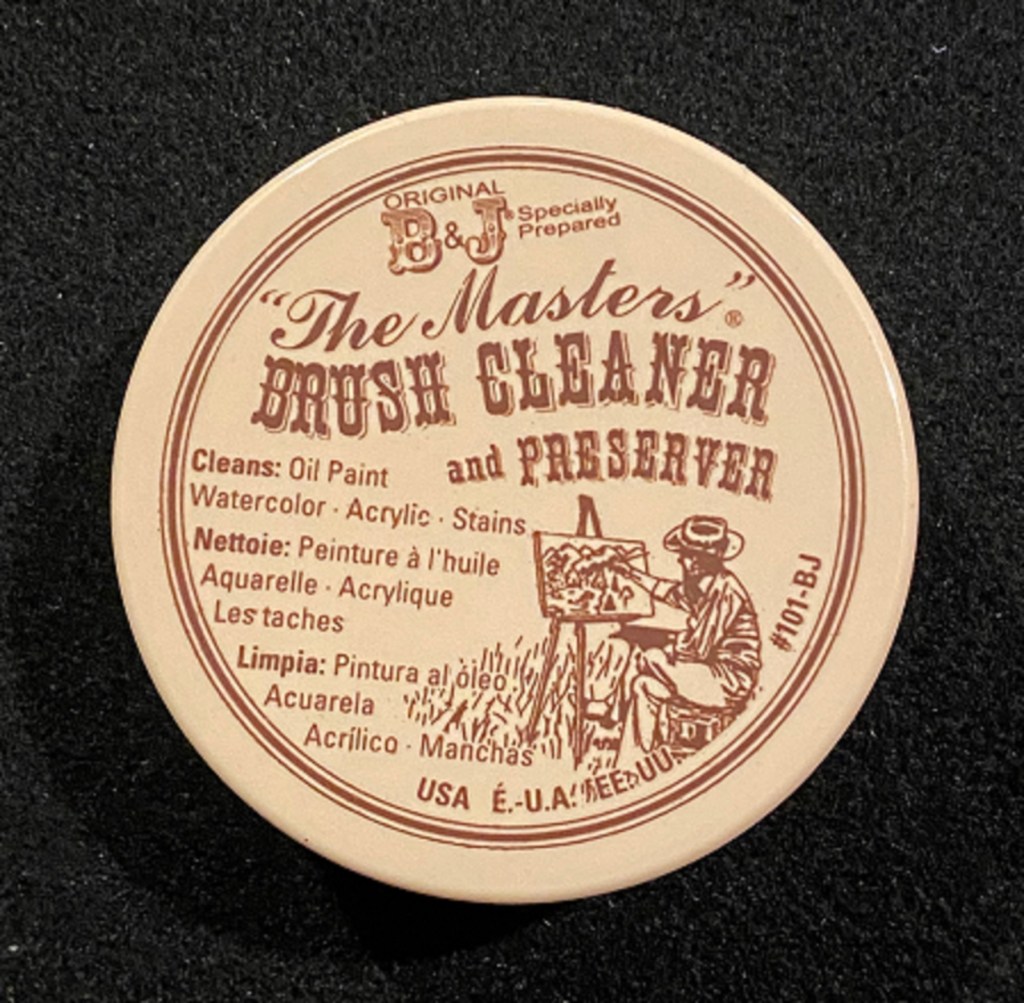
1. Swirl your brush back and forth over the cake of “The Masters” Brush Cleaner & Preserver until bristles are soapy. Brush back and forth in my dampened hand until all paint is removed. Repeat a second time. Rinse well, then reform the bristles with a little soap on the fingers. Let dry with the soap on the bristles. Rinse brush with water before using.
2. Clean in a cup of Dawn, put soap in my hand and clean the brush back and forth in the palm of my hand. Rinse well. Then reform bristles with a little Dawn on the fingers. Let dry with some soap on the bristles. Rinse brush with water before using.
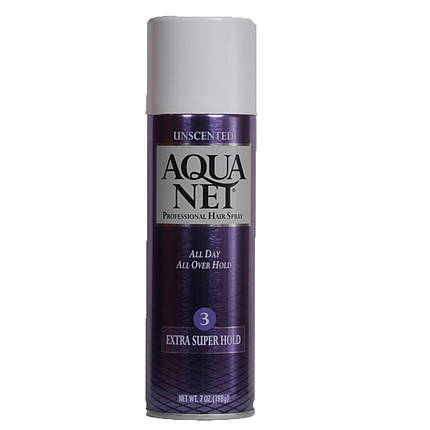
3. Clean brushes in a bowl of Aqua Net hair spray. Mash bristles well until no more paint comes out (add more Aqua Net if necessary). Reform the shape and let dry with some Aqua Net on the bristles. Rinse brush with water before using.
4. Wash brushes with soap and use a little bit of hair conditioner on them and they will smooth back out. Reform the bristles and let dry with a little conditioner on them. Rinse brush with water before using. Use regular hair conditioner. They sell brush conditioner in art supply stores, however it’s the same stuff.
5. Do your final brush cleaning with rubbing alcohol. It removes any remaining residue and allows the bristles to relax. Also, find a spring you can stretch atop your glass and put the handle in the coil holding the brush off the bottom. Use the same for drying. And when the brush gets ratty give it a haircut. You’ll get maximum life from your brushes this way.
6. Clean brush on a bar of Lava soap. Rinse clean. Reshape with a little soap on the fingers. Set out to dry. Rinse brush with water before using.
Reader’s Comments
I got a couple of very warm and kind comments from two of my readers this week that I want to pass on.
The first one comes from spwilcen who said:
“Always a good read. And I am ALWAYS impressed!”
The second comment came from Jim Shay who wrote:
“Another great edition of Wood Chip Chatter Bob. Thanks for posting my inquiry about Bryan. I am still searching also. There’s some great examples of carvings shown in this week. Keep up the good work to all the readers. As soon as I get this process of posting figured out here I’ll send one or more too. Thanks again to Bob for his diligent efforts in producing this forum for us to communicate about our fantastic hobby. Jim Shay”
Thank you both so very much, spwilcen and Jim, for taking the time to send me your kind thoughts. Reading comments like those makes me feel that I’m doing the right thing and pushes me to continue with the work I do every week to make Wood Chip Chatter the best I can make it.
Carver’s Corner
“Carver’s Corner” is the section where you can send in photos of your carvings to have them critiqued by me and get my truthful opinions on what you did right and where you might improve next time. It’s an excellent opportunity to improve your carving skills! Send your photos to carverbobk@woodchipchatter.com.
Our first entry to the “Carver’s Corner” is a Santa ornament carved by Nicky Foley:
Santa Ornament Carved by Nicky Foley
Nicky, this is a first-rate Santa ornament that was skillfully carved and painted in every way. The face is expertly carved and I like how you broke the beard up into clumps of hair for more realism. The hat trim is also clean and well done, and the nose and eyes are spot on. I like the skin tone color as well.
Now for the things I would have done differently. Make the lower lip a little fatter…it’s too thin. Try adding some curvature to the mustache hairs by using some “S” cuts, and tint parts of the face with red blush, particularly on the nose and cheeks.
Overall, an impressive job! Keep up the great work!
Our next entry is a cowboy carved by Dianne Walker. Dianne writes:
“Hi Bob,
I shared the video info with group and they are checking them out. Good idea. I used to watch them all the time. Don’t know why I didn’t think about that.
Anyway, I’m attaching another pic of carving I just finished and would love a critique since you stated on blog you would be glad to do that. It’s the first time I ever used wood burning on a carve and I think I like it. I can’t decide. Lol.
Would love your feedback.
Thanks again for the info you sent previously.
Dianne”
Overall, I like your cowboy very much, Dianne. You paid careful attention to detail, it is carved quite well, and I like the choice of colors. I’m especially impressed with the way you carved the hat and how you fit it onto the head…terrific job there! Good job on the ears and bandana, and the chaps are well detailed.
You need to work on your hands, though. Hands are hard to carve, especially the thumbs. Your thumbs are not positioned properly. I don’t know if you were carving fists or open hands but either way the thumbs should come from over the top. They are not positioned the same way as the fingers. Carefully study your own hands and you will see what I mean. When carving a hand, use your own hand as a model.
I understand that you like the wood burning on your carving, many carvers use it. But wood burning, in my opinion should be used sparingly. Wood burn the areas where one main part/color meets another, the purpose being to avoid one color from bleeding into another. For example, where the jeans meet the boots and chaps or where the bandana meets the shirt. Avoid burning creases in garments. Instead, carve the creases deeper using a small gouge, V-tool or your knife to create shadows. I would have also made a couple more loops of rope around his hand…just a cosmetic thing. I’m always curious about what other carvers use for rope and how they make it stiff.
An all around great job, Dianne. A carving you can be proud of.
Photo Shop
“Photo Shop” is the section of Wood Chip Chatter where carvers can send in photos of their wood carvings for display. It’s your chance to show off your work…sort of a show and tell. The photos will only be displayed and no comments or critiques will be made. For critiques on your carvings send them in to the “Carver’s Corner.” Send your photos to carverbobk@woodchipchatter.com.
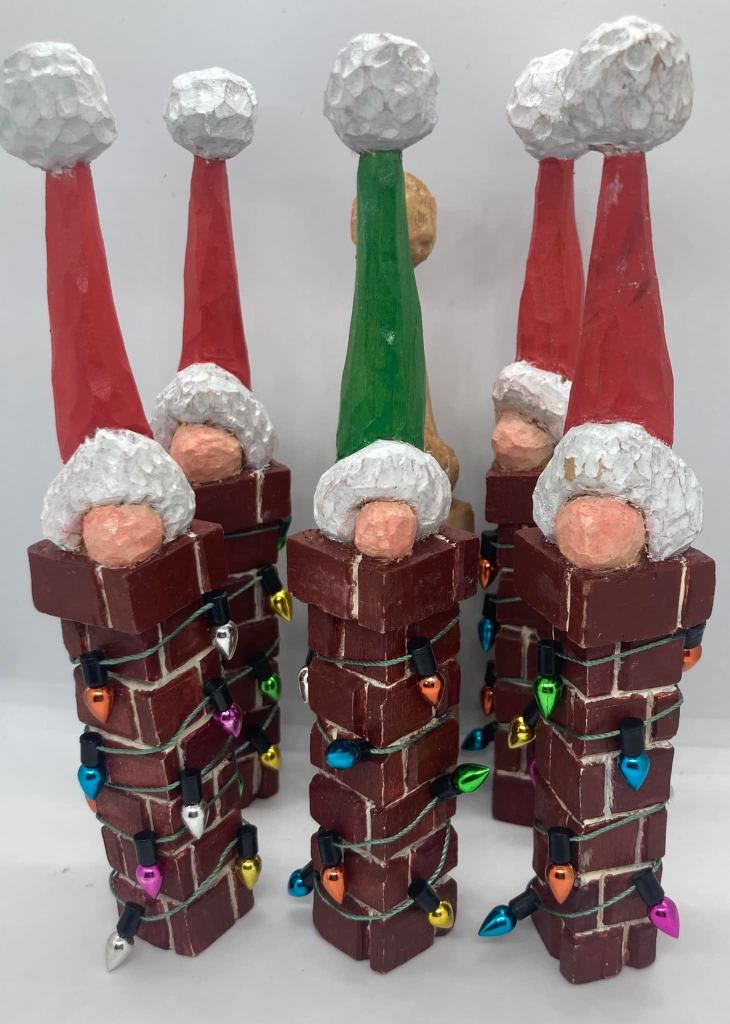
Our first entry to the “Photo Shop” this week comes from Kerem Kozak of Calgary, Alberta, Canada who carved a few of my Chimney Santas from my article in the 2019 Winter issue #89 of Woodcarving Illustrated:
Kerem Kozak’s Chimney Santas
Those are really excellent, Kerem! Very neatly carved. You did a nice, clean job on the bricks and of course I love the Christmas lights!
Our next entry comes from my good friend, Phyllis Stone of York, Pennsylvania. Phyllis carved a cottonwood bark house scene as an anniversary gift for her son and daughter-in-law. The Gnome was carved by Miroslaw Czeladka of Poland:
Anniversary gift carved by Phyllis Stone
That’s a beautiful job you did on the bark house and tree, Phyllis, and the heart base was a terrific idea! Of course Miroslaw’s Gnome made a perfect addition too. Well done and very thoughtful of you. I’m sure your son and daughter-in-law loved it.
News & Announcements
Announcing that I will be at the Lancaster County Woodcarving & Wildlife Art Festival at Millersville University, Millersville, PA. March 12 & 13; Sat. 10 to 5, Sun. 10 to 4. Located in the Student Memorial Center, 101 Shenk Lane on your GPS (the entrance is across the street from this address). Masks are required as per Millersville University policy. I will be at Tables 67 & 68 so stop by and chat for awhile!
The International Association of Woodcarvers has upcoming Zoom meetings on the following Saturdays at 3PM EST with special guest presenters. Check them out…
Zoom: 3104603575
Schedule:
2/26 – Dave Francis
3/5 – Rich Schneider
3/12 – Roger Beane
4/9 – Ray Meyer
4/16 – Steve Tomashek
4/23 – Joe You
4/30 – Chris Hammack
5/7 – Brett Andrews
INTERNATIONAL ASSOCIATION OF WOODCARVERS
COME JOIN US!!!
WOOD CHIP CHATTER NEEDS YOUR PHOTOS!!!
I’m sure you all have some terrific carvings to share in my “Photo Shop” section. Photos of your carvings help to liven up the blog’s appearance and make it more interesting. Also, my “Carver’s Corner” is a great way to get constructive critiques on your carvings so you can learn where to improve on your next ones. When sending in photos please specify whether you want them for display in “Photo Shop” or if you want me to critique them in the “Carver’s Corner.” Send your photos in to carverbobk@woodchipchatter.com. Thanks!
KEEP THE CHIPS FLYING!!!
Send in your questions and comments so we can keep Wood Chip Chatter active and keep the conversations going! Effective discussions are one of the best ways to learn about the topics that interest you. Remember, there’s no such thing as a dumb question. Plus we would all love to learn about the unique tips, techniques and products YOU use in your woodcarving process. Send your questions and comments to carverbobk@woodchipchatter.com. Thanks!
I posted this tutorial in a previous blog on Sept. 4, 2021 but it’s a topic that many carvers struggle with. So at the recent request of one of my readers I am revisiting the topic again this week.
The picture tutorial shown below demonstrates one method of how a baseball hat can be fitted onto a head to give the natural look that the head is actually inside the hat rather that the hat sitting on top of the head. This tutorial was kindly submitted by my good friend, Wayne Smith from Nova Scotia. The method is also the one used by the renowned carver, Lynn Doughty to fit cowboy hats onto his figures, and can be used for fitting any kind of hat onto a head.
Photo 1. Patterns used.
Photo 1
Photo 2. First carve, paint and finish the head. Then cut off the top of the head with a band saw, scroll saw or disk sander.
Photo 2
Photos 3-4. Carve the outside of the hat but do not carve anything on the inside yet.
Photo 3
Photo 4
Photo 5. Place the hat on top of the head exactly the way you want it to look. Then carefully mark around the head on the underside of the hat with a pencil.
Photo 5
Photo 6. Carve out a shallow area in the bottom of the hat staying inside your pencil lines.
Photo 6
Photo 7. Continue carving and adjusting the underside of the hat until it fits over the top of the head the way you want it.
Photo 7
Photo 8. Once the hat fits, carve the inside of the hat bill with a # 3 gouge to give it a rounded look.
Photo 8
Photo 9. At about the center of the head drill a 9/64″ hole about 1/2″ deep.
Photo 9
Photo 10. Insert a 3/4″ long 1/8″ dowel into the hole (the 9/64″ hole and 1/8″ dowel allow for a little play when fitting the hat for the final time). Blacken the end of the dowel with the pencil.
Photo 10
Photo 11. Refit the hat onto the head and press down firmly. The graphite on the end of the dowel will leave a black mark on the inside of the hat.
Photo 11
Photo 12. Replace the 3/4″ long dowel with a 1″ long 1/8″ dowel and glue it in place into the head.
Photo 12
Photo 13. Drill a 1/2″ deep 9/64″ hole in the inside of the hat. Fit the head into the hat (usually I only set the hat down over the head 3/6” to 1/4”… Just above the top of the ears ) just enough to give the impression that the head is up inside the hat and not that the hat is sitting on top of the head. Glue the dowel into the hat as you make the final adjustments fitting the hat on top of the head.
Photo 13
Tip: Paint and finish the head and hat BEFORE fitting them together.
NOTE: This method is the one used by Lynn Doughty on his Out West Caricatures.
Questions & Comments
Our first question this week comes from Jessi M about why wood grain raises when you wet it. Jessi writes:
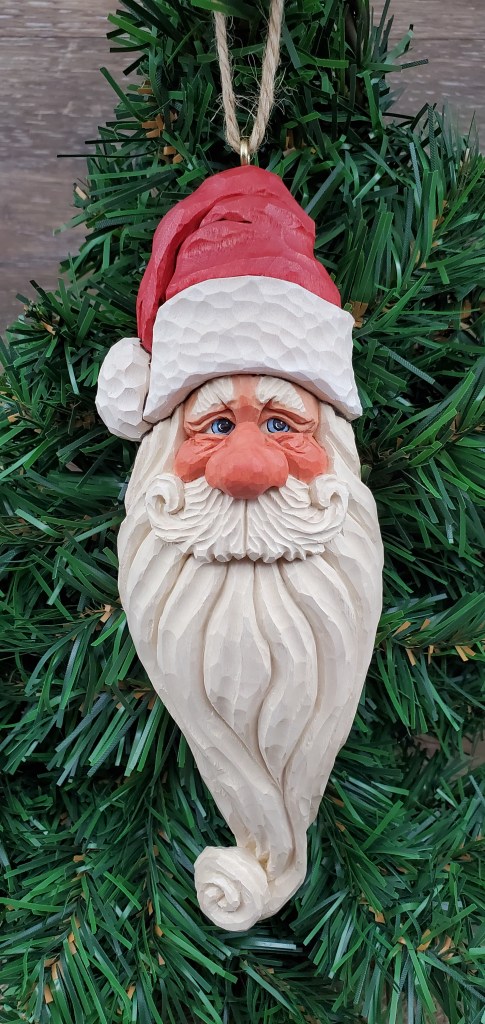
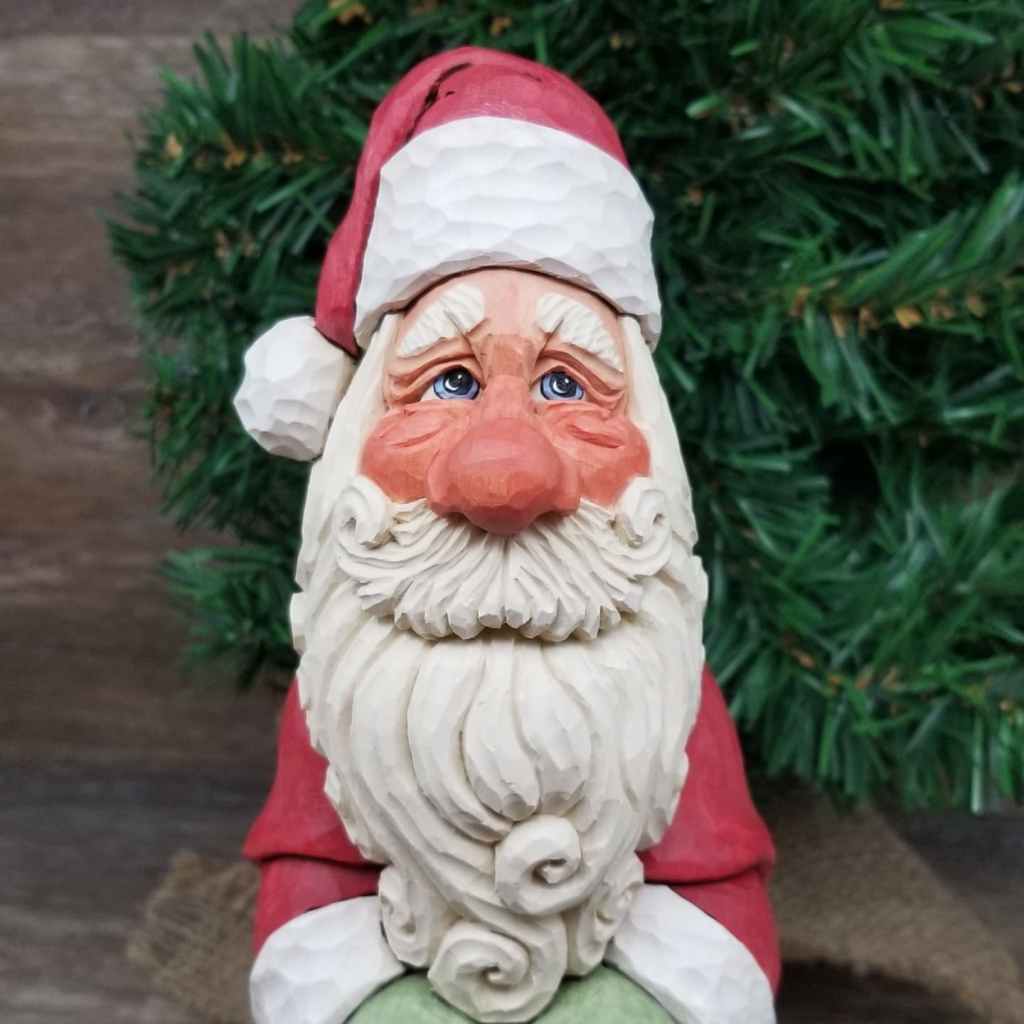
“Hi Bob! I am new to carving, and look forward to your weekly e-mails. My question is not so much about a specific carving, but a bigger problem. When I finish my carvings, I sand with 100 grit, 220, then 2,000. It feels smooth to the touch. I then do 1/2 linseed oil and half mineral oil (as suggested in Woodcarvers Illustrated) and sometimes paint. BUT THEN I go to photograph it, and it looks fuzzy. It is specifically obvious around this Santa’s nose. What is going on here, and how do I fix it?”
Jessi’s Santa
Thank you for writing, Jessi. I’m glad you are enjoying Wood Chip Chatter and that you found a new hobby in wood carving. Like all of us, I’m sure you will get a lot of enjoyment from it. Your question actually has a very simple answer. Anytime you wet your carving with any kind of liquid it raises the grain of the wood. So even though you’ve sanded your carving as smooth as you can, when you wet it the liquid soaks into the wood, expanding the wood fibers and causing them to raise. This happens with oils as well as aqueous liquids. Sanding the fuzzy areas one more time with 600 grit cloth sandpaper will do the trick.
Photos reveal a lot of flaws in a carving so the carving will always look worse in the photo than it will to the naked eye. It’s actually a good idea to photograph your carving as you carve it, or just before you paint it. Any areas that need more carving or that don’t look quite right can still be taken care of, before you completely finish the carving.
Next we have a question from Jim Shay about a deceased carving instructor named Bryan Middleton of Oshawa, Ontario, Canada. Jim writes:
” I stumbled onto a YouTube video named “ Caricature Heads Day 1 and has a follow up named Caricature Heads Day 2. The instructors name is Bryan Middleton and was from Canada. He has passed away since these videos were made. My question is, do you happen to know of these videos and where a copy of the instructional hand out he used when he did the classes he taught ? His methods are so simple and informative. Even my old tired brain understands what he is teaching. I’d love to get my hands on one of his handouts. Thanks for reading my request, Jim Shay.”
Thanks for writing, Jim! I’ve never heard of Bryan Middleton but I did a little research and found out that he must have been a member of the Oshawa Senior Citizens Caricature Carving club in Oshawa, Ontario. Perhaps he taught lessons to the group and obviously made a few videos during that time…around 2016. Apparently he had heart trouble and must have passed away from that.
I suggest looking up the Oshawa Senior Citizens and see what you can find out that way. I have personally done some checking but am not able to find any contact information on the group. If anyone of our readers knows anything about Bryan Middleton or the Oshawa Senior Citizens club please let us know. Thanks!
Carver’s Corner
Nicky Foley asked me to critique his “No Fishing” fishing scene carving:
Nicky Foley’s “No Fishing” Fishing Scene
Thanks for the opportunity to critique your carving, Nicky. First off, I like it a lot. It’s humorous and unique, and has a lot of well thought out accessories. Since it’s more of a “cartoon-type” caricature as opposed to a “realistic-type” caricature it’s hard to find anything wrong with it. I like the facial expression, glasses and the neat lettering. The tackle box and basket are really cool too!.
The main area I picked up on that you want to work on is the hands. Look, for example at his right hand…there are too many fingers. I realize the top one is supposed to be his thumb but the thumb should be wrapped the other way, around behind the pole. Look at your own hand as you hold a pole and you will see what I mean. His left hand has the same problem. The thumb should curve around in the opposite direction as the fingers.
Try carving the detail in the pants next time instead of burning it just to add a little more realism, and round off the edges of his arms so they don’t appear so flat. Little cosmetic things like these can make a big difference.
Overall, I like the concept and attention to detail. Well done!
Next we have a carving of a cowboy done by Wade Buie who would like some advice on it. Wade writes:
"Please give me any help to improve my skills
Thanks
Wade Buie"
Wade Buie’s Cowboy – Front view
Wade Buie’s Cowboy – Side view
Wade Buie’s Cowboy – Back view
Thanks for sending in your photos, Wade. I appreciate the opportunity to critique your carving. I like the way you carved the rifle...very realistic job there. Good job on the hands and boots too. One of the first things I noticed is that you need to sharpen your tools. Some of your cuts are not crisp, particularly around the belt. Go with less wood burning. It's easy to overdo. For example, I would not burn the wrinkles in the clothing.
Another thing I noticed is that the crotch of his pants is too low. Make the legs a bit longer and bring the crotch up just a little higher. Then make the zipper longer. The zipper part of the pants should come almost right down to the crotch.
Lastly, I realize that hats come in all shapes and sizes but yours appears to be out of shape, and not fit his head quite right. There should be more curl to the sides and the front and back tend to reach straight out and almost downward. Study the photos below to see what I mean.
Fig. 1
Fig. 2
Just these few simple changes should make a big difference. I hope you’ll try another one and send it in for me to see.
Photo Shop
This week we have a photo of a pair of Simple Snowman ornaments my good friend, Phyllis Stone carved from my article in the Woodcarving Illustrated Winter 2021 issue #97.
Phyllis’ Bob’s Simple Snowman Ornaments
I really like these, Phyllis! Very nicely done, and personalizing the hats was a great idea! Thank you for sharing them!
News & Announcements
From Dan Gillen comes this information about the Texas Woodcarvers Guild, Spring Round-up:
March 25 – April 1 Kerrville, Texas Texas Woodcarvers Guild, Spring Round-up March 25th is setup and taking competition entries in the afternoon. March 26th & 27th is the Texas State Woodcarving Championship competition, carving show & sale, 1 and 2-day carving seminars, and whitling contest. March 28th – April 1st, 20 Carving instructors holding 64 carving seminars (1 and multiple day) seminars. Website https://texaswoodcarversguild.com/ contains all the details. Seminar registration and fee payments can all be handled online via the website.
ALL LEVELS OF EXPERTISE ARE WELCOME TO COME AND PARTICIPATE! (Beginners, Intermediate and Advanced).
Thank you, Dan! Really appreciate the information.
The International Association of Woodcarvers has upcoming Zoom meetings on the following Saturdays at 3PM EST with special guest presenters. Check them out…
Zoom: 3104603575
Schedule:
2/19 – Kevin Applegate
2/26 – Dave Francis
3/5 – Rich Schneider
3/12 – Roger Beane
4/9 – Ray Meyer
4/16 – Steve Tomashek
4/23 – Joe You
4/30 – Chris Hammack
5/7 – Brett Andrews
INTERNATIONAL ASSOCIATION OF WOODCARVERS
COME JOIN US!!!
With St. Patrick’s Day less than a month away I thought I would pass along this simple Leprecaun pattern I designed. I hope you’ll try it and send in some photos!
WOOD CHIP CHATTER NEEDS YOUR PHOTOS!!!
I’m sure you all have some terrific carvings to share in my “Photo Shop” section. Photos of your carvings help to liven up the blog’s appearance and make it more interesting. Also, my “Carver’s Corner” is a great way to get constructive critiques on your carvings so you can learn where to improve on your next ones. When sending in photos please specify whether you want them for display in “Photo Shop” or if you want me to critique them in the “Carver’s Corner.” Send your photos in to carverbobk@woodchipchatter.com. Thanks!
KEEP THE CHIPS FLYING!!!
Send in your questions and comments so we can keep Wood Chip Chatter active and keep the conversations going! Effective discussions are one of the best ways to learn about the topics that interest you. Remember, there’s no such thing as a dumb question. Plus we would all love to learn about the unique tips, techniques and products YOU use in your woodcarving process. Send your questions and comments to carverbobk@woodchipchatter.com. Thanks!
With the new year comes a new schedule of woodcarving shows and events. Here are the shows currently scheduled for 2022:
“2022 Woodcarving Shows & Events”
February 2-5 – Ashland, Nebraska. Nebraska Carving Retreat at Mahoney State Park. Three or four-day classes. Email Roger Nadrchal at Wood_chips@yahoo.com. Visit website: http://www.nebraskacarvingret reat.com.
February 5 – Sebring, Florida Highlands Woodcarvers’ Artistry in Woodcarving at Sebring Recreation Club, 333 Pomegranate Ave. Hours: 10 to 3. Admission: $3. Call Charlie Portes (518) 744-3830 or Bob Seybolt (863) 471-6077. Or email Highlandswoodcarvers@gmail.com.
February 10-21 – Tampa, Florida. Woodcarving show/competiton at Florida State Fair. Brenda Gregory (813) 734-2810; brenda.gregory@floridastat efair.com.
February 22-25 – North Port, Fla. Florida Woodcarvers Roundup at VFW Post #8203, 4860 Trott Cir.; 8:30 to 4:30. Multiple classes. Contact: Jim O’Dea (941) 697-2002; jeodea@aol.com. jeodea.wixsite.com/my-site-1
February 22 – March 5 – Anchorage, Alaska. Artistry in Wood #18 at Midtown Mall. Email: Bnelsen68@gmail.com; call (907) 240-3840.
February 26-27 – Mesa, Arizona. 32nd Desert Woodcarving Show & Sale at Mesa Centennial Hall, 201 N. Center Street. Email Mark Mosher: outofthewoodsbymark@gmail.com.
March 5-6 – Cedar Rapids, Iowa . Cedar Valley Woodcarvers show/competition at National Czech and Slovak Museum, 1400 Inspiration Pl, SW. Hours: 10-4. Don Lund (319) 683-2864; klund@sharontc.net.cedarvalleywoodcarvers.com
March 12–13 – Millersville, Pa. Lancaster County Woodcarvers Show and Wildlife Art Festival at Millersville University Student Memorial Center, 101 Shenks Ln. 10am-6pm Sat., 10am-4pm Sun. $5 adm. Children under 15 (with adult), students (with ID), and veterans (with ID) free. Contact Bob Hershey (717) 951-5569, bzcarvn@ptd.net .
March 26-27 – Rochester, Minn. Rochester Woodcarvers 46th show at 4-H Building, Olmsted County 08 Aune Dr. SE; 10-4. Free admission. Call (507) 254-5445; email rochcar ve@gmail. com. www.rochesterwoodcarvers.com
March 26-27 – Mound,Minnesota . Snow Daze Carvin g at American Legion Post 398, 2333 Wilshire Boulevard. Email: mnCarvers@MinnesotaWoodCarvers.com.
April 1-3 – Charlotte, NC. 39th annual Showcase of Woodcarvings at Central Piedmont Community College. http://www.charlottewoodcarvers.com/showcase for details including a discount on hotel accommodations.
April 23 – Westby, Wisconsin. Carve In 6@ Bekkum Memorial Library, 206 N. Main St., 10am to 4pm. Free admission. Contact John Sutton (608) 634-4396, lbarnfarms@gmail.com; or Bekkum Library (608) 634-4419.
May 7 – Inverness, FL. Nature Coast Carving Club of Citrus Co. show and sale. at 6298 E. Gospel Island Road, Admission $2, Open 9 am-3 pm. Email: naturecoastwcc@gmail.com
May7–8 – Mountain Home,Ark. North Arkansas Woodcarvers’ show/sale at Baxt er Count y Fairgrounds. Sat 10-5; Sun 10 -4. Free admission. Contact: Sandy (870) 431-8070; webmaster @northarkansaswoodcarvers.org. Visit website: http://www.northarkansaswoodcarvers.org.
May 7–8 – Missoula, Mont. Montana State Woodcarvers show & sale (actual and virtual) at Missoula County Fairgrounds. $4 admission. Sat: 9 -3 ; Sun: 11-5. Tom Collins (406) 529-0239; tomcollins875@gmail.com.
May 21-22 – Sacramento, Calif. Capital Woodcarvers host 50th show at Scottish Rite Center, 6151H St. Sat. 9-5, Sun. 9-4. Alison Cook (916) 485-7893; crystal53@hotmai l.com.
June 11-18 – Maquoketa, Iowa. The Affiliated Wood Carvers present 54th International Woodcarvers Congress at Jackson County Fairgrounds. Website: woodcarverscongress.org.
July 9-15 – Creede, Colorado. Creede Woodcarvers Rendez vous. Register online at www.creedewoodcarvers.com.
July 17-21 – Honesdale, Pa. 20th Northeast Woodcarvers Roundup at Cherry Ridge Campsite. Free admission; cost for materials. Robert Muller (570) 470-2736; rmuller@nep.net. Website: www.cherryridgecarvers.org.
September 3-4 – Wheeling, West Virginia. 43rd annual Oglebay Woodcarvers Show in Pine Room at Oglebay Park. Free admission. Email clark@unimaxsystems.com; website www.oglebaywoodcarvers.com.
September 23-25 – Honesdale , Pa. 18th Fall Carve In at Cherry Ridge Campsite. No admission fee; cost for materials. Robert M uller (570) 470-2736; rmuller@nep.net. Website: www.cherryridgecarvers.org.
October 22-23 – Wayne, New Jersey. North Jersey Wood Carvers present 36th annual Woodcarving, Arts & Crafts Show at Wayne P.A.L. Call Jerry Cetrulo (973) 835-8555.
October 29-30 – East Berlin, PA. Conewago Carvers Woodcarving and Art Show and Sale at East Berlin Community Center. 9 am-4 pm Sat. & Sun. Contact: Doug Gabel, email: douglasjgabel@gmail.com or Kyle Gabel, email: kylemgagel@gmail.com.
Questions & Comments
I received a very nice comment from Will V. this regarding The Story of Jilly Gnomette who said:
“Love the story. Very appropriate at this time. Thank you for sharing. Will V.”
Thank you for your kind comment, Will. It is much appreciated. I had hoped my readers would enjoy the story.
Our first question this week comes from Todd Martin of Huntington, Indiana. Todd, like many others has trouble properly placing hats on top of heads and has sent in two photos as an example.
“Hi Bob,
Thanks for your previous critiques, and for the blog in general!
I have another carving for critique as well as a related question:
I typically avoid putting hats on my carvings because they never turn out quite right, so I decided to practice. This is my most recent attempt, and I’d appreciate any critique / advice.
For the question, perhaps in an upcoming issue you could discuss setting up hats (especially baseball hats and / or cowboy hats). For me, it seems to be an issue of proportion. I try to situate the head in the hat, but the hat usually ends up too small.
Thank you!
Todd”
Baseball player bust carved by Todd Martin – Front view
Baseball player bust carved by Todd Martin – Side view
Thanks for your message, Todd! It’s always good to hear from you and I appreciate the contribution of your photos. Actually, the hat doesn’t look too bad but I can help you with a couple of things, and the topic of placing hats on heads is excellent. Many carvers struggle with that.
I have discussed the subject in the past but I think it’s worth repeating, so perhaps next week I’ll revisit it.
The problem that most carvers have is that they either carve the hat too small for the head or don’t carve it low enough down onto the head.
When placing a hat on a head, regardless of what type of hat it is, it is import ant to make sure the head fits inside the crown of the head. The way to insure this is being done is to carve the hat so that it comes down to the top (or slightly lower) of the ears.
The front of the hat is pulled down over the forehead (Fig. 1). The side view (Fig. 2) shows how the hat is seated slightly below the top of the ear. Also notice that the crown of a baseball cap wraps all the way around the front of the hat and ends almost at the ear on both sides. The back view shows that the hat is pulled down to a point approximately half way down the ears (Fig. 3).
Fig. 1 – Bottle Stopper carved by Bob Kozakiewicz – Front view
Fig. 2 – Bottle Stopper carved by Bob Kozakiewicz – Side view
Fig. 3 – Bottle Stopper carved by Bob Kozakiewicz – Back view
Notice the same principles hold true when placing a cowboy hat. The head fits within the crown of the hat and the hat is pulled down over the forehead and down to the ears (Fig. 4).
Fig. 4 – Bottle Stopper carved by Bob Kozakiewicz – Front view
Keep these guidelines in mind whenever you’re carving a hat and you should see a big improvement in the appearance of your carvings.
Carver’s Corner
“Carver’s Corner” is the section where you can send in photos of your carvings to have them critiqued by me and get my truthful opinions on what you did right and where you might improve next time. It’s an excellent opportunity to improve your carving skills! Send your photos to carverbobk@woodchipchatter.com.
This week in the “Carver’s Corner” we have a terrific carving of a Marine soldier carved by Rex Reitmayer. Rex has asked for some of my thoughts on it.
Please critique. Hopelessly Addicted to Wood Carving
Thank you,
Rex Reitmayer
Marine soldier carved by Rex Reitmayer – Front view
Marine soldier carved by Rex Reitmayer – Back view
Marine soldier carved by Rex Reitmayer – Left quarter view
Marine soldier carved by Rex Reitmayer – Right quarter view
Excellent job, Rex! I really like this one. You’ve added a high level of detail, and the paintjob and color choices appear to be quite accurate. As I tell most carvers, go lighter with your coats of paint. Thin your paints more with water and add several coats to build up the color. So many carvers are guilty of this, including myself sometimes. I feel that the eyes are too bright and have a scared appearance. I never use pure white on my eyes. Always use some kind of an off white to tone down the color of the eyeballs. To get rid of the scared look, paint the pupils larger. I think you can still do that and you will see a big difference.
Lastly, there is one piece of detail which many carvers fail to observe that you have inaccurate, and that is the way the shirt closes over his chest. You have the right side of the shirt overlapping the left side, as in a woman’s shirt. A man’s shirt has the left side overlapping the right side. A minor detail which almost no one will notice, but something to keep in mind for accuracy in the future.
Overall, a very fine carving. Nice work.
Our next entry for the “Carvers’ Corner” this week comes from Wayne Arrowsmith with photos of some magnificent Santas he would like me to critique. Wayne says:
"This pattern was in a WCI issue about 10 years ago. A few adaptations were made with the hat and painting."
Santa carvings by Wayne Arrowsmith – Front view
Santa carvings by Wayne Arrowsmith – Top left view
I looked carefully at your carvings, Wayne, and hope I don't disappoint you here, but I can't really give them much of a critique because they are so well done. I don't see anything particularly wrong with them. The carving is excellent, and I like the way you changed the hats to make each one different. The painting is also exemplary, especially in the way you embellished the carvings with unique designs. Your color choices are excellent to. Normally, I tell most carvers to go lighter on the paint but not so in this case. I like the deep dark colors, and personally, I tend to go heavier with the paint on my Christmas carvings. I just feel that they look brighter and more cheerful that way.
Although they look perfectly fine, I might have tried to add more “body” to the beards and mustaches by using more “S” and “C” type cuts, but that’s about it. Overall the carvings look happy and jolly, the way Santas should look. Great work! I hope to see more of your carvings in the future.
Photo Shop
“Photo Shop” is the section of Wood Chip Chatter where carvers can send in photos of their wood carvings for display. It’s your chance to show off your work…sort of a show and tell. The photos will only be displayed and no comments or critiques will be made. For critiques on your carvings send them in to the “Carver’s Corner.” Send your photos to carverbobk@woodchipchatter.com.
My good friend Tony Harris of Tennessee sent me some photos of two Santas he carved from Phil Bishop roughouts:
Santa carved by Tony Harris
Santa carved by Tony Harris
Magnificent work as always, Tony!
Dianne Walker also sent in some photos of the carvings she has done lately:
“Angry Bird” carved by Dianne Walker
Tall Gnome carved by Dianne Walker
Great carvings, Dianne! I really like your “Angry Bird”, and the bird on top of the Gnome’s hat is a cute touch!
Thank you so much, Tony and Dianne, for sharing your photos with everyone. I really appreciate your contributions!
News & Announcements
The International Association of Woodcarvers has upcoming Zoom meetings on the following Saturdays at 3PM EST with special guest presenters. Check them out…
Zoom: 3104603575
Schedule:
2/12 – Tom Wilkinson
2/19 – Kevin Applegate
2/26 – Dave Francis
3/5 – Rich Schneider
3/12 – Roger Beane
4/9 – Ray Meyer
4/16 – Steve Tomashek
4/23 – Joe You
4/30 – Chris Hammack
5/7 – Brett Andrews
INTERNATIONAL ASSOCIATION OF WOODCARVERS
COME JOIN US!!!
Woodcarving Academy
Established in 2020, the Woodcarving Academy offers dozens of videos created by some of the country’s top level instructors. More videos are added regularly as they are created by the instructors.
With a paid subscription to the Woodcarving Academy you can view any videos you like for as many times as you like.
There is even a Free level which allows you to tour the website and watch the sample videos and content, and receive email updates as new content becomes available.
Check out the Woodcarving Academy and learn with the masters right in the comfort of your own home!
WOOD CHIP CHATTER NEEDS YOUR PHOTOS!!!
I’m sure you all have some terrific carvings to share in my “Photo Shop” section. Photos of your carvings help to liven up the blog’s appearance and make it more interesting. Also, my “Carver’s Corner” is a great way to get constructive critiques on your carvings so you can learn where to improve on your next ones. When sending in photos please specify whether you want them for display in “Photo Shop” or if you want me to critique them in the “Carver’s Corner.” Send your photos in to carverbobk@woodchipchatter.com.
KEEP THE CHIPS FLYING!!!
Send in your questions and comments so we can keep Wood Chip Chatter active and keep the conversations going! Effective discussions are one of the best ways to learn about the topics that interest you. Remember, there’s no such thing as a dumb question. Plus we would all love to learn about the unique tips, techniques and products YOU use in your woodcarving process. Send your questions and comments to carverbobk@woodchipchatter.com. Thanks!
Keep a sharp edge and keep on carvin’!
The Funny Bone
An old Scottish woman went to the local newspaper office to publish the obituary for her recently deceased husband.
The obit editor informed her that there is a charge of 50 cents per word.
She paused, reflected, and then said, “Well then, let it read, “Angus MacPherson died.”
Amused at the woman’s thrift, the editor told her that there is a seven word minimum for all obituaries.
She thought it over and in a few seconds said, “In that case, let it read…