
How to Measure and Use a Cane
How to Determine Proper Cane Height and Length
Before you start using a cane or walking stick it is important to measure it to find your proper cane height so it is the right length for you. These factors should be considered up front before you start making your own cane, if you choose to do so. Undersized or over-sized canes may not offer the same stability and performance as a properly sized cane.
There are several ways to determine what your cane length should be–even if the user is not available to measure. Choose 1 of these 3 easy methods for sizing a cane.
How to Measure for a Cane
Before you start using a cane or walking stick it is important to measure it to find your proper cane height so it is the right length for you. Undersized or over-sized canes may not offer the same stability and performance as a properly sized cane.
There are three ways to determine what your cane length should be…even if the user is not available to measure.

1. Measure the Size of an Existing Cane
Simply take an existing cane, and measure from the lowest part of the top of the handle to the bottom of the tip. Round up to the nearest half inch. (see Diagram A)
2. Measure the Cane User
- Have the user put on their walking shoes.
- User should stand naturally upright as much as possible.
- Let their arms fall to the sides naturally with a normal relaxed bend at the elbow (see Diagram A for correct posture).
- Using a tape measure or yard stick, measure the distance from their wrist joint (bottom crease at the wrist) down to the floor. Round up to the nearest half inch.
(**For accurate length a second person must read measurement to prevent wrist from moving)
3. Measure Half the Height of the User
If the user is not available or does not have an existing cane, use this method.
Although this works for most cane users it is not always exact.
Most users cane measurements will be within one inch of half the users height.
- Convert height into inches: Example user height is 5’6″ which is 66 inches. 66 divided in half = 33 inches (always round up to the nearest half inch).
- Add half an inch to this measurement to get 33.5 inches.
The estimated cane length would be 33.5 inches for the above example.

How to cut your own Walking Cane
(use for wood, Lucite, carbon fiber or aluminum canes)
- Measure your proper cane height by using step #2 in the cane sizing information above.
- Measure your cane from the lowest part on the top of the handle to the bottom of the rubber tip (see diagram A).
- Take this length and subtract the length determined by step #2. This is will be the size that will need to be cut off from your cane.
- To size the cane, remove the rubber cane tip by using a twisting motion.
- Cut the needed amount off your cane using a hack saw or fine tooth blade. Make sure to cut it at a flat angle.
- Replace the rubber tip and make sure it is on securely before use.
Example – A cane measures 37″. The size determined in Step #2 is 32″. (37″-32″=5″) The length that should be removed is 5″.
How to Use and Walk With a Cane
Canes are not intended to be used like a crutch for full weight bearing. It’s important you match your cane to your body type.
An important consideration in choosing a cane is to match the cane with the user’s body size, so that the cane becomes the key to better mobility and safety for the user. Canes are not designed to substitute for bearing all the weight you normally would on your legs, as crutches do but to provide you with an extra foot on the ground for balance. The cane adds a third point of ground contact that alters the bio mechanics of walking to affect balance, relieve painful joints and provide stability to the user.
- Grip the cane in hand on your “strong” side so it provides support to the opposite lower limb.
- Take a step with the “weak” leg and move the cane forward at the same time.
- Lean your weight through the arm gripping the cane as needed.
- Ensure the weak leg assumes the first step, which holds the most weight, on level surfaces
- The walking cane should be moved around 1 1/2 feet forward with each move.
Canes are intended to help with a users balance. A cane size is designed to be proportionate to a cane users body size. The cane’s shaft size, handle size and construction are factors in determining a cane users size.
About Falls
Falling is a serious issue for our older population. 1 out of 3 seniors fall every year. 90% of broken hips are the direct result of falls. By the time a senior reaches age 75, falls are the major cause of fatal injuries.
Cleaning a Cane
The best method of cleaning your cane is simple soap and water. Other products may leave a slippery film or possibly damage your cane. In particular, Lucite canes should NOT be cleaned with Windex or other window or cleaning products. These cleaners can actually cause the clear acrylic to look dull and hazy..
Weight Considerations
Not all canes and walking sticks are made to support weight. Use discretion and common sense in the use of canes which are very thin, or have a dual use or feature. For example, for a sore ankle, use a support cane, not a sword cane.
Resource: Fashionable Canes
Carve an Eagle Head Cane Topper
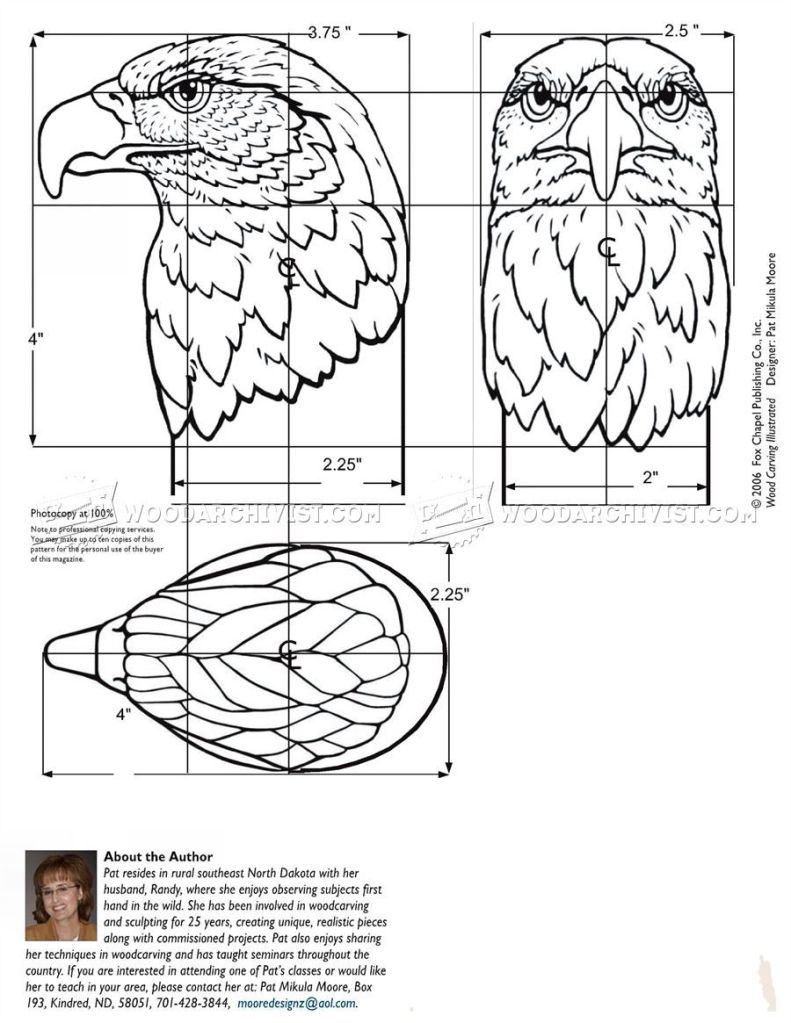
The following link will take you to an article that appeared in the Fall 2017 Issue of Woodcarving Illustrated which gives you step-by-step instructions on how to carve this Eagle Head Cane Topper:
http://woodcarvingillustrated.com/blog/2017/06/13/realistic-eagle-bust/
Reader’s Comments

My first comments this month come from my good friend, Jim Babcock from Columbus, Indiana. As a follow up to my remarks on experimenting with your wood carving Jim tells about how he likes to experiment with tinting oils with oil paints. Jim writes:
“Bob:
Always look forward to a new edition of Wood Chip Chatter; always something new to learn & try from yourself and others. I especially appreciated your opening comments about experimentation and trying new finishing methods and materials. Can’t tell you how many times I have tried something new and been surprised by the outcome.
I have learned to use a bit of scrap wood to check stains, even if I have had a past experience with a brand or shade. That has been true with penetrating oil stains that can vary more than one would think they should.
Keep up the good work Bob !
Jim Babcock Columbus, Indiana”
Jim later wrote:
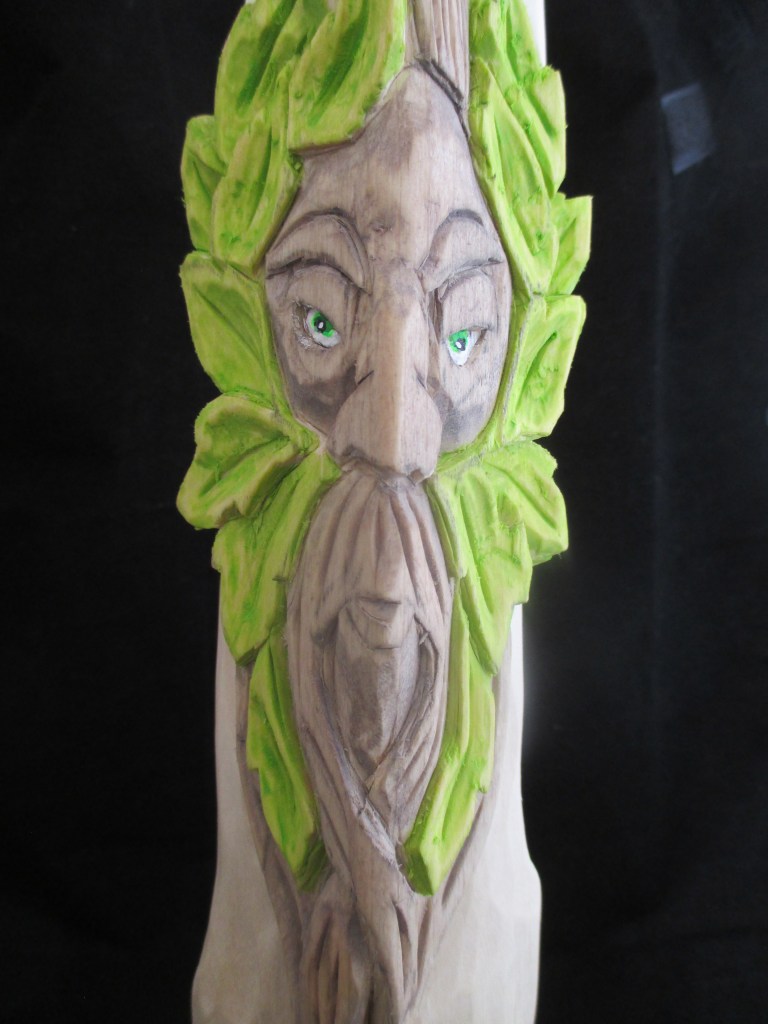
“Bob:
To add one more thing to the application of a finish on a carving, I sometimes tint an oil base stain to gain a desired color. Others have done this as well by adding a bit of oil paint to a neutral oil base penetrating stain; in this case, the green highlights to the attached basswood carving. Consistency might be a concern if I were applying a tinted stain to a large surface area on a carving .
Jim Babcock
Columbus, Indiana”
Thank you for the pleasant comments and words of encouragement, Jim!
Many carvers tint their oil treatment with an oil paint (usually raw sienna) but I see that you are taking the concept to another level by using various other colors and using these tinted oils like stains. In my mind it’s like painting with very diluted oil paints.
I like the result you got on your carving in the photo. The green color has a vivid hue and appears to be applied very evenly. I hope you will continue to experiment, Jim, and I look forward to hearing more about your results.
Next, I received some very complimentary words from My good friend, Dick Bonewitz from Carmel, Indiana. Dick wrote:
“Thanks so much for sharing your experience with using a spray before you painted and the unsatisfactory results you experienced. That was great information.
And thanks for your efforts of putting out this blog every month. It’s much appreciated.
Dick Bonewitz
Carmel In”
Thank you so much for your kind words, Dick! They are greatly appreciated.
Next comes a very important comment from my friend, Donald Crippen about giving credit where credit is due. Donald Writes:
“I really enjoy your email each month and read it all. Today, though, I felt I had to respond to this issue. One of the photos showed three pumpkins (which were done very well) that leaves you with the feeling that they were the original designs of the carver. In actuality they are from a Doug Linker video that is available on YouTube. I do a lot of Linker’s carvings, but would never put it online without giving credit to the designer. It might just have been an unintentional omission, but thought you would want to know.”
Thank you for your input, Donald, and your point is well taken. It’s very simple. If the design is not yours or if you got the idea from someone else, mention that person’s name and give him/her credit for the creativity, time, experimentation, and hard work that went into developing that carving. It’s more than showing common courtesy, it’s showing respect.
I don’t know why this happens so often but I would like to believe it’s either lack of knowledge or an oversight by the carver, as I’m sure was the case this time. It’s a debate that’s been going on for as long as I can remember. In fact, to read more on this topic search back to my blog of October 5, 2021 where I have written on this in the past. Thank you again, Donald for bringing up this meaningful subject.
My next comment comes from my friend, Jon Gledhill from St. George, Utah with some pertinent information he learned along his woodcarving journey. Jon writes:
“Bob, Thanks for including me in this group. I appreciate your insights and thoughts about experimenting and being willing to try new things. I agree whole-heartedly.
I was really resistant to learning from other sources (books, etc.) when I began carving in 1995, because I wanted to “discover my own style”. Thanks to some friends who gave me books and tools for birthday gifts over the next few years, I began to experiment with different carving styles.
When I finally decided to seek guidance from others, I was surprised and pleased at two things: first, my carving skills improved dramatically, and at a much faster pace, and, second, the carving community is amazingly friendly and helpful.
As my skills have developed, I’ve tried to give back, and share my enthusiasm and skills with others – as a way to honor and express gratitude for those who have helped me along the way.
Your emails are appreciated for more than their content. They’re a connection to the kind of people I love being associated with. Thank you!
Sincerely, Jon Gledhill St. George, Utah”
Thank you for writing and for your kind words, Jon! They are greatly appreciated. In my opinion, the best way to learn to be a better wood carver is to keep an open mind. Don’t get hung up on just one type of resource or method. Try everything…read books, watch videos, attend shows, talk to other carvers and study their work, and perhaps even join a local woodcarving club. As you have found, wood carvers are some of the nicest people you will ever meet and almost every one of them is more than willing to help and share their knowledge. With that every carver in his/her own small way is actually giving back to the community. Helping other carvers and giving back is not only important to the growth of the woodcarving community but also very gratifying to yourself, and I encourage you to continue the good work you are doing.
Photo Shop

“Photo Shop” is the section of Wood Chip Chatter where carvers can send in photos of their wood carvings for display. It’s your chance to show off your work…sort of a show and tell. The photos will only be displayed and no comments or critiques will be made. For critiques on your carvings send them in to the “Carver’s Corner.” Send your photos to: carverbobk@woodchipchatter.com
Our first entry to the “Photo Shop” this month comes from my good friend, Dean Stewart who sent in some photos of two beautiful pendants he recently carved. “BobIn case you need some context here is a recent fox pendant I carved from basswood and a wolf from black walnut.”
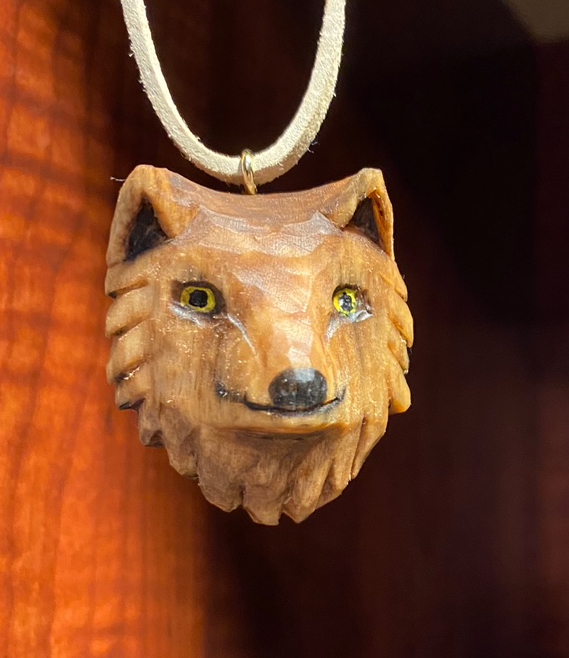

Nice work on both, Dean! I really like them. Thanks for the photos!
Our next entry comes from my good friend, Geir Larsen from Lofthus, Norway. Geir has been carving for four years and learned from books and watching YouTube videos. Geir says he is partial to small and cute pieces. These are some of the mushroom houses he has carved recently.
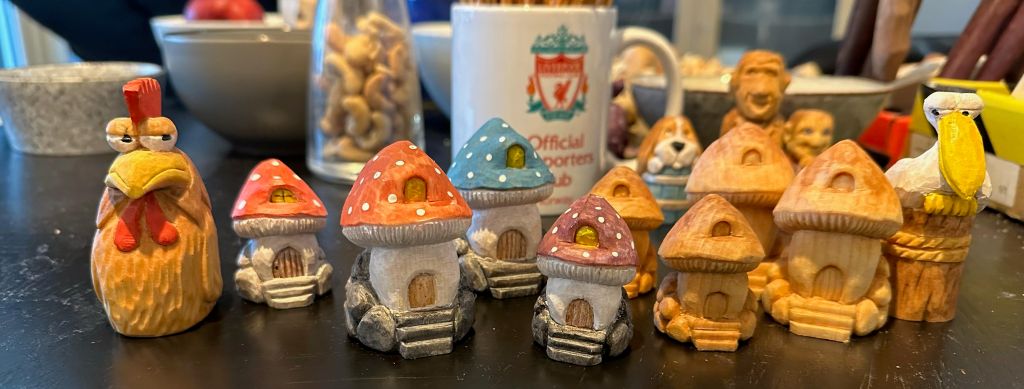

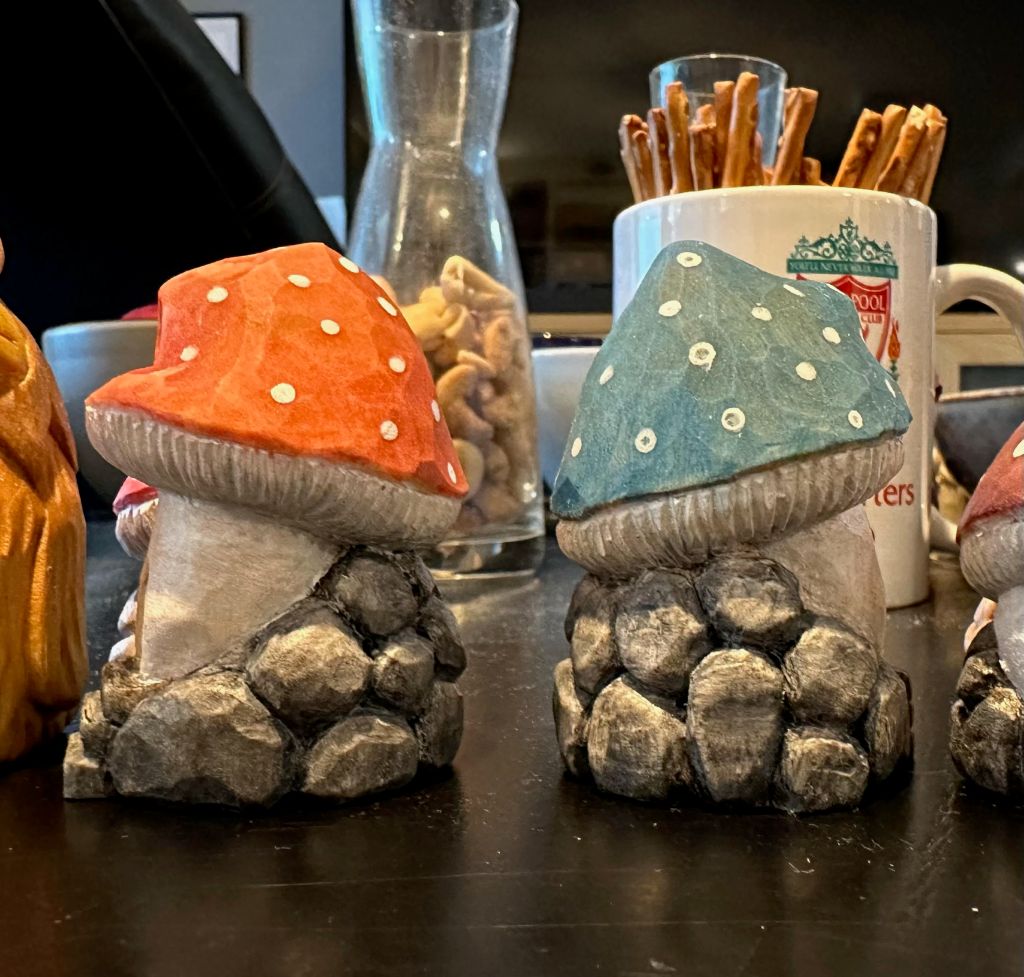

Thank you so much for the photos, Geir. Your carvings are terrific! It’s amazing how accomplished you have become in just four years.
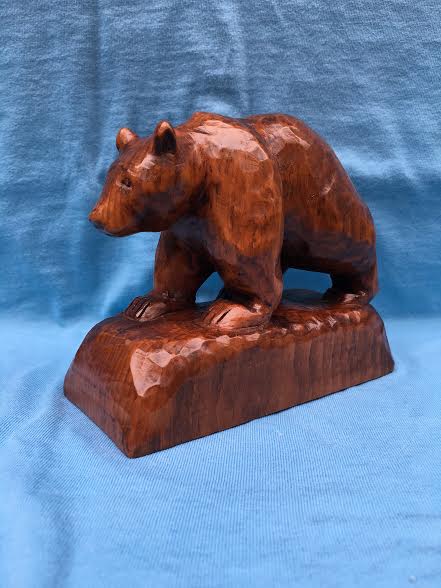
I thought I would add a carving photo to the “Photo Shop” this month so here is a carving of a grizzly bear I did many years ago:
Carving Tip
Watch the Grain!
Watch the grain direction. Even the grain in a clean piece of basswood sometimes changes direction. If you’re carving and suddenly your knife digs in and the wood starts to tear, splinter or becomes resistant to carve, turn the wood around and carve in the other direction.
Questions & Answers

I received some excellent comments from my friend John Nielson of Overgaard, Arizona with answers to the cracking problem he had with his carving last month. John agreed with my advice and did not give up because of the problem he had. The answer he found is most enlightening. John Writes:
“Bob:
Follow up on the previous email about wood cracking.
After spending more than 70 hours on my carving, I did not want to give up because “wood does what wood wants to do.” I just had to try to salvage my first human bust.
I was browsing YouTube and found a couple videos on repairing cracked carvings. They were more geared towards chainsaw carvings but the cracks they showed were similar to my dilemma, so I watched and then tried one of their solutions for stained/natural wood.
Using cut-offs saved from the blank, I created wood wedges to put in the cracks. Wedges were same wood & inserted in the same grain direction. In all I had to make 10 wedges to address the major voids in my blank.
The secret they used was Gorilla glue! Why? The glue is activated by water and expands 3-4x its volume once activated. Since the crack is not straight and the wedges don’t completely fill the void, the expanding foam from the Gorilla glue helps fill the gap.
Spray the crack with water. Then put Gorilla glue on both sides of the wedge. Use a mallet or piece of scrap to tap the wedge into the crack and let the Gorilla glue do its thing. Continue until all wedges have been inserted. Leave all of the wedges proud of the wood. Set aside for 24 hours.
I am providing a few before & after pictures.


You can see that the Gorilla glue does make a bit of a mess if you don’t use a brush to apply it. (I just squeezed it from the bottle.) This fix is adding substance to the existing blank & allowing me to continue carving. Much of the surface will be modified as I finish the piece, so I am not really worried about the foam oozing out.
When trimming the wedges, it is recommended that care be taken. Using a saw, Dremel or a grinder is better than a mallet and chisel. Basically the trimming should not be a blunt force that could tear out the wedge.
The smaller cracks will be filled with Elmer’s Pro Bond because of its ability to take on stain.
I will send pictures of my progress and hopefully the final product in the near future. Bottom line-I hope this offers a solution that others find helpful.
Keep the chips flyin’!
John Nielsen”
Excellent work, John, and congratulations for sticking with it. It pays to do research. Hopefully, the solution will work and by all means send in your WIP photos. I am anxious to see how things progress. Also, Gorilla makes many different types of glues. Can you tell us exactly what type is the one you used?
Pattern of the Month

Upcoming Workshops & Seminars

Woodcarving an Angel
Teacher: Dave Stetson
Dates: September 2,3,9,10,16,17
Times: Sat, Sun – 9:30am-11:30 Pacific /11:30am-01:30pm Central / 12:30pm – 2:30pm Eastern
12 hours (6 sessions – 2 hours each day)
Location: Online (Via Zoom)
For details and to sign up email Dave Stetson

Woodcarving Lion in tree
Teacher: Janet Cordell
Dates: September 8,11,15,18,25,29
Times: 2-4 p.m. Pacific Time 3-5 p.m. Mountain Time 4-6 p.m. Central Time 5-7 p.m. Eastern Time
12 hours ( 6 sessions – 2 hours each day)
Location: Online (Via Zoom)
For details and to sign up email janet_cordell@yahoo.com

Carving Witch Hazel
Teacher: Dale Green
Dates: September 30 October 1,7,8
Saturday & Sunday both weekends 9:30 am-11:30 Pacific / 10:30 am – 12:30 pm Mountain /
11:30 am- 1:30 pm Central / 12:30 pm – 2:30 pm Eastern
8 hours ( 4 sessions – 2 hours each day)
Location: Online (Via Zoom)
Cost: $100.00 includes roughout and shipping within the US (International $120)
Pay for registration with Dale here: https://paypal.me/DaleGreenWoodcarving

Woodcarving Santa
Teacher: Dave Stetson
Dates: October 21,22,28,29 Nov 4,5
Times: Sat, Sun – 9:30am-11:30 Pacific /11:30am-01:30pm Central / 12:30pm – 2:30pm Eastern
12 hours (6 sessions – 2 hours each day)
Location: Online (Via Zoom)
For details and to sign up email Dave Stetson
Online Classes With Chris Hammack
Teacher: Chris Hammack
Chris Hammack is offering a new series of online classes to help students learn and sharpen their woodcarving skills. Individual and Group Classes are available through his web site chrishammackart.com/groupclass

Whittle Wednesdays
Teacher: Dwayne Gosnell
Dates: Two – 2 hour classes each month on Wednesdays
Location: Online (Via Zoom)
To sign up contact Dwayne Gosnell via email dagwood_76@gmail.com

Woodcarving Academy
Established in 2020, the Woodcarving Academy offers dozens of videos and seminars created by some of the country’s top level instructors. More videos are added regularly as they are created by the instructors.
With a paid subscription to the Woodcarving Academy you can view any videos you like for as many times as you like.
Subscription rates: Monthly = $19.95 Quarterly = $49.95 Annual = $139.95
There is even a Free level which allows you to tour the website and watch the sample videos and content, and receive email updates as new content becomes available.
Check out the Woodcarving Academy and learn with the masters right in the comfort of your own home! Go to: www.woodcarvingacademy.com or Email: support@woodcarvingacademy.com
News & Announcements


The International Association of Woodcarvers has upcoming Zoom meetings on the following Saturdays at 3PM EST with special guest presenters. Check them out…
Zoom: 310-460-3575
Presentation Schedule:
9/2 – Brian Doty
9/9 – TBA
9/16 – Robert Rangel
9/23 – Live broadcast from the CCA’s Carvin’ The Rockies 2nd Annual Event
9/30 – Rich Embling
10/7 – Tom Wilkinson
10/14 – Live from the Sevierville Show
10/21 – Chucky Ducky Schuck
10/28 – Ashton Brown of Badger State Blades
INTERNATIONAL ASSOCIATION OF WOODCARVERS
COME JOIN US!!
The Jersey Hills Wood Carvers (JHWC) club is a small but growing group of wood carvers sharing their time, knowledge and joy of woodcarving. The JHWC generally meets from 7:00 PM EST to 9:00 PM EST on the 1st, 3rd and 5th Thursday of each month (when school is in session) at the Jefferson Township High School wood shop classroom.
Membership is “FREE” and open to anyone interested in woodcarving regardless of their ability.
JHWC’s Upcoming Meetings and Events
2023
September 7th and 21st
October 5th and 19th
November 2nd, 16th and 30th
December 7th and 21st
2024
January 4th and 18th
February 1st, 15th and 29th
March 7th and 21st
April 4th and 18th
May 2nd, 16th and 30th
June 6th and 20th
For more information contact:
Al Santucci alsantucci4@gmail.com President
Bill Brunner billbrunnerdesign@gmail.com newsletter/website editor
Or visit:
Website: https://www.jerseyhillswoodcarver.com/
Facebook: https://www.facebook.com/groups/736479646821641/
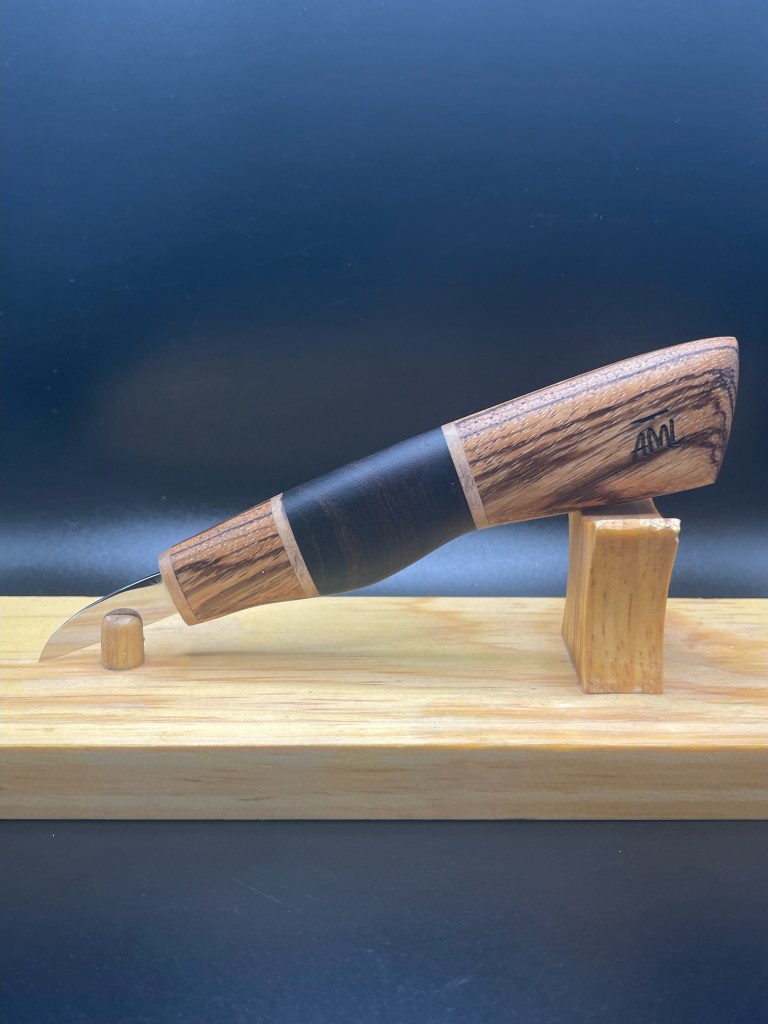
AML Wood Carving Knives

AML Wood Carving Knives are handmade by Andy Loughlin in Monroe, New York.
The blades are made from 1095 high carbon steel sharpen easily and hold an edge well. The variety of handle styles are all made from diverse exotic woods from all around the world. The knives are all available for auction on EBay under “AML Knives.” Bidding usually starts at $22 and most knives sell for between $40 and $100.
Every knife comes carving sharp right out of the package and each one comes with a custom made magnetic wooden sheath (see below) at no extra cost.
I now own two AML Knives and can speak personally about their quality. These are not production knives. Each knife is handmade by Andy, himself. The knives are very sturdy, well made, and will stack up well to the big boys. These knives have quickly become quite popular and sell out fast so check the site (“AML Carving Knives” on EBAY) often for availability. Below are examples of some knives currently available or which have recently sold:


ASKING FOR YOUR PARTICIPATION!!!
Your contributions to Wood Chip Chatter are a key component to making it the blog that it is. You may notice that some months certain sections are missing and the reason is there were no entries sent in to that section. I hate to see that and I’m sure you do too. So let’s all pitch in and do just a little bit once in awhile with a question, comment or photo. Send them to carverbobk@woodchipchatter.com. They will help keep Wood Chip Chatter going and will be greatly appreciated.
Next month is October which means it’s time for pumpkins! Let’s have some fun and see how many of you will send in photos of your favorite pumpkin carvings!

The next issue of Wood Chip Chatter will be posted on October 6, 2023.
Keep a sharp eye out for it!

Keep a sharp edge, and keep on carvin’!


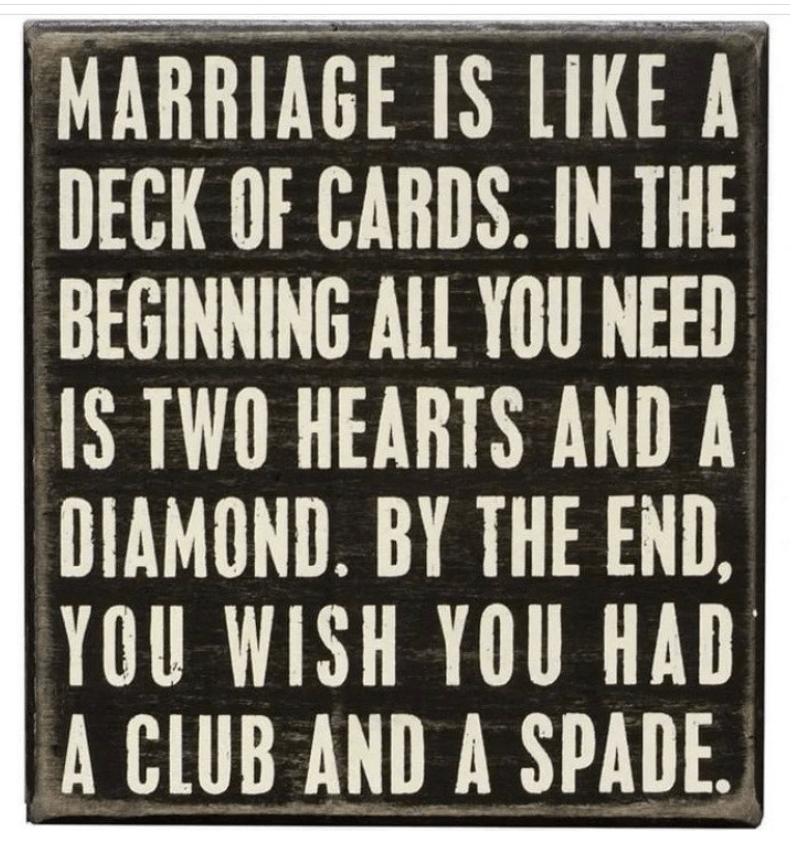
Funny Bone


Bob: Please include our upcoming class with Kev
LikeLike
Hi Wade,
What class is that? Can you give me some details? Thanks.
LikeLike
Bob:
<
div>Could you please put
LikeLike