
I‘ve been carving for close to 60 years now and I’m still learning. That’s the thing about carving, you never stop learning. The more you look around, the more you find new ways of doing things, whether it’s how to carve eyes or how to antique your carvings. There’s always something out there that you never knew or tried before, which brings me to the purpose of this story.
I made my career as a chemist, so naturally I was always experimenting. Experimenting is in my blood. So even after 12 years of retirement I’m still experimenting, even when it comes down to woodcarving. This is how we learn. We learn through experimentation. In other words, if you don’t try it how do you know if you can do it or if it works?
We all have our preferred methods of finishing our carvings, including me. Some of us seal our carvings with oils before painting while others just paint right on the dry wood or some even paint on wet wood. After painting, the sky is limit as the finishing possibilities are endless. Do I antique or not antique? Do I finish with acrylic, polyurethane, lacquer, varnish, etc.? Do I wax or not wax? And finally, what combination of all of the above do I use?
I, like most, have my preferred method and I’m happy with the results I get, but the chemist in me asks, do I have the best method? Maybe I should experiment some more, so I continue to experiment, and continued to learn.
So let me tell you about my latest experiment. I had just completed carving a Santa ornament and it was now ready for the painting stage. At this point, more often than not I will coat the carving with walnut oil, let it dry a bit then go on with the painting (with acrylics). This time, however I thought I would experiment. So instead of coating with walnut oil I decided to spray the carving with Krylon clear matte acrylic spray. I immediately noticed a big difference that I didn’t like. The carving had turn very light, almost white, a far cry from the golden brown color I get with the walnut oil.
However, I was too far along with this carving to give up so I continued on to the painting phase after the acrylic dried. That’s when I noticed the second failed result from my experiment. It was impossible to paint with watered down paints because the paint looked chalky after it dried. So I was forced to apply the paint heavier than I wanted, although I have to admit with the heavier coat of paint some parts of the carving began to look okay.
There was one area of the carving I couldn’t save though, and that was the face, a critical area of any caricature. When I use walnut oil I find that I don’t usually need to paint the face. I only use a little red to add some blush highlights. This time, though, because the face was so white I was forced to paint the face with rather heavy coats of paint which did not give me the results I wanted.
After the paints were completely dry I forged on with my normal method of finishing a carving. I gave the paint a sealer coat of the Krylon clear matte acrylic spray, allowed the Krylon to dry for about 4 hours then applied a coat of Howard Feed-N-Wax as I normally do. After letting the wax cure overnight I buffed it with a soft cloth and horsehair shoe brush. In the end, in my opinion the carving looked acceptable but not what I really wanted.
My experiment was a failure, but I learned three valuable lessons from it. I learned 1) Spraying a carving with Krylon clear matte acrylic is not a good choice. 2) Never give up on a wood carving. Most of the time you can make it work, and if you can’t, it’s a learning experience, and 3) If I had never experimented I would have never learned lessons #1 & #2.
The moral of the story is don’t be afraid to experiment, try new things or ask questions, and never stop learning. Get out of your comfort zone! For example, if you never carved eyes, ears or hands before, try them. Practice on scrap wood. If you never attempt to carve an eye you will never carve an eye. Learn through experimentation, never give up, and never stop learning.
Reader’s Comments

I received some very nice comments from a few of my reader celebrating the two year anniversary of Wood Chip Chatter. The first one comes from my good friend, Bob Nesbit who said:
“Bob
Happy Anniversary on Wood Chip Chatter and all the work you put into it. I always look forward to receiving it and the good information it contains. Thanks for all your effort RJ Carver”
Thank you so much for your kind words, Bob!
I received a second message from my good friend, Robert Martel but the there was no content in the message. I’m sorry there was nothing to read in your message, Robert but I’m sure you had some nice things to say.
My next comment comes from my friend Anthony Ionnotta who enjoyed my tutorial on How to Carve a Moravian Star ornament that I posted way back on July 24, 2021. Anthony writes:
“Your step-by-step instructions are so clear that a beginner with a sharp knife can easily carve the Moravian star!
Bravo!”
Anthony, I’m glad you enjoyed carving the Moravian Star and found my instructions helpful. Thank you for your kind compliment.
My next comment comes from my friend, Glenn Smith with the Boynton Beach Woodcarvers in Florida in the form of an idea responding to last month’s article on how to make a depth gauge for relief carving. Glenn writes:
“Very good suggestion on measuring depth on relief carvings.
I have found another way that is simple enough and works good (at least for me).
A straight edge and a tire tread depth gauge. It gives readings in mm and 32nds of inches.
I really enjoy your newsletter and keep up the good work.
GLENN SMITH
BOYNTON BEACH WOODCARVERS
FLORIDA”
That’s a great idea too, Glenn, and I’m glad you’re enjoying Wood Chip Chatter! Do you have or can you take some pictures of it for me to post along with your comment?
My good friend, Jim Babcock of Columbus, Indiana wrote in to report on his experience using walnut oil to pre-treat his carving. Jim Said:
“Bob:
Thanks again for the suggestion to use walnut oil as a finish. Ordered some in and just had
an opportunity to use it on a basswood carving. I still may apply some diluted acrylic paint
to this piece, but I don’t mind the look of the walnut oil alone.
Jim Babcock
Columbus, Indiana”

I‘m glad you are happy with the walnut oil results, Jim. The walnut oil gives the wood a nice golden tone and has no odor. Lots of times I can avoid painting my faces and just add a little red here and there for blush highlights.
And last but not least I received a note from my friend, Lawrence (Laurie) Keating from British Columbia, Canada. Last month Laurie sent in two photos of the plinth he carved to the “Photo Shop” and since he signed his note as Laurie I mistakenly referred to him as a female. Well, Laurie writes in this month to set me straight. He said:
“Thanks for adding me to the blog. Only one point – Laurie is short for Lawrence!! Not the first time I’ve been a “her” . It’s more commonly used as a man’s name in Canada than the USA. I think it stems from the British. No harm done”
Thanks once again for sending in your photos, Laurie, and my sincere apologies on the gender mistake. I was unaware of the use of the nickname Laurie for Lawrence in Canada. In the United States males named Lawrence are commonly referred to as Larry.
Photo Shop

“Photo Shop” is the section of Wood Chip Chatter where carvers can send in photos of their wood carvings for display. It’s your chance to show off your work…sort of a show and tell. The photos will only be displayed and no comments or critiques will be made. For critiques on your carvings send them in to the “Carver’s Corner.” Send your photos to carverbobk@woodchipchatter.com.
My first entry to the “Photo Shop” this month comes from my good friend, Ray Steinhart who sent in a photo of some very cool looking pumpkins he carved. Ray said: “Congratulations on wood chip chatter. Happy Anniversary. I’ve only been carving a couple years I wished I had started a long time ago. I try to pick carving’s without eyes, they drive me crazy.”

Thanks for the photo, Ray…always very much appreciated. And thanks for the congratulations.
I really like your pumpkins, especially the straw hair under the hats.
Here’s a little bit of tough love, you will never learn to carve eyes if you don’t try them. There are all types of eyes and ways to carve them. You have nothing to lose. Start with simple cartoon eyes and work your way up.
Remember, if you ruin it, it’s just a piece of wood, and chalk it up to practice and a learning experience.
My next entry to the “Photo Shop” comes from my good friend, Henrik Rydberg from Sweden who send in two photos of an excellent 80’s Rock Fan he carved. Henrik wrote:
Hello Bob,
Regards from Sweden!
Here is a picture of my ”80s rock n’ roll fan”. I carve the figures in linden and my daughter Kim paints them with acrylics. I finish them with danish oil. I have made a new website at www.henrikrydberg.com where I posted pictures of my carvings.
Thank you for your great blogg!
Best regards
Henrik Rydberg


Thank you for the photos, Henrik! That’s a really great carving. I like everything about it, especially the job you did on the hands You and your daughter make a terrific team. I hope you’re enjoying Wood Chip Chatter and that we’ll be seeing more of your great carvings in the future.
Carver’s Corner

“Carver’s Corner” is the section where you can send in photos of your carvings to have me critique them and offer you my truthful opinions on what you did right and what you might improve on next time. It’s an excellent opportunity to improve your carving skills! Send your photos to carverbobk@woodchipchatter.com.
I received an entry to the “Carver’s Corner” from my good friend Jim Weiner who sent in a photo of three Santa ornaments he recently completed and would like some advice on them. Jim writes:
“HI Bob,
I am a relatively new carver of 3 years, and I have greatly improved since the beginning, attached is a photo of 3 Santa Ornaments I have recently carved. Can you look at them and recommend one area I should focus on for improvement please? I “think” the beard would be the area, as I am struggling with hair layering and any advice would be greatly appreciated.
Thanks,
Jim “

Thank you for the photo, Jim! I’ll be happy to help where I can.
The overall shape of the heads and faces are fine, as are the hats. You also did a good job on the eyes. I would work on adding some bags and creases below the eyes on your next ones, though. Add some nostril holes to your noses in the future. They will make a big difference in the appearance of the carvings and can easily be added with a small U-gouge or even your knife if you don’t have the right gouge.
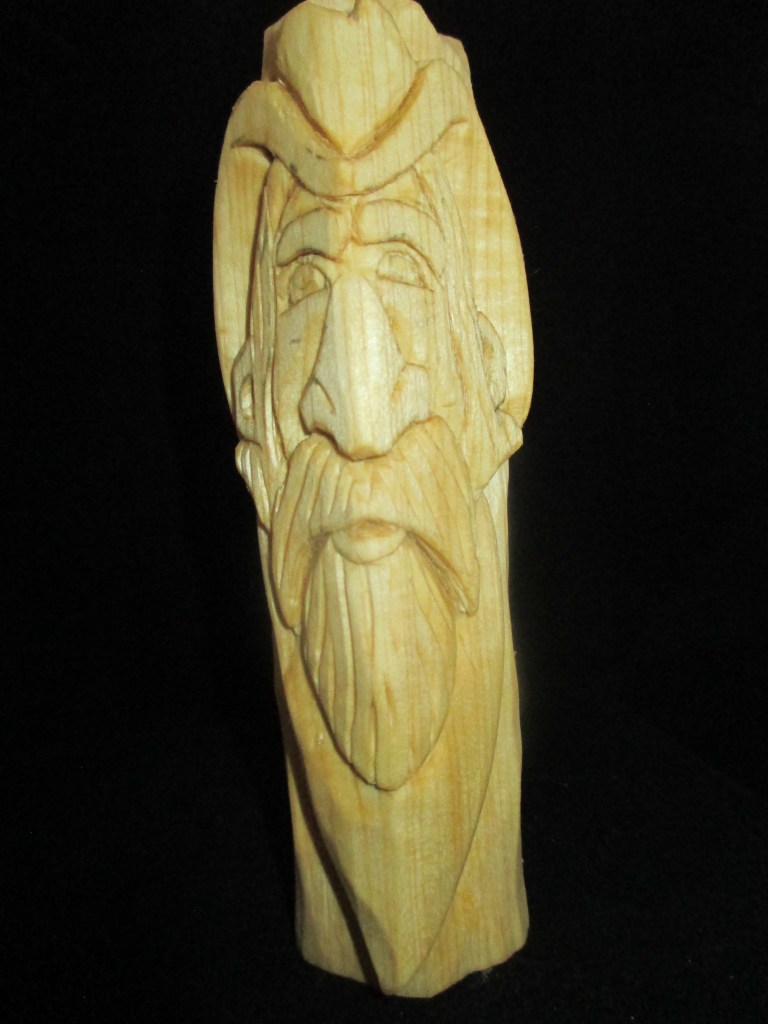
I can see your concern over your beards and mustaches. You’ve made a valiant attempt to use wavy lines but like with everything, there is a technique to carving good ones. Besides making use of S-cuts you want to use different sizes and shapes of gouges. Start with a large U-gouge or soft V-tool and make just a couple (3 or 4) of random deep cuts, then go to a medium-sized U-gouge or V-tool and carve random S-cuts all around the beard area. Finish by using a small U-gouge or V-tool to make more S-cuts. Then take your carving knife and carve some random deep cuts throughout the beard. No more than 3-5 cuts will do it. I also find it important to bring some of my gouge cuts all the way to the edge of the carving as I go, to break up the ends of the beard and create separations. Use your carving knife to enhance these separations. Do the same thing on the mustache. The photos below show two Santa ornaments which are by no means perfect examples, but help to show the separations achieved by using the techniques I just described.
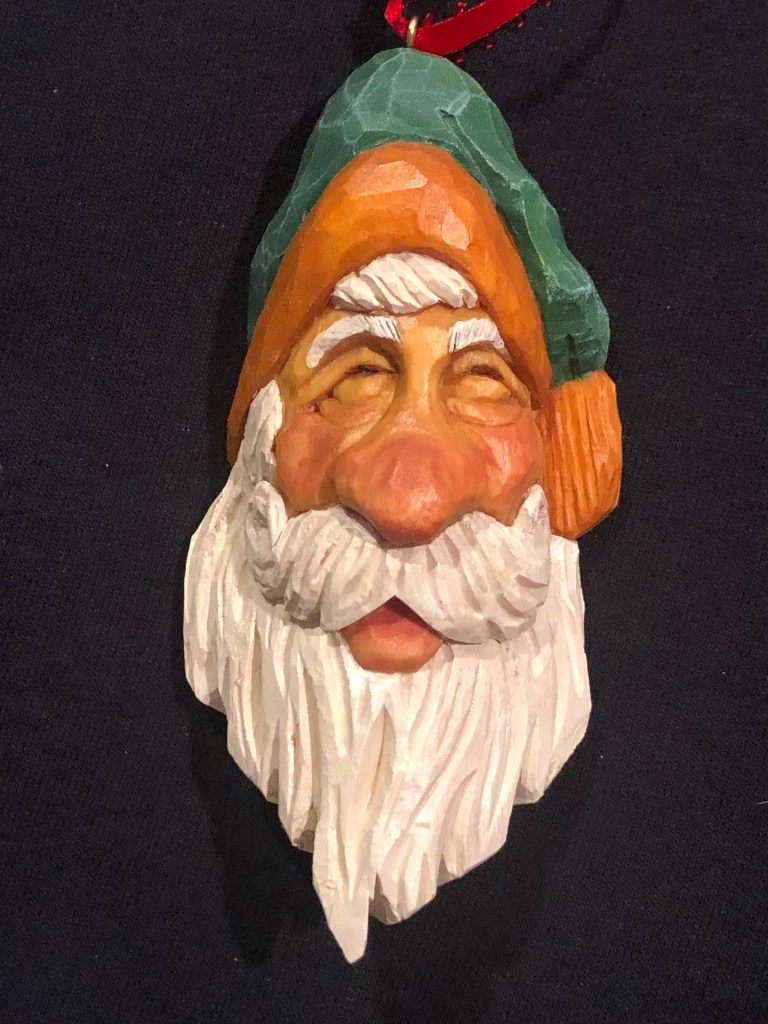
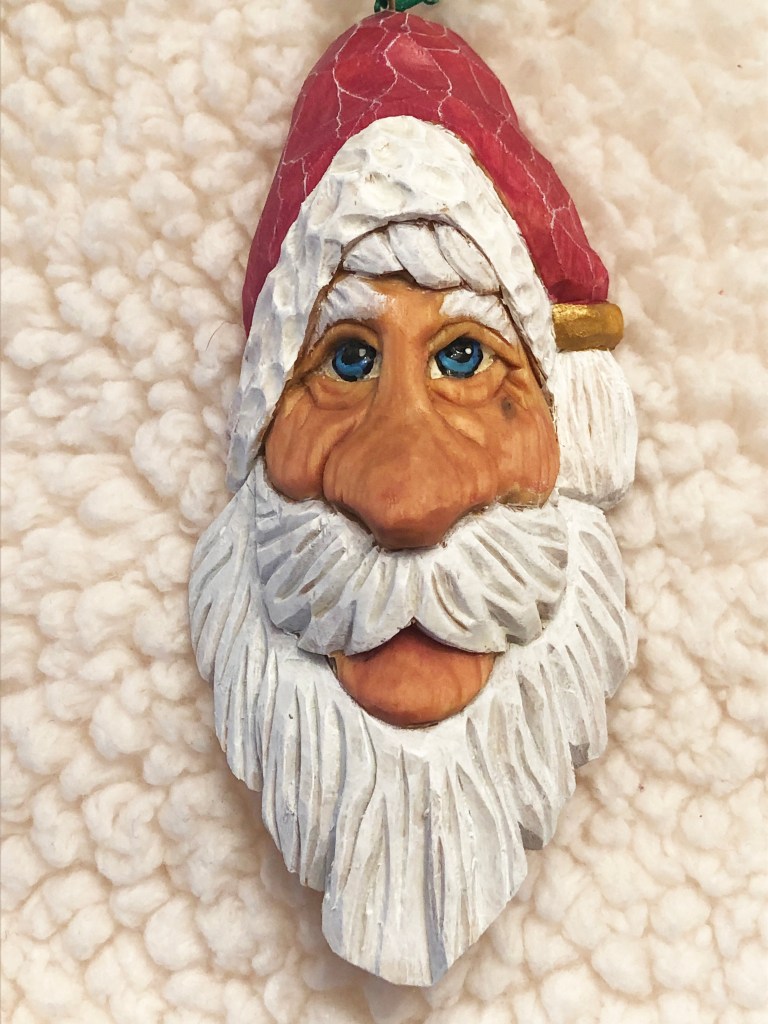
Your painting also needs improvement. The paint is applied way too thick and it gives the carving a plastic look. Water down your paints and apply them in several thin layers rather than in one thick layer. The faces all appear to be painted with one flesh tone color. In the future, blend in some VERY thin coats of red to areas like the tip of the nose and cheeks to create blush highlights and bring the faces to life. You will see a big difference. Use the two photos above as guides.
As a relatively new carver you are doing a terrific job, Jim. You are carving faces and as anyone will tell you they are not easy to carve. I hope you will find this critique helpful, and that your carvings continue to improve as a result. I would love to see more of your work as your carvings progress further.
Questions & Answers

I received a question from my friend Judy about what kind of knife I used in my How to Carve a Moravian Star tutorial. Judy wrote:
“What type of knife are you using? Great tutorial, hoping my hubby will give it a try.”
The knives I use are Helvie knives but any good wood carving knife will do as long as it’s sharp. Helvie knives are hard to get but Flexcut, OCCT, AML and Deep Holler are also good knives which are readily available at reasonable prices. I hope your hubby will try the tutorial, Judy. It’s a fun project and the star looks nice hanging on your Christmas tree.
If he needs a recommendation for some good wood carving knives just send me a note.
I received a very intriguing question from my friend, John Nielsen of Overgaard, Arizona regarding a serious problem with wood cracking. John writes:
“I have a question about wood cracking.
I took a class recently in Colorado where the average humidity ranged from 10 to 20%. We had butternut log “roughouts” that were cut from logs harvested 2 years ago. They were prepared for class about a week before in a location that was about 50% humidity and put into plastic trash bags & tied off for transport to class.
My blank was an end cut from the original log so there was some minor cracking to begin with. The blank was moist and the plastic bag was wet when I opened it. I did not notice anything significant when I mounted the blank to the carving vise. Each day at the end of class I covered the carving with the plastic bag and tied it off.
On the third day I began to notice a crack developing on both sides of the carving. It grew a little each day but became very obvious on the fifth day as wood fibers began tearing. On the seventh day when I removed the carving from the vise, I noticed the crack open up more. Apparently the attachment to the vise was bridging the gap. It was then I realized the crack was the entire width, through the pith, and was 2/3 up the carving.
That night I soaked the entire carving. The next afternoon I pulled the carving out and saw some wood fibers had swollen and the crack had closed up midway up the carving, but otherwise the soaking did nothing. I rewrapped in plastic, doubled with another and set it aside.
Two days later I checked and though the wood was moist, there was no obvious change other than the cracking seemed to stop.i flipped the carving so the end cut was facing up and poured water into the crack and to my surprise water poured through the pith as if it was a drain.
Any advice to stop this major crack, prevent any future cracking, and to salvage the carving I have so I can complete it?
Thanks in advance!
John Nielsen Overgaard, AZ”
John,
To answer your question about stopping the major crack I’m afraid it is likely too far gone to do much with. although sealing the carving with a polyurethane or lacquer should deter future cracking and, therefore possibly salvage the carving in general.
Based on what you have told me, and some things we don’t know, it appears you may have been headed for problems right from the start, especially if the butternut logs which were harvested 2 years ago were simply cut and left to dry while laying on the ground outside. Immediately after logs are cut they begin to lose moisture. Most of the moisture is lost rapidly through the ends of the logs. The proper way to store fresh cut logs is to seal the ends with paint or other type of sealer. This slows the moisture loss and reduces checking (or cracking). The logs should also be stored on a rack off the ground.
You mentioned your blank was an end cut from the log which as we now know is the area where most of the cracking occurs, so I think you were in trouble right there. Also, the fact that the blank was moist and the inside of the bag was wet when you opened it piques my interest. Air that contains 50% humidity is not considered saturated and should not cause the amount of condensation you are describing from a typical piece of wood after it is placed in a plastic bag. It appears to me your blank may have been soaked with water before it was placed in the bag and shipped.
Soaking your blank with water and double bagging it was a futile effort as you found out. The only thing water will do is swell the wood fibers temporarily, but it not deter the cracking process. In fact, if anything it made it worse. Drying is a natural process that wood undergoes. It is inevitable and cannot be stopped, only slowed down, and once wood starts cracking you cannot reverse the process.
Unfortunately, you were given a bad blank which was cracked and wet. Too wet, in my opinion. Wood is destined to dry, and so was your blank. Covering the carving with the plastic bag every night may have slowed the drying process very slightly but at that point you had a relatively small piece of wet wood which was going to lose its moisture (rapidly) in a short amount of time with further cracking being the result.
Apply a coat of polyurethane to the carving and be sure to allow it to get inside the cracks. If you carve more on the blank I suggest you recoat the areas that have been carved away. This will help to slow the cracking of the blank.
I hope this has been somewhat helpful. Feel free to write back if you have any further questions.
Pattern of the Month
Here is a nice challenge for all of you chip cavers. This would make a nice project for a plate.

Upcoming Wookshops & Seminars

Introducing Fab Phoebe!!!
- Instructor: Bob Hershey
- Dates: August 19, 20, 26 & 27
- Times: Saturday & Sunday both weekends 12:30pm – 2:30pm Eastern Time / 11:30am – 1:30pm Central Time / 10:30am – 12:30pm Mountain Time / 9:30am – 11:30am Pacific Time
- 8 hours (4 sessions – 2 hours each day)
- Location: Online Via Zoom
- Cost: $130.00 includes roughout and shipping within the US.
Payment may be made through PayPal, Zelle or personal check. If paying by PayPal add $5.00 service charge UNLESS you send it to friends & family. For PayPal and Zelle please use email bzcarvn@ptd.net. This is NOT the same email address as this email was sent from. For personal check mail to Bob Hershey, 13 Pfautz Ave., Lititz, PA 17543. Please include your mailing address so I can send the roughout. About two weeks before the class I’ll email you the link to the Zoom page for the class and the password to view the videos.
Thank you for participating in past classes and I look forward to carving with you again.
For more information contact Bob Hershey at bzcarvn@gmail.com or 717-951-5569.
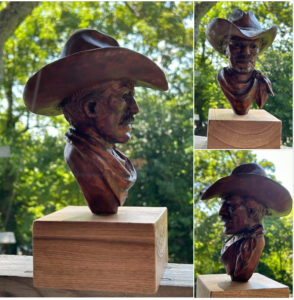
Carving the American Cowboy
Teacher: Janet Cordell
Dates: August 7,11,14,18,21.25
Times: 2-4 p.m. Pacific Time 3-5 p.m. Mountain Time 4-6 p.m. Central Time 5-7 p.m. Eastern Time
12 hours ( 6 sessions – 2 hours each day)
Location: Online (Via Zoom)
For details and to sign up email janet_cordell@yahoo.com

Woodcarving an Angel
Teacher: Dave Stetson
Dates: September 2,3,9,10,16,17
Times: Sat, Sun – 9:30am-11:30 Pacific /11:30am-01:30pm Central / 12:30pm – 2:30pm Eastern
12 hours (6 sessions – 2 hours each day)
Location: Online (Via Zoom)
For details and to sign up email Dave Stetson

Online Classes With Chris Hammack
Teacher: Chris Hammack
Chris Hammack is offering a new series of online classes to help students learn and sharpen their woodcarving skills. Individual and Group Classes are available through his web site chrishammackart.com/groupclass

Whittle Wednesdays
Teacher: Dwayne Gosnell
Dates: Two – 2 hour classes each month on Wednesdays
Location: Online (Via Zoom)
To sign up contact Dwayne Gosnell via email dagwood_76@gmail.com

Woodcarving Academy
Established in 2020, the Woodcarving Academy offers dozens of videos and seminars created by some of the country’s top level instructors. More videos are added regularly as they are created by the instructors.
With a paid subscription to the Woodcarving Academy you can view any videos you like for as many times as you like.
Subscription rates: Monthly = $19.95 Quarterly = $49.95 Annual = $139.95
There is even a Free level which allows you to tour the website and watch the sample videos and content, and receive email updates as new content becomes available.
Check out the Woodcarving Academy and learn with the masters right in the comfort of your own home! Go to: woodcarvingacademy.com or Email: support@woodcarvingacademy.com
News & Announcements


The International Association of Woodcarvers has upcoming Zoom meetings on the following Saturdays at 3PM EST with special guest presenters. Check them out…
Zoom: 310-460-3575
Presentation Schedule:
The International Association of Woodcarvers will be going back to its regular monthly meeting schedule beginning in September.
8/26 – Rich Smithson – Helvie Knives
9/2 – Brian Doty
9/23 – Live broadcast from the CCA’s Carvin’ The Rockies 2nd Annual Event
9/30 – Rich Embling
10/7 – Tom Wilkinson
INTERNATIONAL ASSOCIATION OF WOODCARVERS
COME JOIN US!!!
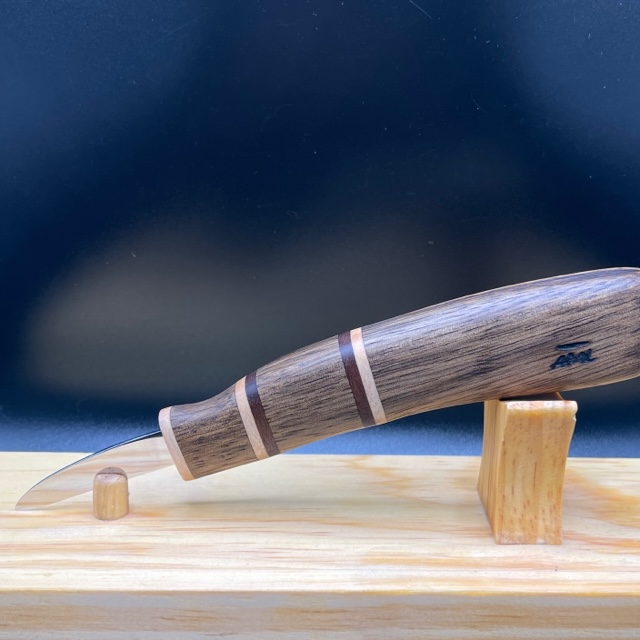
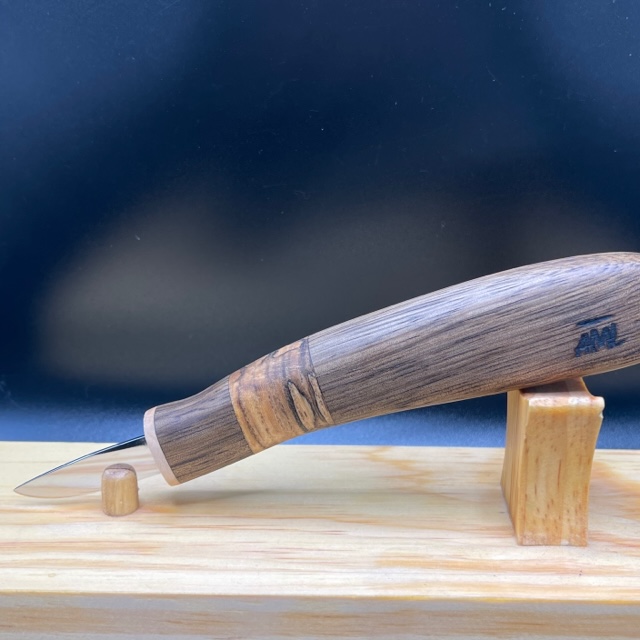
AML Wood Carving Knives
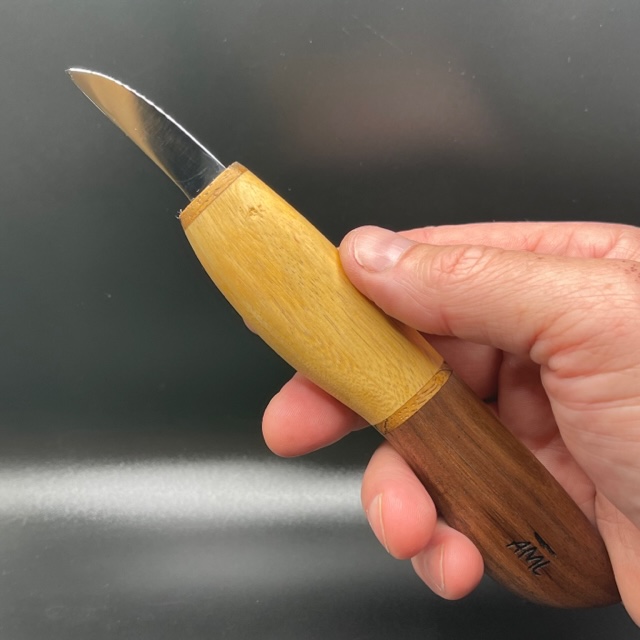
AML Wood Carving Knives are handmade by Andy Loughlin in Monroe, New York.
The blades are made from 1095 high carbon steel sharpen easily and hold an edge well. The variety of handle styles are all made from diverse exotic woods from all around the world. The knives are all available for auction on EBay under “AML Knives.” Bidding usually starts at $22 and most knives sell for between $40 and $100.
Every knife comes carving sharp right out of the package and each one comes with a custom made magnetic wooden sheath (see below) at no extra cost.
I now own two AML Knives and can speak personally about their quality. These are not production knives. Each knife is handmade by Andy, himself. The knives are very sturdy, well made, and will stack up well to the big boys. These knives have quickly become quite popular and sell out fast so check the site (“AML Carving Knives” on EBAY) often for availability. Below are examples of some knives currently available or which have recently sold:


Let’s All Pitch In!
Wood Chip Chatter is an interactive type of blog. It is unique in that there are two main drivers that make it work, input from me and input you. Without either one the newsletter cannot succeed. This blog has four main sections where you can contribute…Reader’s Comments, Photo Shop, Carver’s Corner, and Questions & Answers. Why not pitch in and send your contributions addressed to carverbobk@woodchipchatter.com. All will be truly and greatly appreciated. Thank you.
The next issue of Wood Chip Chatter will be posted on September 1, 2023.

Keep a sharp eye out for it!
Keep a sharp edge, and keep on carvin’!


Funny Bone


I really enjoy your email each month and read it all. Today, though, I felt I had to respond to this issue. One of the photos showed three pumpkins (which were done very well) that leaves you with the feeling that they were the original designs of the carver. In actuality they are from a Doug Linker video that is available on YouTube. I do a lot of Linker’s carvings, but would never put it online without giving credit to the designer. It might just have been an unintentional omission, but thought you would want to know.
LikeLike
Bob, Thanks for including me in this group. I appreciate your insights and thoughts about experimenting and being willing to try new things. I agree whole-heartedly.
I was really resistant to learning from other sources (books, etc.) when I began carving in 1995, because I wanted to “discover my own style”. Thanks to some friends who gave me books and tools for birthday gifts over the next few years, I began to experiment with different carving styles.
When I finally decided to seek guidance from others, I was surprised and pleased at two things: first, my carving skills improved dramatically, and at a much faster pace, and, second, the carving community is amazingly friendly and helpful.
As my skills have developed, I’ve tried to give back, and share my enthusiasm and skills with others – as a way to honor and express gratitude for those who have helped me along the way.
Your emails are appreciated for more than their content. They’re a connection to the kind of people I love being associated with. Thank you!
Sincerely, Jon Gledhill St. George, Utah
LikeLike
Great newsletter! Describing the experimental nature you have I could see you as the Mad Scientist or even the witches of MacBeth. “Bubble, bubble, toil & trouble…”😎😎
Did you see my followup on the wood cracking with before & after pictures? I will send more when I get the cracks filled snd the nlank is once again carve ready.
I was cleaning out emails and came to saved Wood Chip Chatter and realized i have all issues since at least January. Before I delete, do you need any previous newsletters?
John Nielsen Overgaard, AZ
LikeLike
Hi John,
I addressed what I thought was you problem with the cracking in your carving blank in my last newsletter dated August 4, 2023 but I have not seen your follow up with the before & after pictures. You might want to send them again and any other photos of how you filled the cracks. I’m sure my readers will be interested in how you did it.
Thank you for the offer of previous newsletters but all of the newsletters I write are saved in my archived files.
LikeLike
Bob, I’ve been enjoying your emails, with their insights, suggestions, and ideas. I do a lot chip carving, so especially liked the pattern you shared this month. Thought I’d send a couple of photos, showing it transfered a trivet board and after carving it. Would love your input on it. Best wishes, Jon Gledhill Hurricane, UT
LikeLike
Hi Jon,
I replied to you through email but I haven’t heard back from you so perhaps you didn’t get it. I got your message but there were no photos attached. Could you try sending them again? Thanks.
Bob K.
LikeLike
Thanks Bob! Didn’t get your email, but here are the photos I wanted to send you. Since the first email, I carved another version, taking bigger chips. I look forward to your input. Jon
LikeLike
Jon…don’t know what’s wrong but I still didn’t get the photos. Try sending them to my personal email: rwkoz51@gmail.com Thanks! Bob K.
LikeLike