
Congratulations to Wood Chip Chatter! This issue marks the second anniversary of my blog. I began two years ago in July, 2021 as a small publication with only a handful of subscribers, and today Wood Chip Chatter has grown to a monthly newsletter with nearly 1,000 subscribers bringing woodcarving and whittling information and news of a wide range of topics.
I want to thank all of my valued subscribers , both those who have been with me since the beginning and those who have recently signed on. I work tirelessly every month to gather stories, tutorials and other woodcarving related information as well as other topics of interest to make Wood Chip Chatter a valuable source that’s worth reading, and I hope you find benefit in what I produce. Here’s to many more years of wood carving and whittling fun!

Happy Anniversary!!!
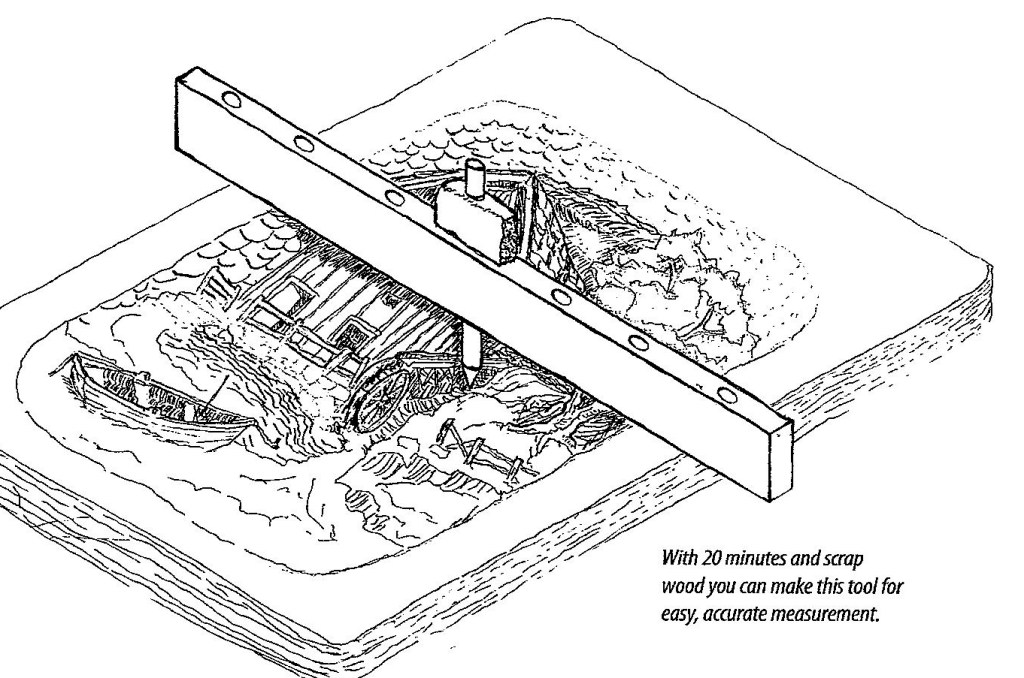
How to Make a Relief Carving Depth Gauge
from an article by Jim Dupont
To construct the depth finder, select a narrow piece of wood about 1/2″ (13mm) x 1 1/2″ (40mm) x 18″ (460mm). Cut off a section of 1/4″ (6mm) dowel that will accommodate the width of your board plus the deepest penetration you expect to make into a relief carving. Add a couple of extra inches for the eraser and a handhold. Sharpen one end in a pencil sharpener.
Drill holes, slightly larger than the diameter of the dowel, along the edge of the piece of wood every 2″ (50mm). These holes allow you to take depth readings at all areas of the carving. This provides a stop gauge while holding the dowel in place.
Reader’s Comments

I received a wonderful comment this month came from my good friend, Jim Babcock from Columbus, Indiana. Jim writes:
“Bob:
Thanks much for the latest Wood Chip Chatter; always much appreciated and a good chance to see what you and others are up to. Also great that you have an expansive calendar of events and seminars. Like so many things, the pandemic was very tough on carving shows and our vendors. In addition to sharing knowledge and checking out the vendor tables, they also provide support for their local communities. Keep up the good work Bob.
As a side note, have not yet tried your suggestion for walnut oil as a finish. I have used diluted gel stains from time to time and wonder if the results will be similar.
Jim Babcock Columbus, Indiana”
Thank you so much for your kind words of encouragement, Jim! I’m glad you are really enjoy Wood Chip Chatter. I try to bring new exciting and interesting information every month.
Definitely give walnut oil a try. When you do you’ll be glad you did and will never go back to boiled linseed oil again.
Gel stain is not the same as walnut oil or boiled linseed oil. The oils are wood finishes used for sealing wood and are mainly used by wood carvers as a pre-treatment prior to painting. Gel stain, on the other hand is just what it says…a stain. It is used to stain or color the appearance of the wood.. You would not want to use gel stain first and then paint over it. That said, gel stain makes and excellent antiquing medium to be used AFTER you paint. You can even apply a coat of walnut oil to the carving to seal the wood after the gel stain is completely dry.
I received another note from my good friend Todd Martin from Huntington, Indiana commenting on my response to his question about bugs in cottonwood bark. Todd Said:
“Thanks for the feedback, Bob! Very helpful. And thanks again for tracking down the information a out addressing bugs in bark.”
Anytime, Todd! I’m glad I was able to help.
Photo Shop

Photo Shop is the section of Wood Chip Chatter where carvers can send in photos of their wood carvings for display. It’s your chance to show off your work…sort of a show and tell. The photos will only be displayed and no comments or critiques will be made. For critiques on your carvings send them in to the Carver’s Corner. Send your photos to carverbobk@woodchipchatter.com
My first entry to the Photo Shop the month comes from my good friend, Geir Larsen, Geir has been busy making carvings from the new Ddalo carver series. Geir writes:
“1x1x2 Ddalo carver dog in barrel. Basswood, BLO, acrylics”

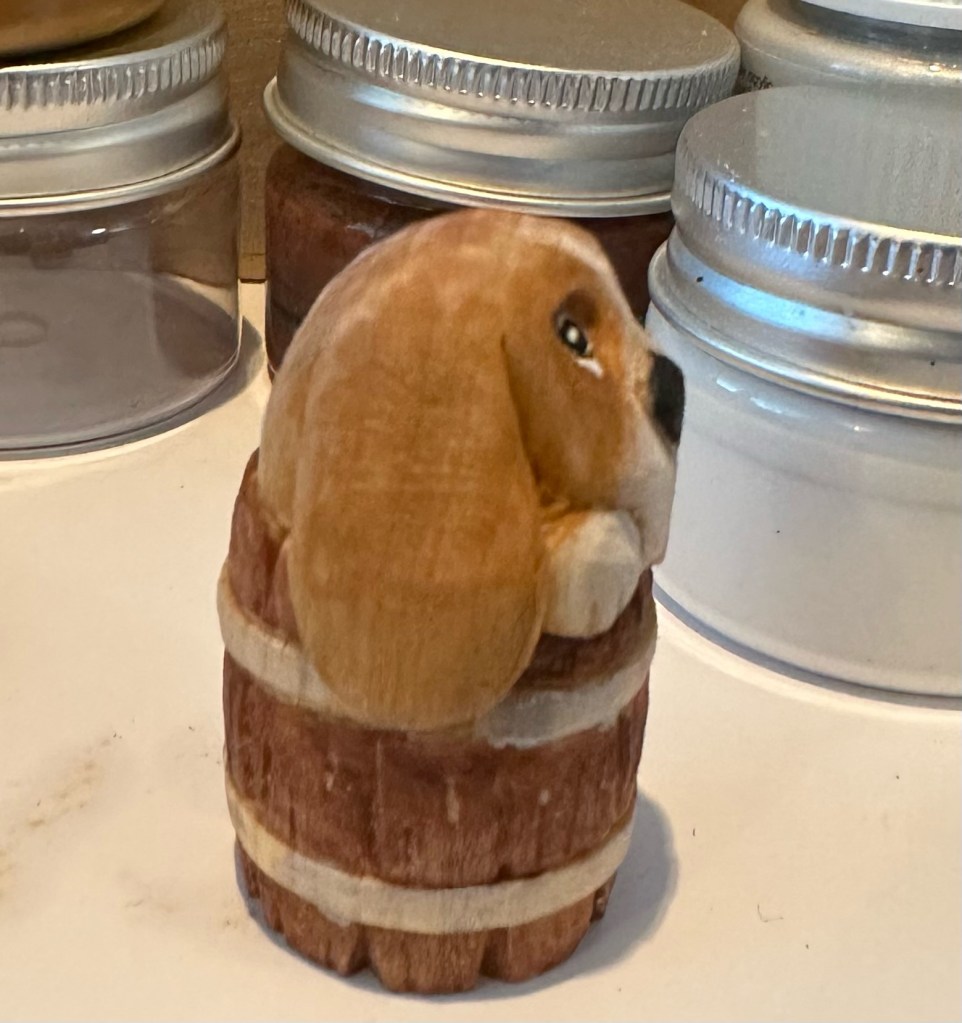
Super job on your dog in a barrel, Geir! I’ll have to try one of those some time.
My next entry to the Photo Shop comes from my friend, Laurie Keating from British Columbia, Canada. Laurie describes her carving below:
“Hi Bob. Thought I’d send in a couple of photos for the “show and tell” section of your newsletter.
I call these my Curious Folk carvings. Material is a 1”x2”x4” block of butternut. They’re carved in a rough, flat plane-ish style. The plinth is just a scrap piece of pine. Painted first with a black wash in the shadow areas. This is selectively carved back then thin color washes applied overtop. A coat of finishing wax completes it. There’s a short length of thick copper wire fitted into the plinth and up one leg of the character to hold him in place but also makes him removable. These characters are inspired by @aeminnoti on Instagram.
Thanks again Bob. Enjoy the newsletter
Laurie Keating
BC, Canada”
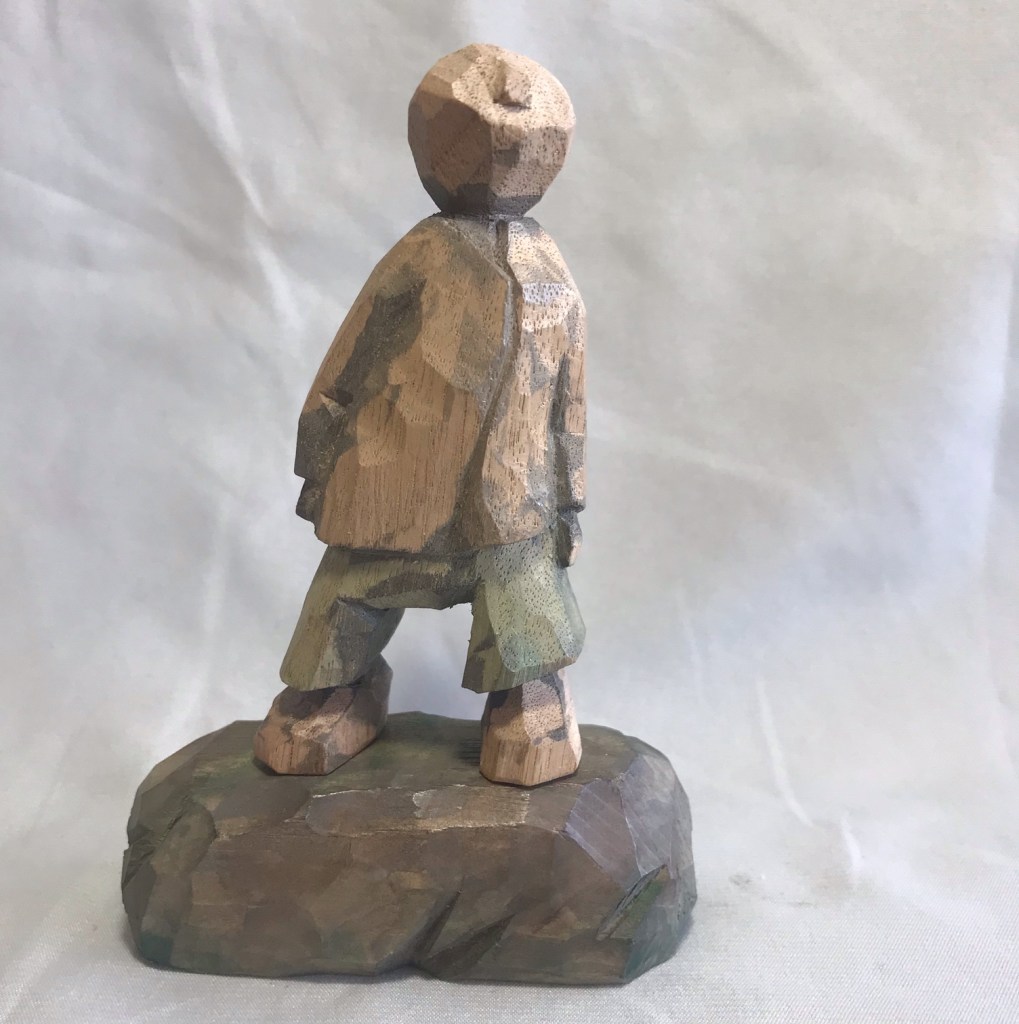

Thank you for sending in your photos, Laurie! I always appreciate getting comments, questions and photos from my readers. I had never heard of a plinth before so I had to look it up. Apparently it is basically a slab used as a supporting structure. If yours is that kind of plinth it is a very elaborate one. In any case, you did a very nice job on it, and although it is not a detailed caring it does appear to be in the flat plane style. Nice work on it, Laurie, and I’m glad you are enjoying Wood Chip Chatter!
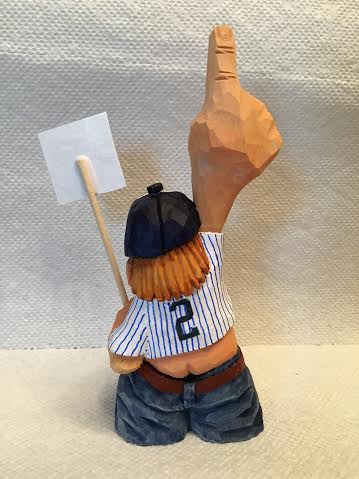
I thought I would add a couple of photos of a carving I did a few summers ago. I hope you like it.

Question & Answers

I received a question from my friend, Ernie Kelley who is looking for a good Santa carving book. Ernie writes:
“Hey Bob! I always enjoy your post! A lot of great information. Is the a Santa carving book that you would recommend? Thanks, Ernie Kelley”
Thanks for writing and your kind words. There are a lot of books on carving Santas out there. Some are better than others but I’ve never seen a great one yet. Woodcarving Illustrated is going to publish a book called How to carve a Great Santa. I believe it’s due to be published sometime before the end of this Summer. It will contain approximately 30 different projects from about 24 different popular authors, including myself (two of my projects will be featured in the book). It promises to be an excellent book on Santa carving which I’m sure every Santa carver will want to have in his library. If you’re not in a rush I would wait and look for when that book comes out. It will be well worth it.
Free Pattern

Upcoming Workshops & Seminars

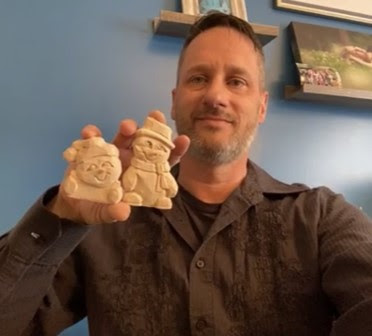
Introducing Fab Phoebe!!!
- Instructor: Bob Hershey
- Dates: August 19, 20, 26 & 27
- Times: Saturday & Sunday both weekends 12:30pm – 2:30pm Eastern Time / 11:30am – 1:30pm Central Time / 10:30am – 12:30pm Mountain Time / 9:30am – 11:30am Pacific Time
- 8 hours (4 sessions – 2 hours each day)
- Location: Online Via Zoom
- Cost: $130.00 includes roughout and shipping within the US.
Payment may be made through PayPal, Zelle or personal check. If paying by PayPal add $5.00 service charge UNLESS you send it to friends & family. For PayPal and Zelle please use email bzcarvn@ptd.net. This is NOT the same email address as this email was sent from. For personal check mail to Bob Hershey, 13 Pfautz Ave., Lititz, PA 17543. Please include your mailing address so I can send the roughout. About two weeks before the class I’ll email you the link to the Zoom page for the class and the password to view the videos.
Thank you for participating in past classes and I look forward to carving with you again.
For more information contact Bob Hershey at bzcarvn@gmail.com or 717-951-5569.
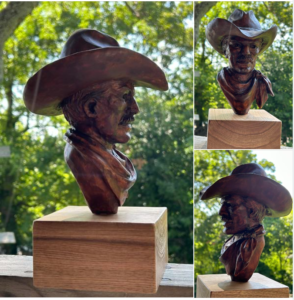
Carving the American Cowboy
Teacher: Janet Cordell
Dates: August 7,11,14,18,21.25
Times: 2-4 p.m. Pacific Time 3-5 p.m. Mountain Time 4-6 p.m. Central Time 5-7 p.m. Eastern Time
12 hours ( 6 sessions – 2 hours each day)
Location: Online (Via Zoom)
For details and to sign up email janet_cordell@yahoo.com
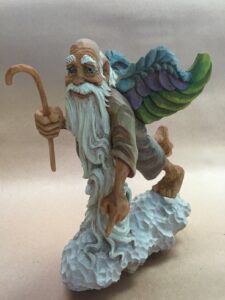
Woodcarving an Angel
Teacher: Dave Stetson
Dates: September 2,3,9,10,16,17
Times: Sat, Sun – 9:30am-11:30 Pacific /11:30am-01:30pm Central / 12:30pm – 2:30pm Eastern
12 hours (6 sessions – 2 hours each day)
Location: Online (Via Zoom)
For details and to sign up email Dave Stetson

Online Classes With Chris Hammack
Teacher: Chris Hammack
Chris Hammack is offering a new series of online classes to help students learn and sharpen their woodcarving skills. Individual and Group Classes are available through his web site chrishammackart.com/groupclass
Whittle Wednesdays
Teacher: Dwayne Gosnell
Dates: Two – 2 hour classes each month on Wednesdays
Location: Online (Via Zoom)
To sign up contact Dwayne Gosnell via email dagwood_76@gmail.com
Woodcarving Academy
Established in 2020, the Woodcarving Academy offers dozens of videos and seminars created by some of the country’s top level instructors. More videos are added regularly as they are created by the instructors.
With a paid subscription to the Woodcarving Academy you can view any videos you like for as many times as you like.
Subscription rates: Monthly = $19.95 Quarterly = $49.95 Annual = $139.95
There is even a Free level which allows you to tour the website and watch the sample videos and content, and receive email updates as new content becomes available.
Check out the Woodcarving Academy and learn with the masters right in the comfort of your own home! Go to: woodcarvingacademy.com or Email: support@woodcarvingacademy.com
News & Announcements

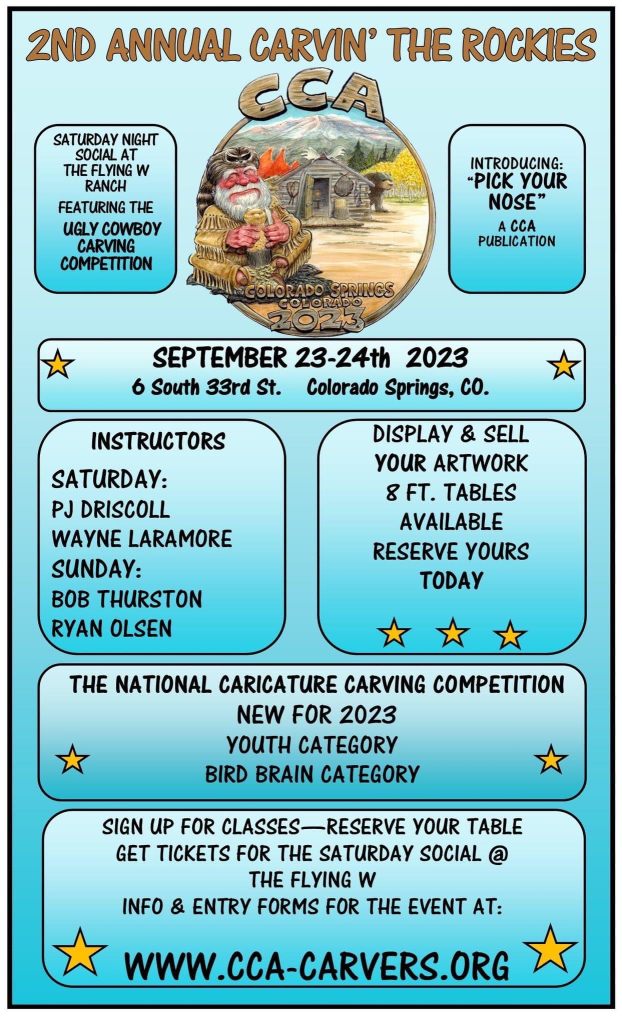

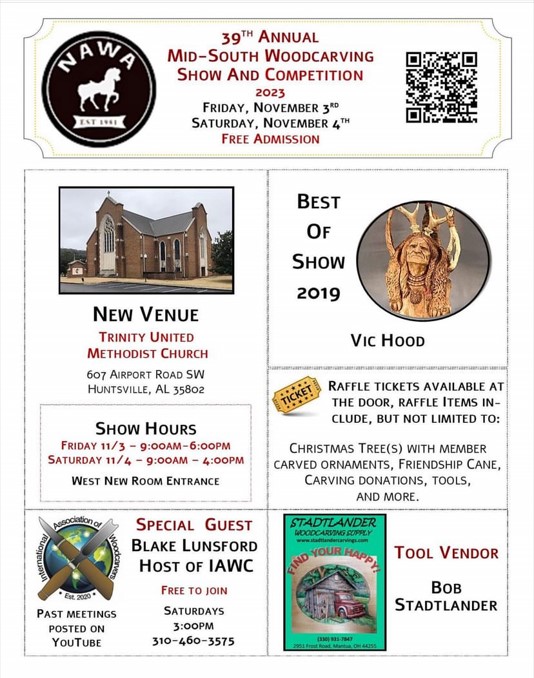
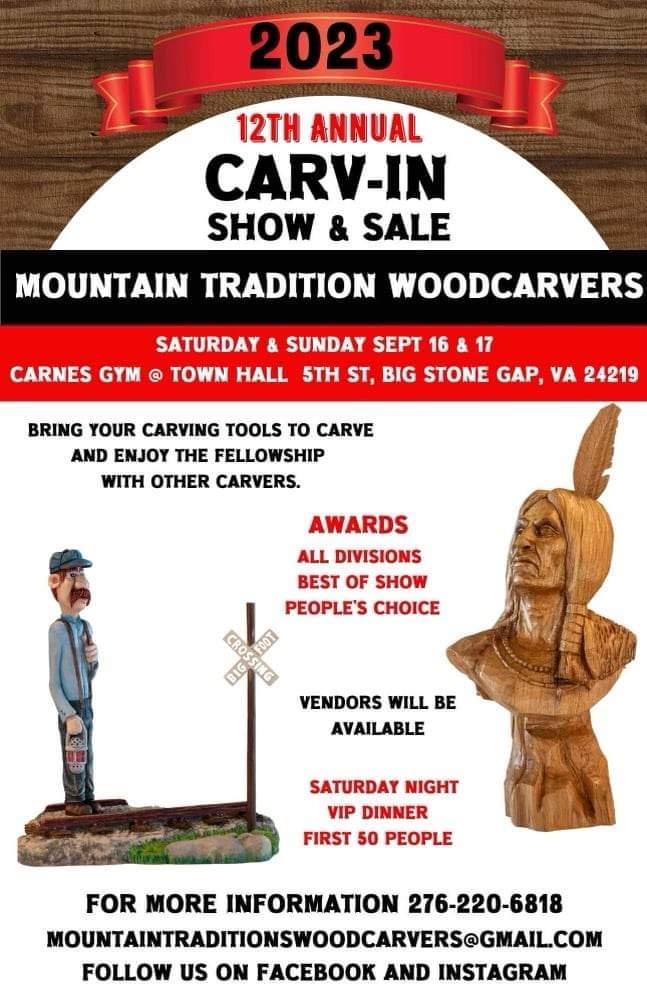

Becky Weisgerber from the Flickertail Woodcarvers wrote and asked me to add their upcoming show to my calendar of upcoming events so I thought I would mention it here in my News & Announcements section:
53rd Annual Flickertail Woodcarvers carving show and sale
Woodcarving displays, classes, tool and wood vendors, raffle of carvings from local artists
Featured artists: Chip carving with Charlene Lynum, rosemaling with Alan Pearson, Josh Epping
• Saturday and Sunday, October 14 & 15
• Classes in the morning with pre-registration, open to the public 12-4:30 both days – free admission
• Location: Bismarck, North Dakota – Bismarck Public Schools Career Academy, 1221 College Drive, Bismarck, ND 58501
• Contacts: Eric Gaasland (307) 349-9782
• Email: flickertailwoodcarversnd@gmail.com
• Website: flickertailwoodcarvers.org
The International Association of Woodcarvers has upcoming Zoom meetings on the following Saturdays at 3PM EST with special guest presenters. Check them out…
Zoom: 310-460-3575
Presentation Schedule:
The International Association of Woodcarvers is now on its Summer schedule for the months of June, July and August. Meetings will be held just once per month during that time.
Summer Presentation Schedule:
7/15 – Randall Stoner (The Mad Carver)
8/26 – Rich Smithson – Helvie Knives
INTERNATIONAL ASSOCIATION OF WOODCARVERS
COME JOIN US!!!
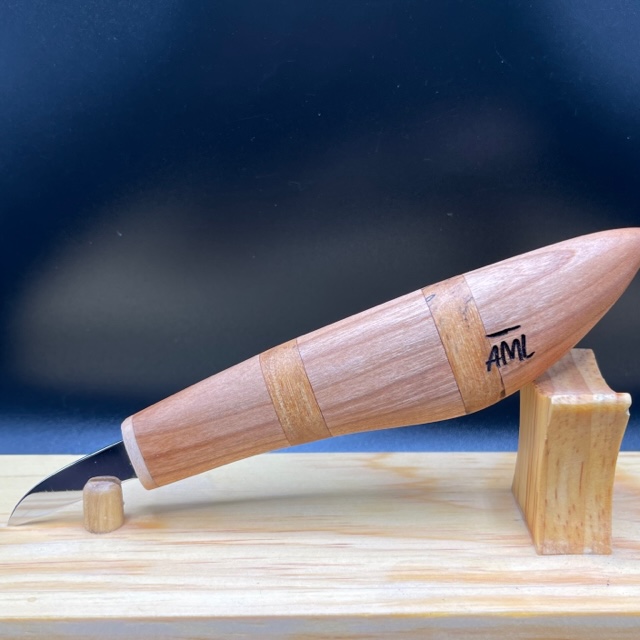
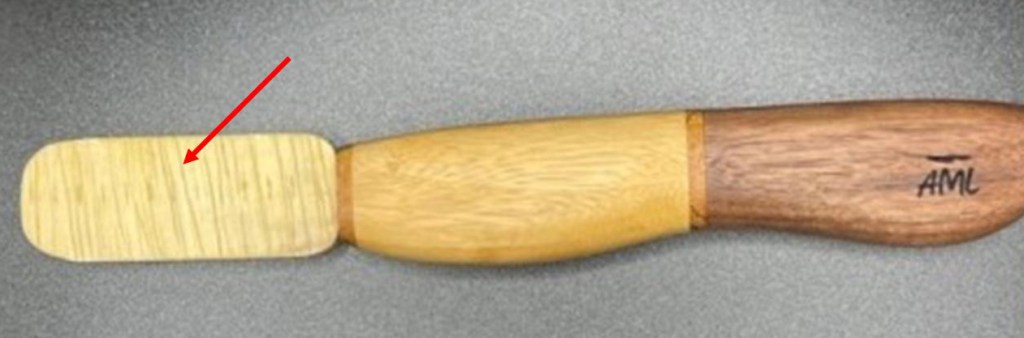
AML Wood Carving Knives
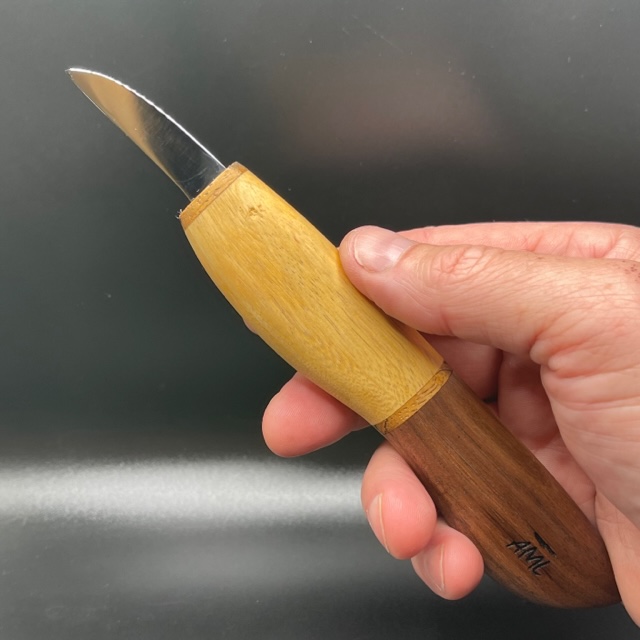
AML Wood Carving Knives are handmade by Andy Loughlin in Monroe, New York.
The blades are made from 1095 high carbon steel sharpen easily and hold an edge well. The variety of handle styles are all made from diverse exotic woods from all around the world. The knives are all available for auction on EBay under “AML Knives.” Bidding usually starts at $22 and most knives sell for between $40 and $100.
Every knife comes carving sharp right out of the package and each one comes with a custom made magnetic wooden sheath (see below) at no extra cost.
I now own two AML Knives and can speak personally about their quality. These are not production knives. Each knife is handmade by Andy, himself. The knives are very sturdy, well made, and will stack up well to the big boys. These knives have quickly become quite popular and sell out fast so check the site (“AML Carving Knives” on EBAY) often for availability. Below are examples of some knives currently available or which have recently sold:


I NEED YOUR HELP!!!
I am in serious need of your contributions to Wood Chip Chatter. Your questions and comments help to keep this blog active and going! Effective discussions are one of the best ways to learn about the topics that interest you. Remember, there’s no such thing as a dumb question. Plus we would all love to learn about the unique tips, techniques and products YOU use in your woodcarving process. Please send your comments to the “Reader’s Comments” section and any questions you may have to the “Questions & Answers” section. Thanks for pitching in!
I also need more photo contributions to the “Carver’s Corner” and “Photo Shop”. My “Carver’s Corner” is a great way to get constructive critiques on your carvings so you can learn where to improve on your next ones, and I’m sure you all have some terrific carvings to share in my “Photo Shop” section. Photos of your carvings liven up the blog’s appearance and make it more interesting.
Send your questions, comments and photos to carverbobk@woodchipchatter.com. They are always greatly appreciated.
The next issue of Wood Chip Chatter will be posted on August 4, 2023.

Keep a sharp eye out for it!
Keep a sharp edge, and keep on carvin’!


Funny Bone


Bob
Happy Anniversary on Wood Chip Chatter and all the work you put into it. I always look forward to receiving it and the good information it contains. Thanks for all your effort RJ Carver
LikeLike
Sent from my iPad
LikeLike
Thanks for adding me to the blog. Only one point – Laurie is short for Lawrence!! Not the first time I’ve been a “her” 😉. It’s more commonly used as a man’s name in Canada than the USA. I think it stems from the British. No harm done 😁👍
Sent from my high techie iPhone thingy.
>
LikeLike
I have a question about wood cracking.
I took a class recently in Colorado where the average humidity ranged from 10 to 20%. We had butternut log “roughouts” that were cut from logs harvested 2 years ago. They were prepared for class about a week before in a location that was about 50% humidity and put into plastic trash bags & tied off for transport to class.
My blank was an end cut from the original log so there was some minor cracking to begin with. The blank was moist and the plastic bag was wet when I opened it. I did not notice anything significant when I mounted the blank to the carving vise. Each day at the end of class I covered the carving with the plastic bag and tied it off.
On the third day I began to notice a crack developing on both sides of the carving. It grew a little each day but became very obvious on the fifth day as wood fibers began tearing. On the seventh day when I removed the carving from the vise, I noticed the crack open up more. Apparently the attachment to the vise was bridging the gap. It was then I realized the crack was the entire width, through the pith, and was 2/3 up the carving.
That night I soaked the entire carving. The next afternoon I pulled the carving out and saw some wood fibers had swollen and the crack had closed up midway up the carving, but otherwise the soaking did nothing. I rewrapped in plastic, doubled with another and set it aside.
Two days later I checked and though the wood was moist, there was no obvious change other than the cracking seemed to stop.i flipped the carving so the end cut was facing up and poured water into the crack and to my surprise water poured through the pith as if it was a drain.
Any advise to stop this major crack, prevent any future cracking, and to salvage the carving I have so I can complete it?
Thanks in advance!
John Nielsen Overgaard, AZ 480-594-1082
LikeLike
John,
To answer your question about stopping the major crack I’m afraid it is likely too far gone to do anything with. Sealing the carving with a polyurethane or lacquer should deter future cracking and therefore salvage the carving in general.
Based on what you have told me, and some things we don’t know, it appears you may have been headed for problems right from the start, especially if the butternut logs which were harvested 2 years ago were simply cut and left to dry on their own. Immediately after logs are cut they begin to lose moisture. Most of the moisture is lost rapidly through the ends of the logs. The proper way to store fresh cut logs is to seal the ends with paint or other type of sealer. This slows the moisture loss and reduces checking (or cracking). The logs should also be stored on a rack off the ground.
You mentioned that your blank was an end cut from the log which as we now know is the area where most of the cracking occurs, so I think you were in trouble right there. Also, the fact that the blank was moist and the inside of the bag was wet when you opened it concerns me. It tells me something was done to the blank when it was bagged. Air that contains 50% humidity is not considered saturated and should not cause condensation from the blank after it was placed in the bag.
Soaking your blank with water and double bagging it was a futile effort as you found out. The only thing water will do is swell the wood fibers temporarilly, but not deter the cracking process. In fact, if anything it made it worse. Drying is a natural process that wood undergoes. It is inevitable and cannot be stopped, only slowed down, and once wood starts checking you cannot reverse the process.
In any case, you were given a bad blank which was cracked and wet. Too wet, in my opinion. Wood is destined to dry, and so was your blank. Covering the carving with the plastic bag every night may have slowed the drying process very slightly but at that point you had a relatively small piece of wet wood which was going to lose its moisture (rapidly) in a short amount of time with further cracking being the result.
I hope this has been somewhat helpful. Feel free to write back if you have any further questions.
Best regards,
Bob K.
PS. John, your unusual experience and questions are intriguing such that I think my other readers would benefit from them. I would like to post them in my blog if you don’t mind. Thanks!
That night I soaked the entire carving. The next afternoon I pulled the carving out and saw some wood fibers had swollen and the crack had closed up midway up the carving, but otherwise the soaking did nothing. I rewrapped in plastic, doubled with another and set it aside.
LikeLike
Please go ahead snd post. If it helps one person it was worth talking about it.
John Nielsen Overgaard, AZ
LikeLike