
21 Tips For a Rotary Tool
by Doug North
1. Choosing a Rotary Tool: Try to choose one that has at least two speeds — more if possible. Depending on the material to be cut, different bits will work best at specific speeds.
2. Wear Eye Protection: Because of the extremely high speed at which the tool operates, it is essential to wear eye protection at all times when using a rotary tool. Some operations require hearing protection and a particle mask as well. It is always a good idea to wear sturdy leather gloves to protect your hands.
3. Let the Tool Do the Work: The speed of the spinning tool should do the work — not the force you apply. Always use light pressure and make multiple passes if needed. This will give you more control and keep your bits from wearing out quickly, or worse, breaking.
Tips For Sanding Wood
4. Sand with the Direction of Spin: When sanding wood, move the tool in the same direction as the debris that is being thrown from the spinning bit. This will give you the smoothest finish.
5. Replacing Sanding Drums: Unscrew and remove the rubber drum from the mandrel completely. Dust the rubber with talc powder, slip the new sleeve on the rubber drum, and screw it securely to the mandrel.
6. Sanding Cams to Shape: Sanding drums are great for shaping wooden cam profiles. Sometimes you can do this while the cam is mounted in the automaton — a great time saver!
7. Sanding Fine Details in Wood: Specially designed radial bristle brushes allow you to sand fine carvings without losing detail. You can make an inexpensive version with a small section of an abrasive cleaning pad screwed to the end of a mandrel.
Tips For Carving Wood
8. Set Up for Carving: A flexible shaft attachment makes carving with a rotary tool much easier. These shafts work best with the tool suspended from a hanger. You will be making some dust, so wear a particle mask and place a fan nearby while working.
9. Roughing-out Carvings: Sanding drum accessories are great for bringing a carving to shape after sawing it out. Start with a large, coarse grit drum and move to a smaller drum with a finer grit of sandpaper as your carving becomes more detailed.
10. Carving with Stones: Wood carving bits often leave a rough surface on woods such as Basswood. Try using grinding stones for the final stages of carving. The pink/orange/brown Aluminum-oxide stones remove material a little faster, while the darker gray/blue/green Silicon-carbide stones remove material more slowly, but leave a smoother finish.
11. Cleaning Wood Cutting Bits and Sanding Drums: Many professional woodcarvers recommend using chemical oven cleaner to clean sawdust out of metal woodcarving bits. You can also try burning the wood out with a small torch. To clear out stones, sanding drums, and sanding discs, run the tool against an abrasive belt cleaner.
Tips For Cutting Metal
12. Cut Metal Against the Direction of Spin: When cutting metal it helps to move the tool opposite to the direction that the debris is being thrown. Mount the piece to be cut in a vise, and hold the tool firmly with two hands because the tool will attempt to climb up and over the object being cut.
13. Dealing with Brittle Cut-off Wheels: If you’re breaking the thin cut-off wheels when cutting metal, stack two wheels together and screw them both to the mandrel. For the thicker, fiberglass reinforced cut-off wheels, a small washer placed on either side of the disc will increase the rigidity of the wheel.
14. Removing Stripped Screws: Brass screws are fairly easy to strip. Use a cut-off wheel to make a notch across the head of the screw, then back out screw with a flat-head screw driver.
Tips for Grinding and Shaping Metal
15. Deburring Tubing and Other Cut Edges: Regardless of how you cut metal, a burr and/or sharp edge can be left behind. Use sanding drums or grinding stones in your rotary tool to quickly smooth them.
16. Rounding the Tips of Pinwheels: Pin-wheels that are less-than-perfect can sometimes jam. Rounding over the jamming pin ends can help.
17. Sculpting Metal: There is nothing harder than diamond. When used in a rotary tool, diamond coated bits allow you to shape almost any kind of metal, even steel.
Tips for Drilling
18. Drilling it Tight Spots: If you need to drill a hole somewhere that is hard to reach, a drill bit in a flexible shaft attachment will sometimes fit where other tools cannot. The right angle drilling accessory will also allow you to reach some very tight spots.
19. Drilling Holes in Glass: Yes, you can use a rotary tool to drill holes in glass! You will need a diamond hole-cutting bit and lubricant. You also need a multi-speed rotary tool so you can use a slower speed. Apply light pressure, drill for a few seconds at a time, then apply more lubricant. Carefully repeat this process until you’ve penetrated the glass.
Tips for Getting Most out of Your Tools
20. Breathing New Life into Old Tools: You can save money by picking up second-hand tools and restoring them yourself. By using grinding stones, brushes, and polishing buffs, you can sharpen, clean, and polish old tools back into working order.
21. Accessorize!: There are many accessories that can be attach to a rotary tool. When used in conjunction with the right bits, a rotary tool can be transformed into a wood cutting saw, miniature router, wall tile saw, planer, drill press, glass engraver, and more. The high-speed rotary tool is a versatile tool that can grow with you and your projects!
Reader’s Comments

My first comment this month comes from my good friend, Jon Gledhill who appreciated my Americana Goose Egg tutorial last month. Jon writes:
“Bob, This project is just what I needed for the eggs I recently purchased! Thanks! I’ll send some photos of the finished project. Jon Gledhill”
I‘m glad you liked the tutorial, Jon, and I look forward to seeing your photos.
My next comment comes from my very good friend, Doug Gabel from Pennsylvania who enjoys reading Wood Chip Chatter and is sorry to hear of my book cancellation. Doug writes:
“Bob, Great blog! I really enjoy reading it and getting all your tips. Sorry to hear about your book. Doug Gabel”
Thank you for your comment and sentiment, Doug. I’m glad you’re enjoying Wood Chip Chatter.
Next we have a comment from my friend, Gus Cooper from Australia who enjoys reading Wood Chip Chatter and is still carving at the age of 87.
“love this keep them coming Gus Cooper Australian wood carver?? I wood carve as a hobby at 87 years of age. my email is patngus1@gmail.com Thank You”
Woodcarving certainly is an ageless hobby…keep at it, Gus and thanks for writing!
My next comment comes from my very good friend, Jim Babcock from Columbus, Indiana. Jim writes:
“Bob:
Sorry to hear about the change of status of your book project with fox chapel ; i was
looking forward to it.
It will be interesting to see what the future holds for specialty print titles, with the push
for digital editions and postage increases. I very much appreciate your feedback and
blog and hope you will continue it.
Jim Babcock
Columbus, Indiana”
Thanks for your kind words, Jim. You make a very good point about the future of printed publications.
Photo Shop

“Photo Shop” is the section of Wood Chip Chatter where carvers can send in photos of their wood carvings for display. It’s your chance to show off your work…sort of a show and tell. The photos will only be displayed and no comments or critiques will be made. For critiques on your carvings send them in to the “Carver’s Corner.” Send your photos to: carverbobk@woodchipchatter.com
My first entry to the Photo Shop this month comes from my very good friend and frequent contributor, Jim Babcock from Columbus, Indiana. Jim sent in a photo of a beautiful relief carving of spring flowers. Jim writes:
“Bob:
Just received and looked at the newest Wood Chip Chatter. As always,
very much appreciate the technical suggestions , patterns, and updates on
happenings within the carving community.
Attached is a relief carving of Spring flowers.
Jim Babcock
Columbus, Indiana”

Beautiful carving, Jim! Nicely undercut and very well done overall.
Next we have a terrific Black Capped Chickadee that my good friend, Shannon Coker carved for her mom for Mother’s Day. Shannon writes:
“Pic of my mom’s Mother’s Day gift
Blk capped chickadee
Topelo
Red cedar from our farm
Shannon”
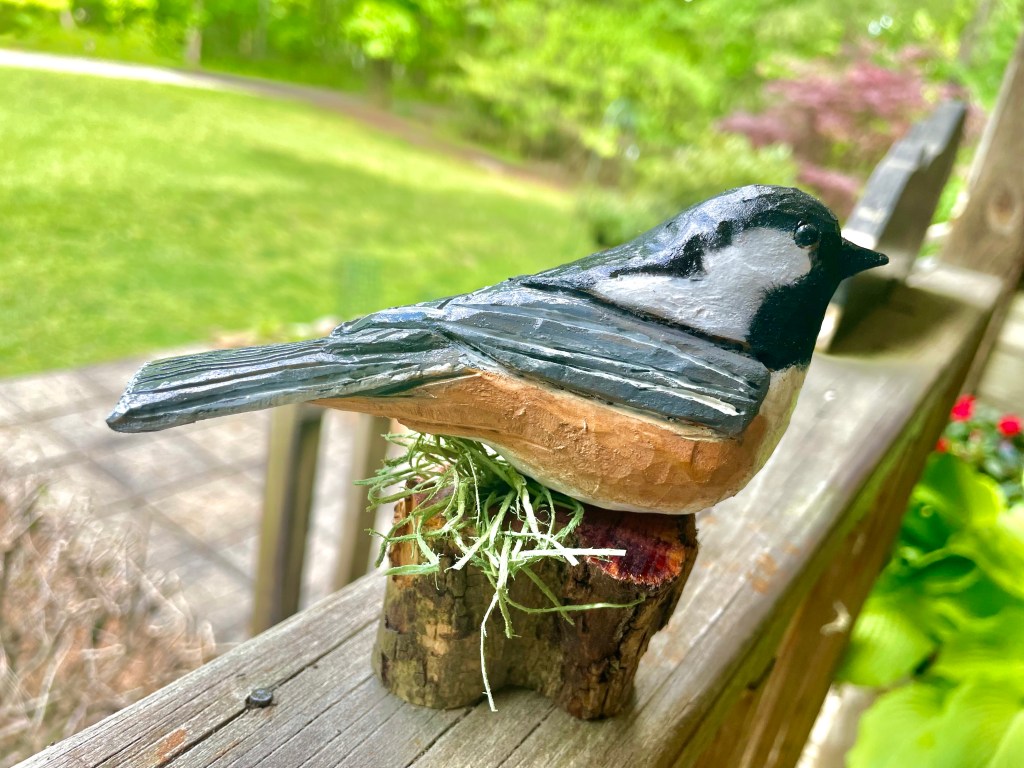
Very nice job, Shannon! I like how you dressed it up with some habitat. I’m sure your mom loved it.
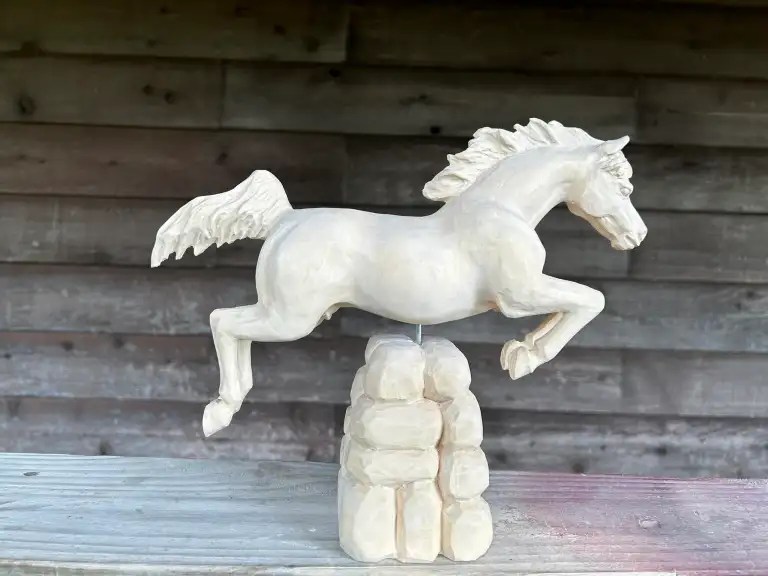
My next entry to the “Photo Shop” is from my good friend, John Nolin who took advantage of my Americana Goose Egg tutorial and carved one of his own. John writes:
“When I chatted with you at the Lancaster, PA show this year, you reminded me that your excellent monthly newsletter needed subscriber carving pictures. So here is a photo of my egg, carved following your very complete instructions and using your free pattern. Thank you! It was a fun carve, and I will be sharing it at “show and tell” at the next meeting of James River Wood Carvers in Richmond. I am also carving a horse using your recent pattern, and will send a photo of that when I finish it. Keep up the good work with your monthly letter!
John Nolin, (Bassfeathers)”
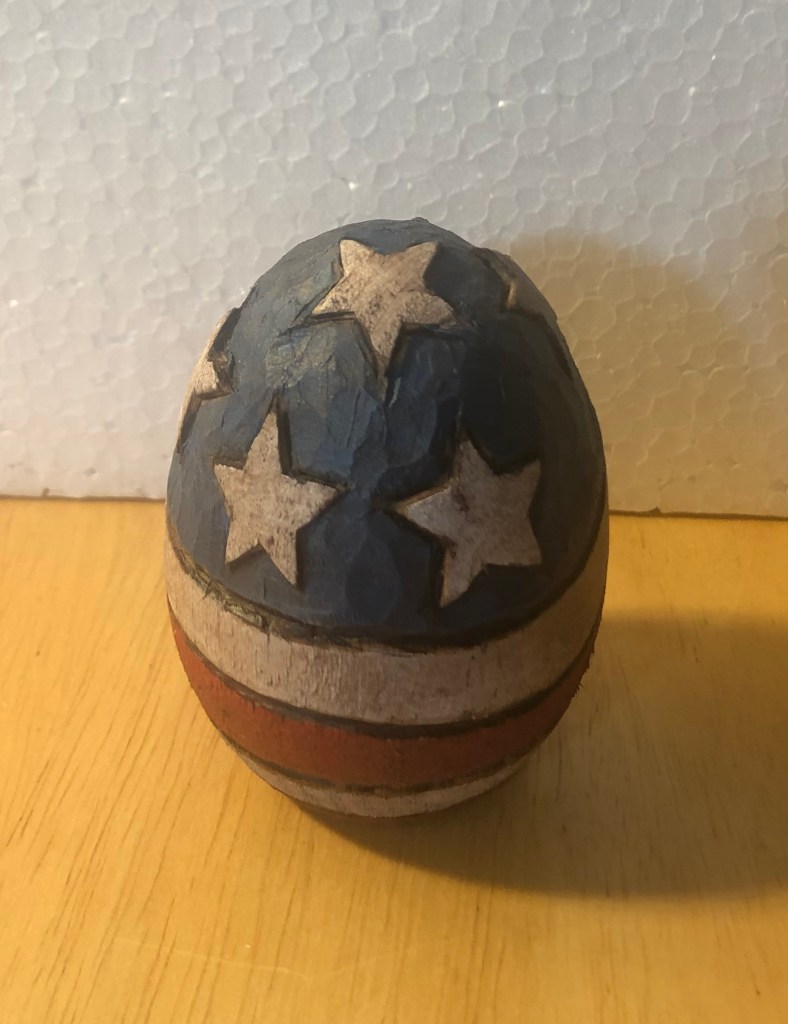
Thanks so much for the photo, John! Your Americana Egg looks awesome and I look forward to seeing your horse!
Carver’s Corner

“Carver’s Corner” is the section where you can send in photos of your carvings to have me critique them and offer you my truthful opinions on what you did right and what you might improve on next time. It’s an excellent opportunity to improve your carving skills! Send your photos to: carverbobk@woodchipchatter.com
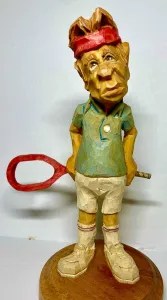
This month we have a charming fisherman scene carved by my good friend, Elise Hartnagel from Palm Harbor, Florida. Elise writes:
“Hi Bob,
I really enjoy reading your blog Wood Chip Chatter. I also enjoyed learning about walnut oil.
Here are a few photos on a carving I just finished that blends elements of Mike Shipley’s Sea Captain, and ddalo’ s fisherman. I added the cat for fun to see who will get the fish in the end.
I welcome any suggestions to improve my work.
Thanks for all the great info.
Elise
Palm Harbor , FL”


Thank you for the photos and your kind words, Elise. I’m glad you’re enjoying reading Wood Chip Chatter. I really love your fisherman scene and the cat was a smart addition. It’s very cute and adds interest to the overall scene, plus the way you have the cat’s paw off the ground adds motion. It could have been made a little thinner and rounder, however. The entire scene was carved neatly and your cuts are all very clean. The painting is also very neat. I usually tell carvers to go lighter with the paint but I really believe it’s a matter of preference.
The hands are shaped well but next time try to get more separation between the fingers to give them more definition. I like the way you carved the piling but I would work a little more on the rope next time. I’m also intrigued by the base. Did you carve and paint that as well? It looks great.
Woodcarving Tip
It’s About the Journey
Don’t be in a rush to finish your carvings. Take your time and enjoy the process. Wood carving is supposed to be fun so take your time, do it right and have fun doing it. Remember, when it comes to wood carving, “It’s about the journey, not the destination.”
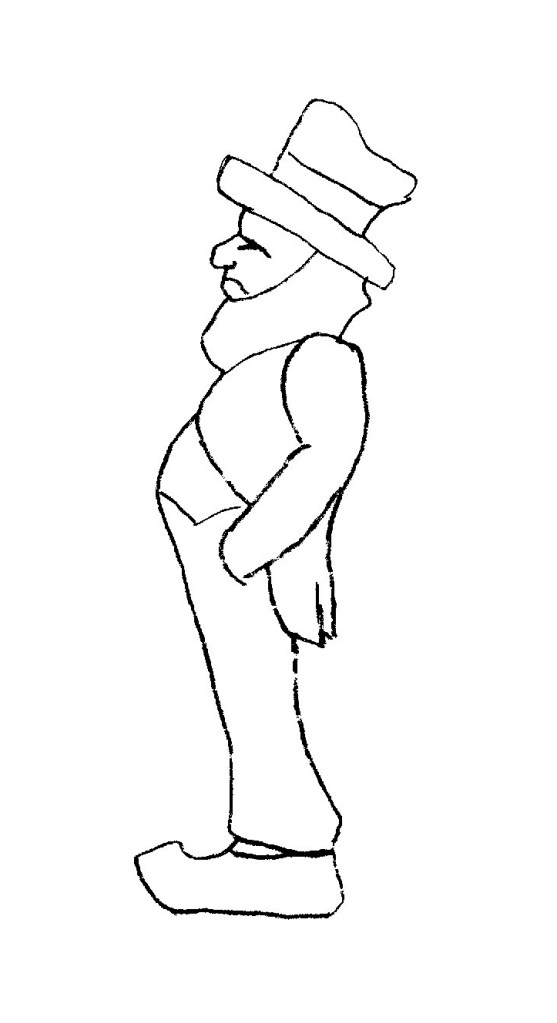
Pattern of the Month
Uncle Sam
Upcoming Workshops & Seminars
Sir Melcomel
Teacher: Dwayne Gosnell
Dates: June 11, 25 6PM Eastern
Location: Online (Via Zoom)
For details and to sign up click on Dwayne’s website https://www.dgosnellwoodcarving.com/Dwayne’s website

Bruce’s Brawlers
Teacher: Dwayne Gosnell
Dates: July 9, 23 6PM Eastern
Location: Online (Via Zoom)
For details and to sign up click on Dwayne’s website https://www.dgosnellwoodcarving.com/
Carving A Horse Jumping Fence
Teacher: Janet Cordell
Dates: Aug 5, 9, 12, 16,19, 23, 2024
Times: 2-4 p.m. Pacific Time /3-5 p.m. Mountain Time /4-6 p.m. Central Time /5-7 p.m. Eastern Time /
12 hours ( 6 sessions – 2 hours each day)
Location: Online (Via Zoom)
For details and to sign up email Janet Cordell
George
Teacher: Dwayne Gosnell
Dates: – August 6,20 – 6PM Eastern
Location: Online (Via Zoom)
For details and to sign up click on Dwayn’s website https://www.dgosnellwoodcarving.com/

Online Classes With Chris Hammack
Teacher: Chris Hammack
Chris Hammack is offering a new series of online classes to help students learn and sharpen their woodcarving skills. Individual and Group Classes are available through his web site chrishammackart.com/groupclass

TWhittle Tuesdays
Teacher: Dwayne Gosnell
Dates: Two – 2 hour classes each month on Tuesdays
Location: Online (Via Zoom)
To sign up contact Dwayne Gosnell via email dagwood_76@gmail.com

Woodcarving Academy
Established in 2020, the Woodcarving Academy offers dozens of videos and seminars created by some of the country’s top level instructors. More videos are added regularly as they are created by the instructors.
With a paid subscription to the Woodcarving Academy you can view any videos you like for as many times as you like.
Subscription rates: Monthly = $19.95 Quarterly = $49.95 Annual = $139.95
There is even a Free level which allows you to tour the website and watch the sample videos and content, and receive email updates as new content becomes available.
Check out the Woodcarving Academy and learn with the masters right in the comfort of your own home! Go to: www.woodcarvingacademy.com or Email: support@woodcarvingacademy.com
News & Announcements


The International Association of Woodcarvers has upcoming Zoom meetings on the following Saturdays at 3PM EST with special guest presenters. Check them out…
Zoom: 310-460-3575
Presentation Schedule:
We will be starting out Summer Series beginning in June. There will be only one meeting per month during June, July and August.
Next Meeting
6/22 Rick Giujusa @scarecrowwoodcrafts
INTERNATIONAL ASSOCIATION OF WOODCARVERS
COME JOIN US!!!
The Jersey Hills Wood Carvers (JHWC) club is a small but growing group of wood carvers sharing their time, knowledge and joy of woodcarving. The JHWC generally meets from 7:00 PM EST to 9:00 PM EST on the 1st, 3rd and 5th Thursday of each month (when school is in session) at the Jefferson Township High School wood shop classroom.
Membership is “FREE” and open to anyone interested in woodcarving regardless of their ability.
JHWC’s Upcoming Meetings and Events
2024
June 20th
There will be no meetings during July and August while school is not in session.
For more information contact:
Al Santucci alsantucci4@gmail.com President
Bill Brunner billbrunnerdesign@gmail.com newsletter/website editor
Or visit:
Website: https://www.jerseyhillswoodcarver.com/
Facebook: https://www.facebook.com/groups/736479646821641/
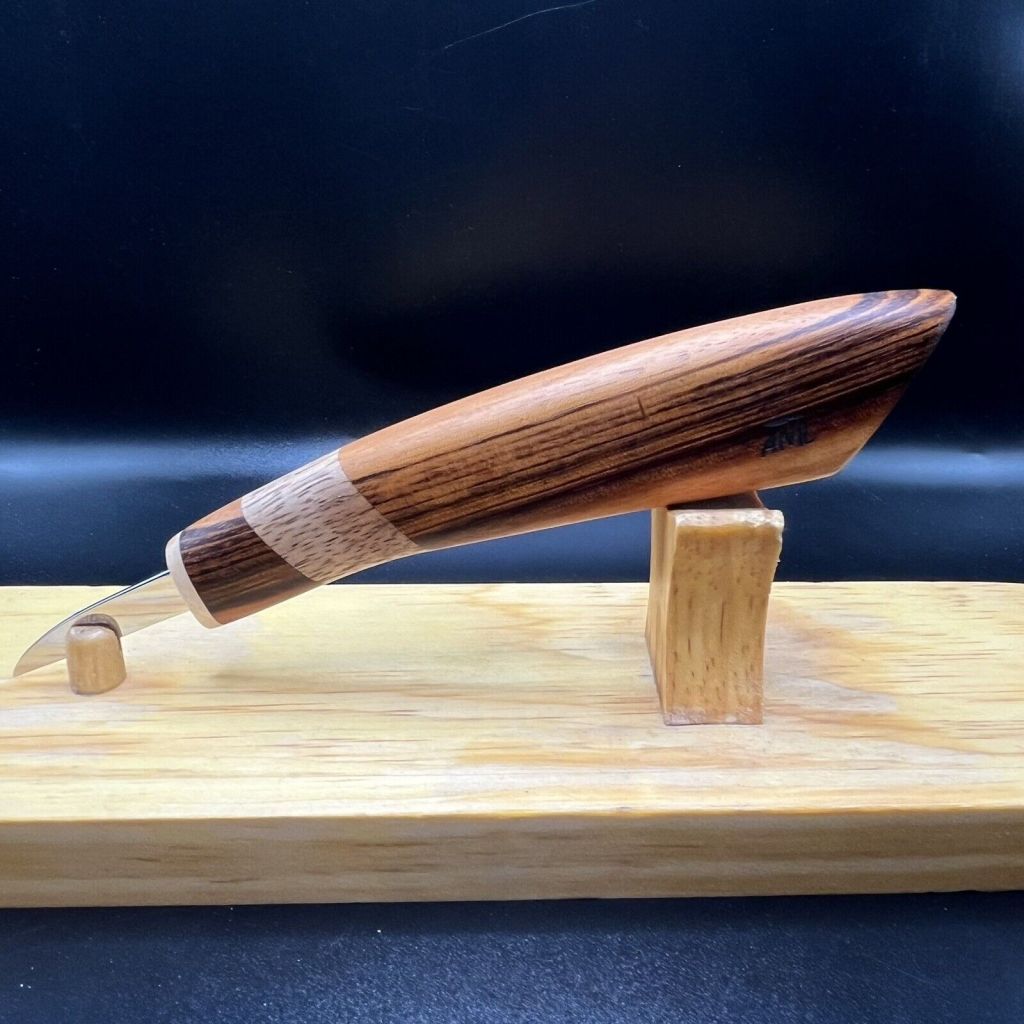
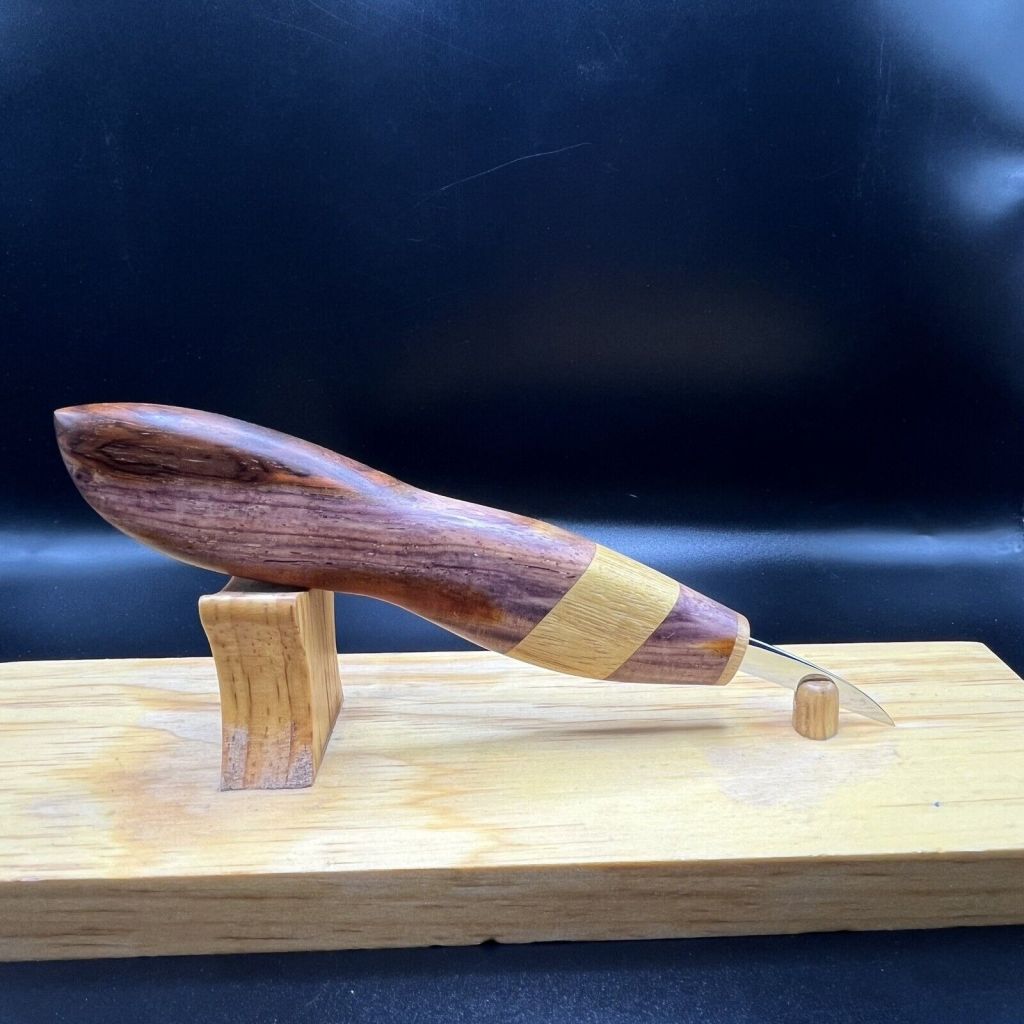
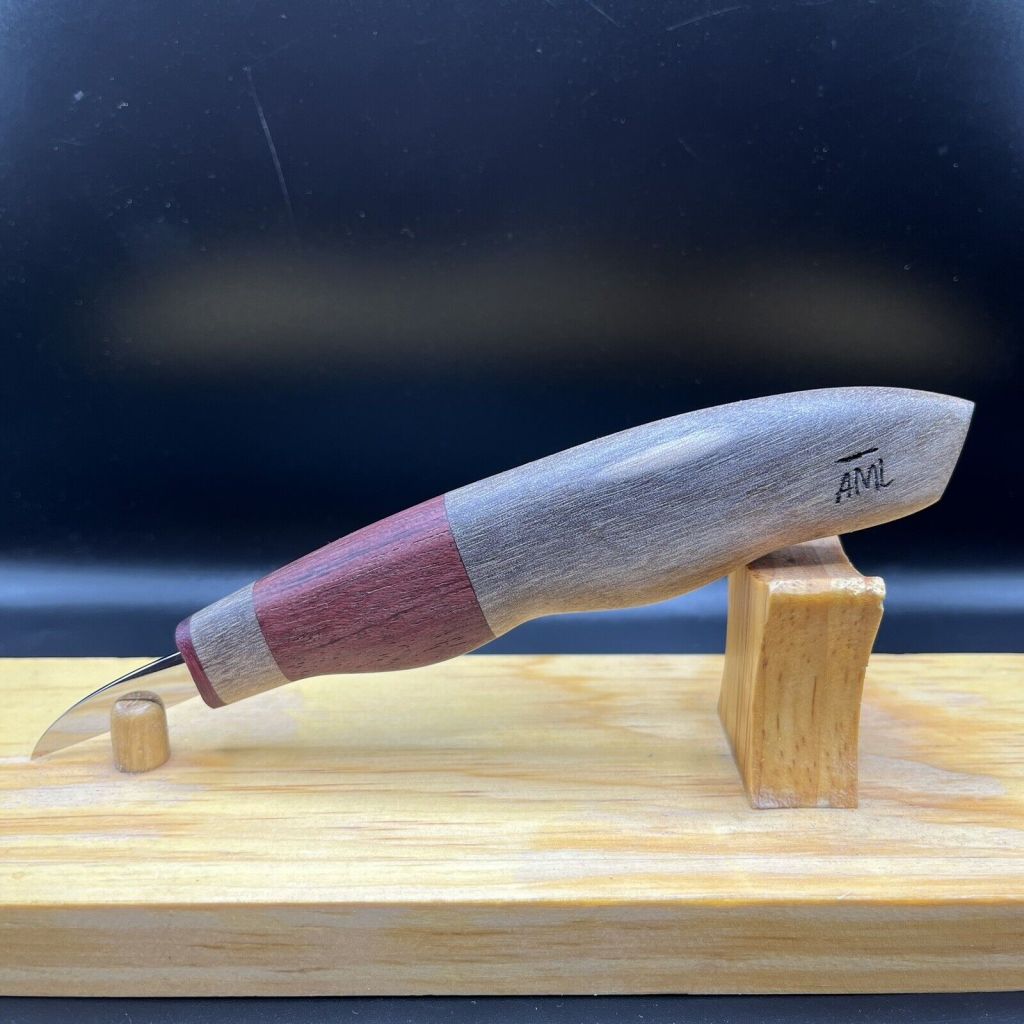
AML Wood Carving Knives

AML Wood Carving Knives are handmade by Andy Loughlin in Monroe, New York.
The blades are made from 1095 high carbon steel sharpen easily and hold an edge well. The variety of handle styles are all made from diverse exotic woods from all around the world. The knives are all available for auction on EBay under “AML Knives.” Bidding usually starts at $22 and most knives sell for between $40 and $100.
Every knife comes carving sharp right out of the package and each one comes with a custom made magnetic wooden sheath (see below) at no extra cost.
I now own two AML Knives and can speak personally about their quality. These are not production knives. Each knife is handmade by Andy, himself. The knives are very sturdy, well made, and will stack up well to the big boys. These knives have quickly become quite popular and sell out fast so check the site (“AML Carving Knives” on EBAY) often for availability. Below are examples of some knives currently available or which have recently sold:


The next issue of Wood Chip Chatter will be posted on July 5, 2024.
Keep a sharp eye out for it.

Keep a sharp edge, and keep on carvin’!


Funny Bone


Thank you Bob, I always look forward to you fantastic news letter Chi Chats. I enjoy your tips, tricks, and articles. Not to mention the odd pattern thrown in to boot. Keep up the great work, trust me You are appreciated. Your Canadian fellow carver John Robinson. Nanaimo.BC Canada.
LikeLike
thanks Bob! Always enjoy reading these and learning something new. Sue MacCullum (True North Carver)
LikeLike
I’m just recently found this great Blog, the “Chip Chatter.” The “21 Tips” make a lot of sense– over the past 40+ years of carving, I have learned many things the “hard way.” Most recently, I really found out why I should not have a carving glove on the left hand while holding the workpiece and using a high-speed rotary tool. The bit grabbed the glove’s little finger which of course included my pinky. The glove is fine, and now, after the trip to the ER for six (6) stitches, and almost two months, the pinky looks okay but is still healing! Lesson learned!
Chuck Strauss, Nelson County, Virginia
LikeLike