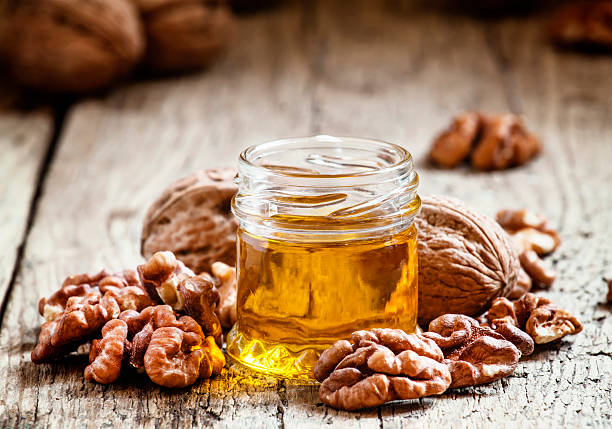
I’ve been advocating the use of walnut oil on your wood carvings for quite awhile. Most people are not as familiar with walnut oil as they are with its combustible counterpart, boiled linseed oil. Here, then are some questions and answers about the use and qualities of walnut oil you might find helpful.
Walnut Oil – Questions & Answers
Is walnut oil a hardening oil?
It penetrates deep into the wood and then hardens, giving you a longer-lasting finish that will not evaporate like mineral oil finishes. Walnut oil hardens into a food-safe, satin finish for bowls, butcher blocks, utensils, and other wood products.
Is walnut oil a drying oil?
Walnut oil, as the name implies, is a type of drying oil that has been pressed and refined from walnuts. It dries slower than linseed oil, but it does not yellow as much, so it is suitable for lighter paints and is recommended for mixing with lead white.
Does walnut oil go rancid on wood?
Oils are especially troublesome when used on counter top cutting boards that don’t get a thorough washing very often. An exception to the typical food-based oils, is walnut oil. It’s widely recommended because it doesn’t go rancid. It dries, unlike the other oils in your kitchen.
Is walnut oil Good for wood?
Much more than a wood salad bowl finish, walnut oil is a killer MULTIPURPOSE wood protectant for your furniture, wooden floors, woodworking projects and even musical instruments. Use it as an efficient desk, dining table, cabinet or shelf walnut finish for protection against scratches, spills and abrasion.
How long does it take walnut oil to dry on wood?
A top coat can be applied over walnut oil, but the oil should be allowed to cure for three to six months before any top coat is applied. Humid or cool conditions will lengthen this time. Walnut oil should be stored in an airtight container that protects it from light. Light and air cause the oil to cure.
How long does it take for walnut oil to dry?
Walnut oil dries in four or five days. It’s an expensive oil, but like so many art supplies, quality is what you’re paying for!F
Does walnut oil spontaneously combust?
Walnut oil is well in the combustible range and can burn if heated over 320F. So no, walnut oil just will not ignite and burst into flames by simply applying it to a wood floor at normal ambient temperatures.
Is walnut oil toxic?
Linseed and Walnut oil are not toxic. There are various oils on the market that do various things to your paint. But they all make your paint ‘fatter’ so it is important to only use tiny amounts.
Should walnut oil be refrigerated?
OIL, WALNUT, COMMERCIALLY BOTTLED — UNOPENED
Properly stored, an unopened bottle of walnut oil will generally stay at best quality for about 1 year. Should you refrigerate walnut oil? Refrigeration is recommended in very hot, humid conditions.
Does oiling wood seal it?
Oils repel moisture, deepen a wood’s natural color without altering it, and is one of the few types of finishes that leave a wooden object in a food-safe state. The problem with an oil finish is that it usually requires maintenance in the form of a reapplication of more oil, so it isn’t a lasting finish.
Reader’s Comments

I received some comments from my good friend, Jon Gledhill about how he found my recent blog on “Painting Tips for Wood Carvers” helpful.
Jon has also been doing a lot of experimenting with various wood stains and writes:
“Bob,
Thank you for another great blog letter!
The information about brushes was very helpful. I’ve wondered if buying “cheaper” synthetic brushes was okay, but now feel much better about my purchase. They’ve been working well, so I’ll keep them!
I’ve been experimenting with creating different shades of stain with one stsin color by applying a more or less layers of sealer and/or finish BEFORE applying the stain. I’ve created a sample board to help me get an idea of what I might want in the finished look. Here’s a photo of the sample board, and of a recent project where the stain is slightly darker in the bottom area than the rest, using this technique. Would love your thoughts on this process.
Thanks again! Jon”


First of all, I’m glad you found my last blog on “Painting Tips for Wood Carvers” beneficial. You might save yourself some money in the future, Jon. Synthetic brushes are pretty much all I use.
Your experiments on wood stains are very intriguing. I’ve never been very good with using wood stains but I can see you are getting impressive results. I’m going to put you on the spot and ask if you would be willing to write a brief tutorial about your experiments. I can post it in a future blog newsletter as I’m sure many of us will find it interesting and helpful. No pressure!
Photo Shop

“Photo Shop” is the section of Wood Chip Chatter where carvers can send in photos of their wood carvings for display. It’s your chance to show off your work…sort of a show and tell. The photos will only be displayed and no comments or critiques will be made. For critiques on your carvings send them in to the “Carver’s Corner.” Send your photos to: carverbobk@woodchipchatter.com
My first entry to the Photo Shop this month came from my friend Terry Grimm who carved a really cool leprechaun with a lucky gold horseshoe in time for St. Patrick’s Day. Terry writes:
“A little Leprechaun, with his lucky gold horseshoe, is all set for St. Patrick’s Day.”
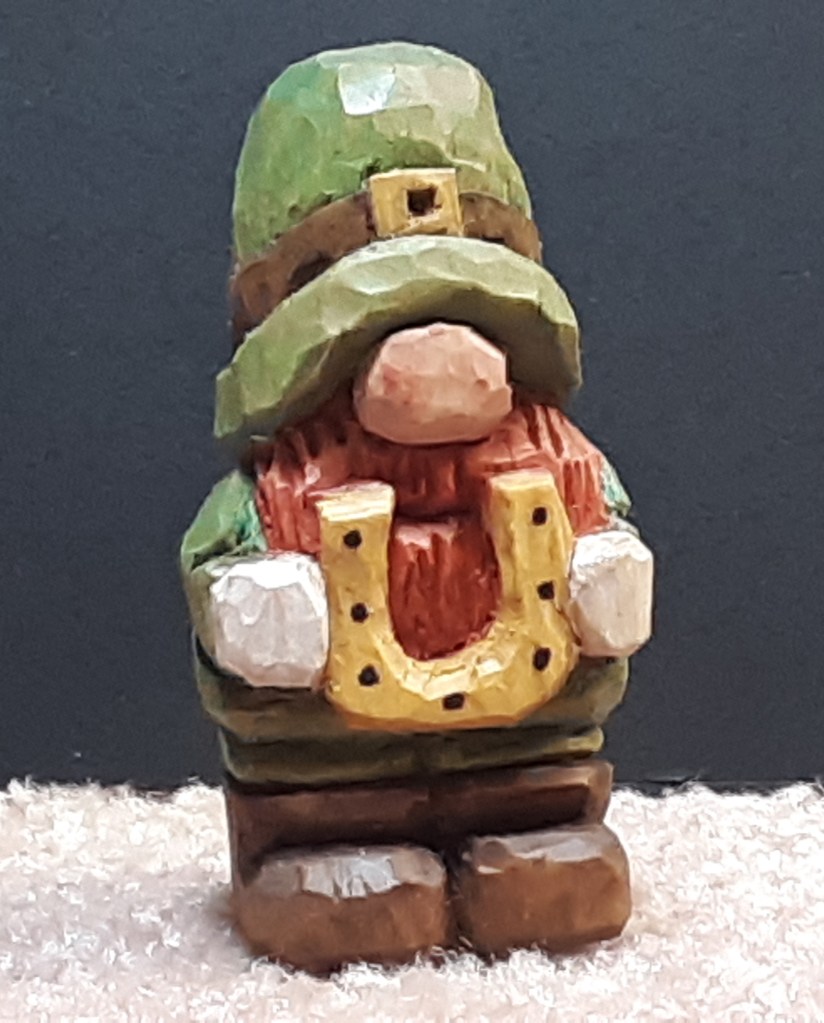
Very nice little leprechaun, Terry! I like the horseshoe idea.
My next Photo Shop entries came from my good friend, Jim Babcock from Columbus, Indiana. Jim writes:
“Bob:
Attached are a couple of recent carvings. In the most recent W.I. magazine, Kevin Applegate
included a feature on a Sherlock Holmes carving, which I decided to do in relief form.
The second carving is a woodspirit that includes a bit of carving, some woodburned highlights,
and Bob Dylan’s lyrics that remind us that , “… you don’t need a weatherman to tell which way
the wind blows.”
Jim Babcock
Columbus, Indiana”


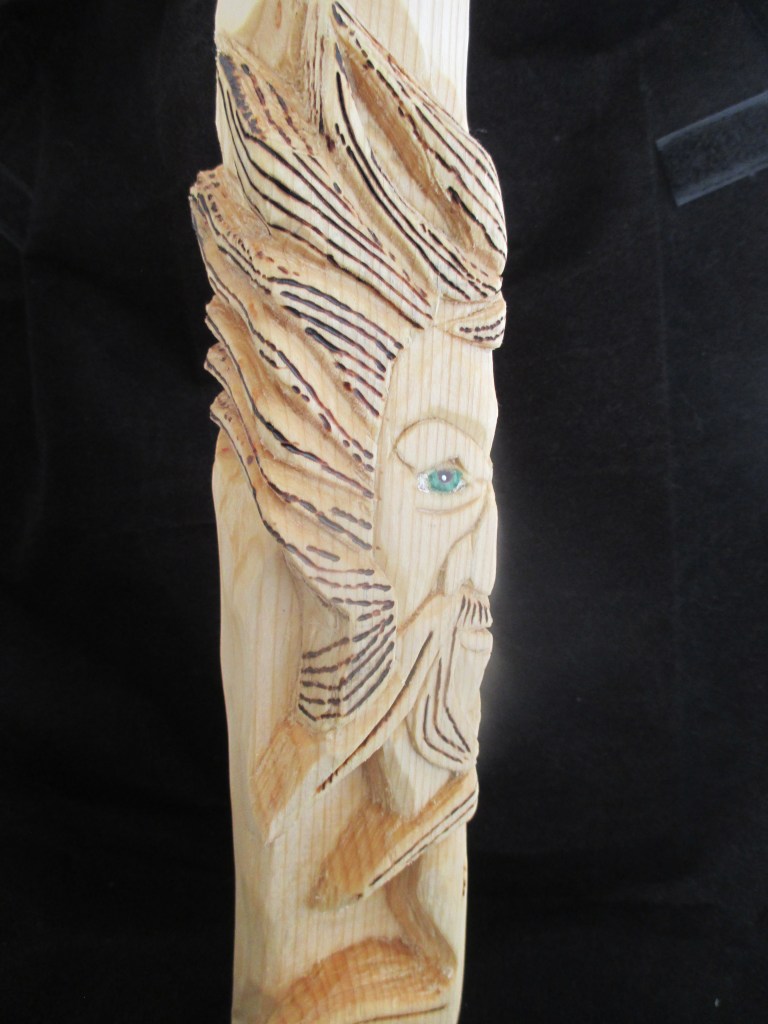
Thanks for the photos, Jim! Your work looks good. I especially like the Sherlock Holmes relief.
Next we have some photos of the recent work my friend Andy Tarap has been doing. Andy writes:
“You can use these however you would like, I always appreciate reading your newsletter! I recently started on basswood eggs and I saw that you have done them in the past. They are a nice change after doing so many blocks. I have also carved golf balls which I enjoy. I’m ok if you critique any of my carvings as well. I have been carving for 3 years now, mainly following tutorials on YouTube from ddalo, Doug Linker, Gene Messer, Blake Lunsford, Cousin Jack carves and so on and I recently got a one year pass for the wood carvers academy. I’m not great at coming up with my own creations yet. Here’s a random sampling of some of my work. People can see my stuff on instagram @andytarap
Thank you for your time,
Andy Tarap”

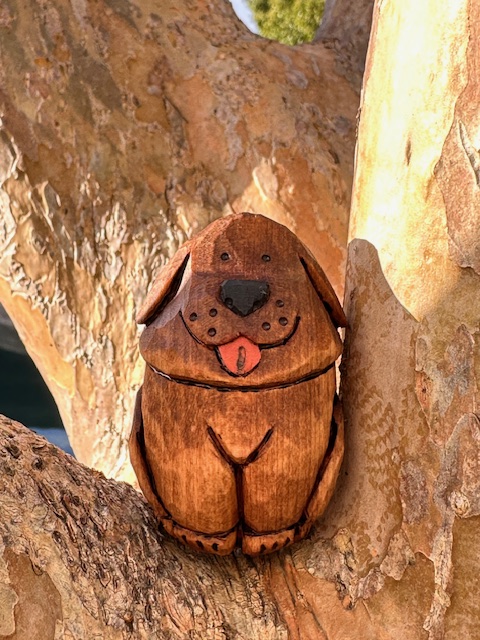

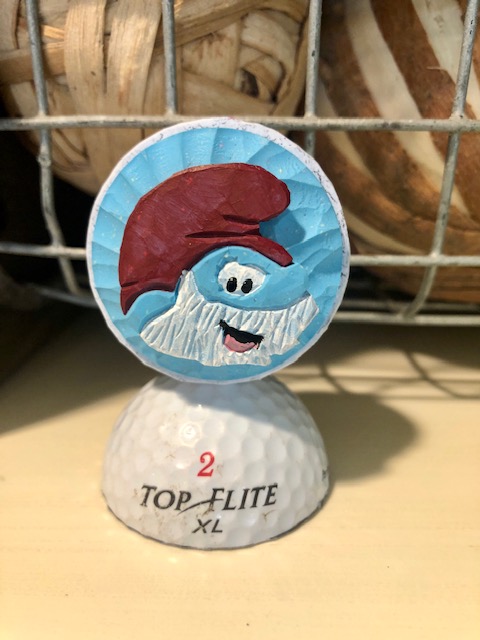


Thanks for the photos, Andy! All of your carvings are great. I posted your eggs and golf balls here this month. Next month I’ll post more photos of your terrific work.
My very good friend, Jessi Mongold sent in photos of two excellent carvings she did as family gifts. Jessi writes:
“Hi Bob!
It was great to see you this weekend! I have attached photos of a few Christmas gifts I made for my family to share with the Woodchip Chatter family.
Any critiques you have on the mouse would be greatly appreciated!
Many Thanks,
Jessi”

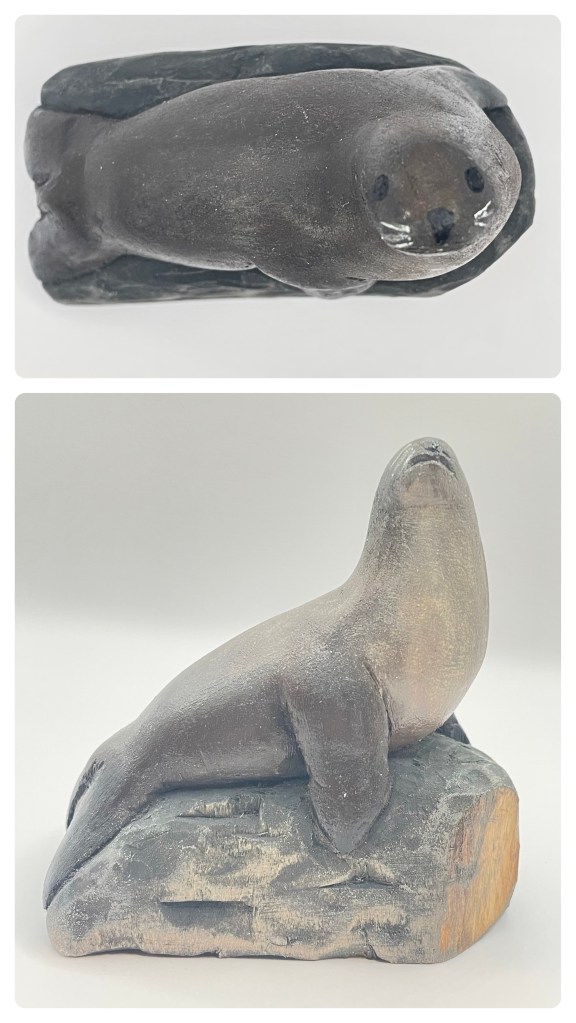
Those are really beautiful carvings, Jessi! Very realistic looking. Your lucky family members got some very nice gifts. Great job!
My good friend and frequent contributor, Shannon Coker sent in a photo of a beautiful Easter cross she carved from a carvingjunkies.com pattern. Shannon writes:
“Hi all ,
Easter cross pattern via www.carvingjunkies.com
Here is my take on their pattern
Cross and Dogwood
Shannon”
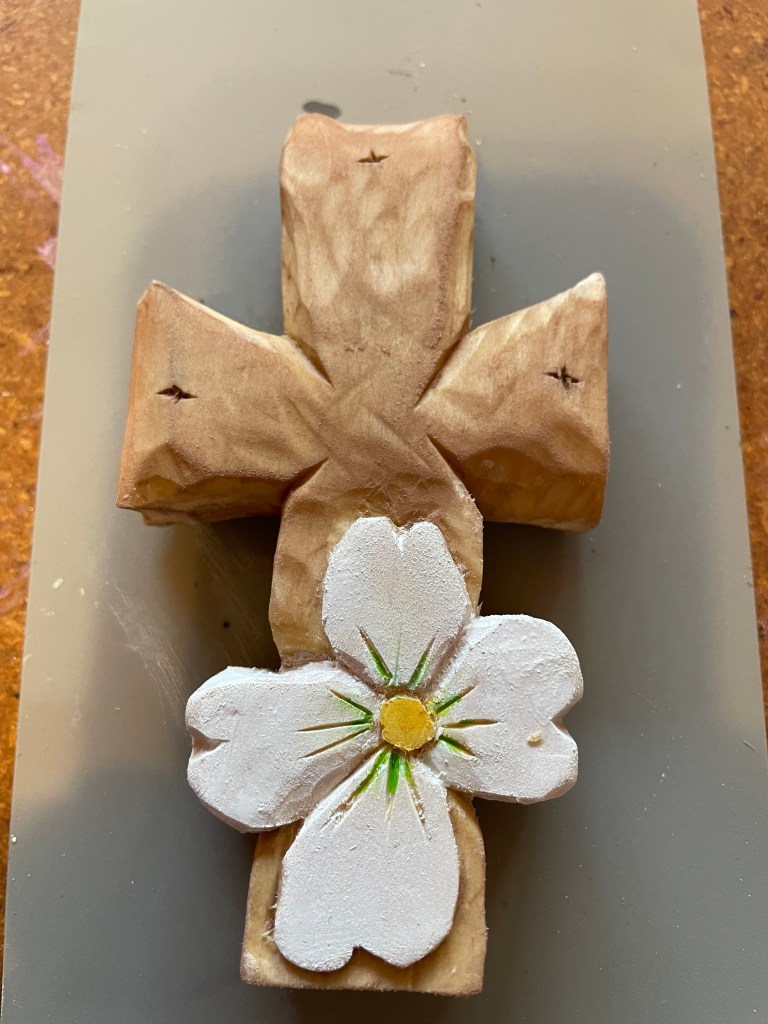
Beautifully done, Shannon! Thank you for sharing.
My good friend, Paul Flatt send in a photo of some of the Ddalo characters he’s been carving. Paul writes:
“Hi Bob
Just thought I would send you this photo of some male and female characters, inspired by Ddalo, for you to use in your next blog if you wish.
I am currently working on some birds based on a Disney Pixar short animation. I will send them over if I get them finished in time.
Best Wishes
Paul”

Thank you for the photo, Paul! Very nicely done. I like the variety.
Carver’s Corner

“Carver’s Corner” is the section where you can send in photos of your carvings to have me critique them and offer you my truthful opinions on what you did right and what you might improve on next time. It’s an excellent opportunity to improve your carving skills! Send your photos to: carverbobk@woodchipchatter.com
My very good friend, Jessi Mongold sent in a photo of a wonderful mouse in a mitten she carved. Jessi writes:
“Hi Bob!
Any critiques you have on the mouse would be greatly appreciated!
Many Thanks,
Jessi”
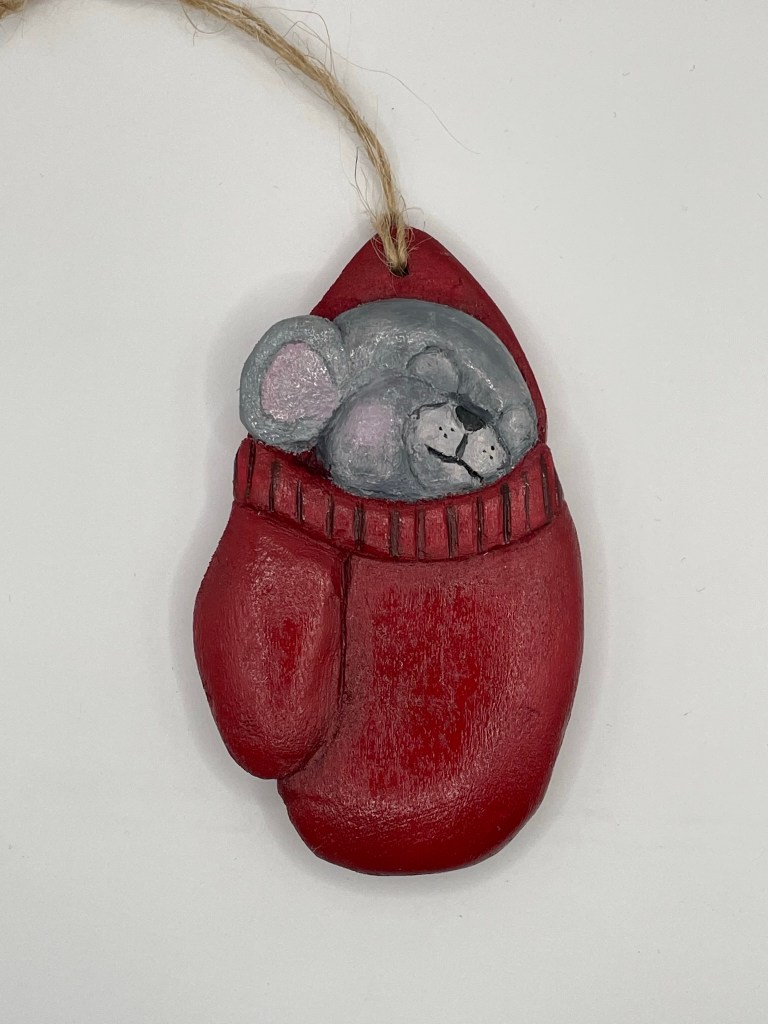
Thank you for sending in the photo of your mouse, Jessi! I think you did a terrific job on it. The carving work is well executed and the mouse really appears to be sleeping inside the mitten. About the only thing I can suggest is that you should try to go thinner with the paint on the mitten part of the carving next time. Water down your paint more and apply it in light layers to build up the color so that the wood grain shows through.
My next entry to the Carver’s Corner came from my friend, Gordon Pribyl from Rapid City, South Dakota. Gordon writes:
“Bob,
I’ve been carving about 3 1/2 years. Watch some YouTube videos but mostly just work things out. My first class ever comes up locally in April. Not a lot to choose from here in western South Dakota and health issues prevent much travel or major time commitments. Appreciate your blog and coaching. Use any of these or none as you see fit. Just trying to improve my craft. Thanks, Gordon Pribyl; Rapid City, SD”

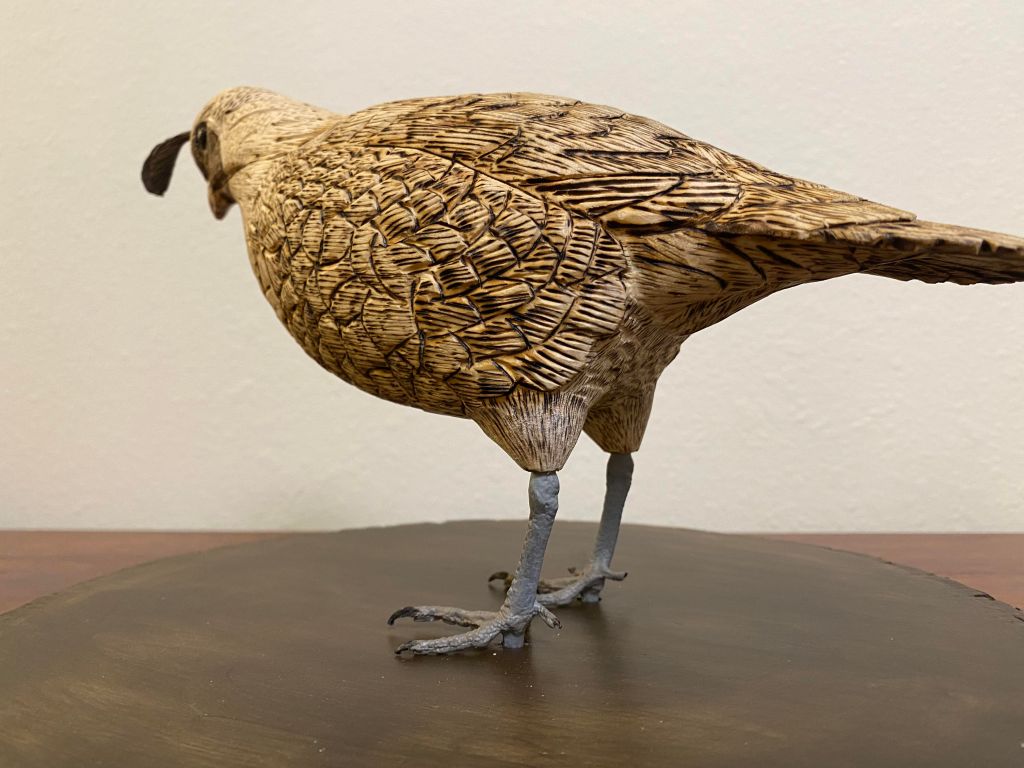

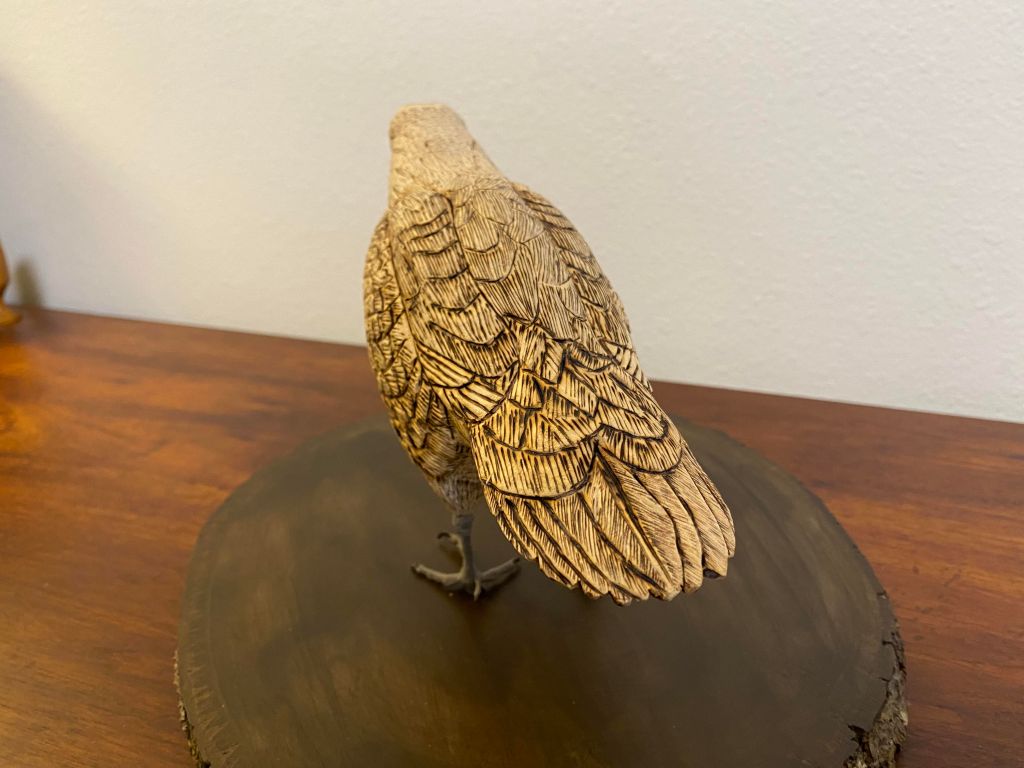
Thank you so much for the photos of your quail, Gordon. They are greatly appreciated. I think you did an overall great job on your quail. The general shape and anatomy seem to be spot on and the pose looks realistic. The only thing that stands out in my mind is the feather detail work. The lines between the body feathers are too pronounced. The cuts are too large and deep, they should be more subtle and it should appear the feathers are overlapping one another. This work is often done with just a wood burner using a thin, fine-pointed nib.
Try to make your lines very close together and all running in the same direction. Studying photos will prove very helpful.
I can relate to your dilemma regarding finding local carving classes and issues with travel. There’s not much here in North Jersey either, although the onset of Zoom classes has come a long way to help solve those problems. You might want to consider a subscription to the Woodcarving Academy.
I hope I was somewhat helpful. Keep up the excellent work you’re doing, and I look forward to seeing more of your work as you progress.
My good friend, Paul Flatt sent in some photos of the Disney Pixar birds he carved recently. Paul writes:
“Hi Bob
Thought I would share my prototype birds from the Disney Pixar animation ” For the birds”.
Have added tails to a couple of them and also might add some feather details.
Just wondering if you have any thoughts and how they can be improved.
Kind Regards
Paul”


Thanks for the photos, Paul! I think your birds look terrific! You did a great job creating three dimensional characters from a two dimensional cartoon. The shapes and colors appear quite accurate and the birds are very recognizable as those from the movie.
You might want to create more feather detail, although I don’t think it’s necessary. Overall, very nice work!
Questions & Answers

I received a question from my good friend, Dean Stewart on how to add fish scales to your carvings. Dean writes:
"Bob,
If you’d be so kind, I’m looking for some help with this small mouth bass carving. I’m interested in knowing if you or your readers have any good ideas for adding the scales. I know that some folks burn them, but I don’t have to tools (or the patience) to do that. I wondering if anyone has a different way?
As always I really enjoy seeing the newsletter hit my inbox. Keep ‘em coming."
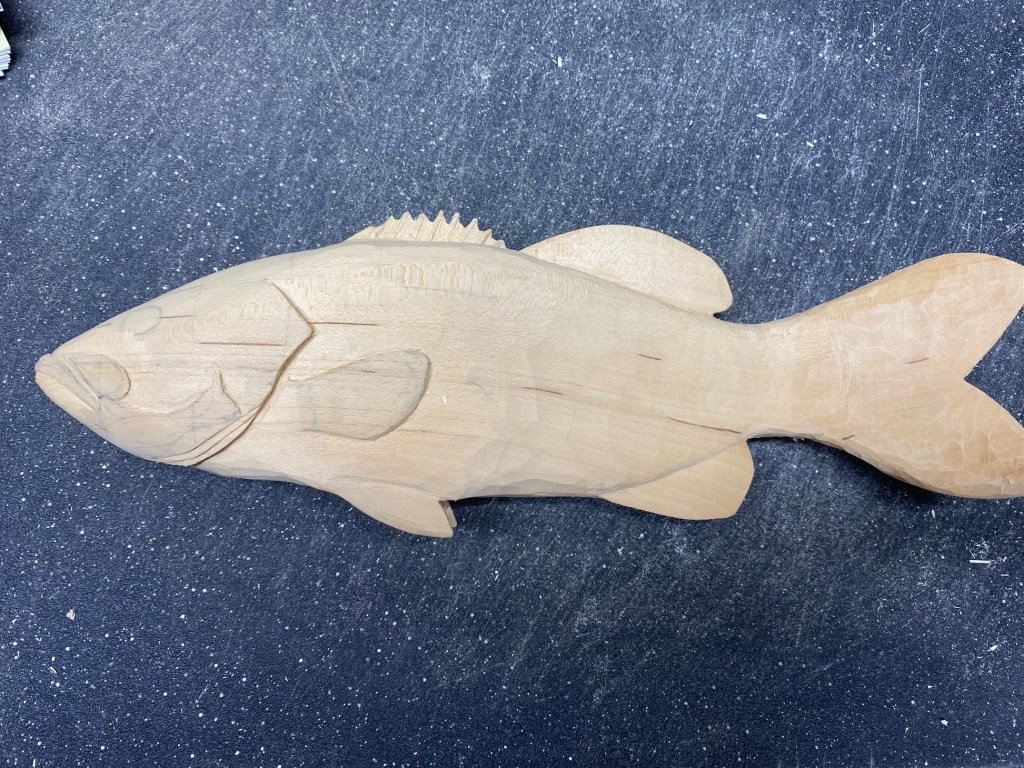
Unfortunately, there is no easy way to add scales, Dean. It’s a long, slow and tedious process. One way is to burn them in, although a lot of people carve them.
A good way to carve them is to use different sized U-gouges.
I don’t know if that helps. I’m not a fish carver so I don’t know much more than that. Perhaps some of our fish carving friends out there can tell us how they do it. Anybody?
Pattern of the Month
Upcoming Workshops and Seminars

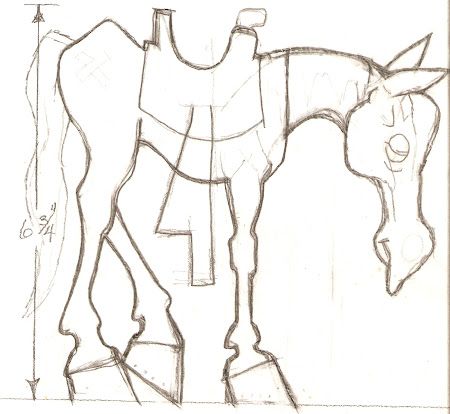
Horse Jumping Fence
Teacher: Janet Cordell
Dates: TBD
Times: 2-4 p.m. Pacific Time /3-5 p.m. Mountain Time /4-6 p.m. Central Time /5-7 p.m. Eastern Time /
12 hours ( 6 sessions – 2 hours each day)
Location: Online (Via Zoom)
For details and to sign up email Janet Cordell

Woodcarving 5 Piece Cowboy (& Friends)
Teacher: Dave Stetson
Dates: June 1,2,8,9
Times: Sat, Sun – 9:30am-11:30 Pacific /11:30am-01:30pm Central / 12:30pm – 2:30pm Eastern
8 hours (4 sessions – 2 hours each day)
Location: Online (Via Zoom)
For details and to sign up email Dave Stetson

Woodcarve Handsome Hunks and Heartthrobs
Teacher: Ryan Olsen
Dates: August 3,4,10,11 (PM Sessions)
Time: Sat, Sun – 1:30pm-3:30 Pacific /3:30pm-05:30pm Central / 4:30pm – 6:30pm Eastern
8 hours ( 4 sessions – 2 hours each day)
To sign up Contact Ryan Olsen ryanscaricatures@gmail.com
Online Classes With Chris Hammack
Teacher: Chris Hammack
Chris Hammack is offering a new series of online classes to help students learn and sharpen their woodcarving skills. Individual and Group Classes are available through his web site chrishammackart.com/groupclass

TWhittle Tuesdays
Teacher: Dwayne Gosnell
Dates: Two – 2 hour classes each month on Tuesdays
Location: Online (Via Zoom)
To sign up contact Dwayne Gosnell via email dagwood_76@gmail.com

Woodcarving Academy
Established in 2020, the Woodcarving Academy offers dozens of videos and seminars created by some of the country’s top level instructors. More videos are added regularly as they are created by the instructors.
With a paid subscription to the Woodcarving Academy you can view any videos you like for as many times as you like.
Subscription rates: Monthly = $19.95 Quarterly = $49.95 Annual = $139.95
There is even a Free level which allows you to tour the website and watch the sample videos and content, and receive email updates as new content becomes available.
Check out the Woodcarving Academy and learn with the masters right in the comfort of your own home! Go to: www.woodcarvingacademy.com or Email: support@woodcarvingacademy.com
News & Announcements

The International Association of Woodcarvers has upcoming Zoom meetings on the following Saturdays at 3PM EST with special guest presenters. Check them out…
Zoom: 310-460-3575
Presentation Schedule:
4/6 – Rod Gatlin (Charlotte Show)
4/13 – OFF
4/20 – Tony Taney (Bulgaria) Tony_Carvings
4/27 – Charlotte Show (No Meeting)
5/4 – Christine Hill
5/11 – Kyle York (Kjaycarvings)
INTERNATIONAL ASSOCIATION OF WOODCARVERS
COME JOIN US!!!
The Jersey Hills Wood Carvers (JHWC) club is a small but growing group of wood carvers sharing their time, knowledge and joy of woodcarving. The JHWC generally meets from 7:00 PM EST to 9:00 PM EST on the 1st, 3rd and 5th Thursday of each month (when school is in session) at the Jefferson Township High School wood shop classroom.
Membership is “FREE” and open to anyone interested in woodcarving regardless of their ability.
JHWC’s Upcoming Meetings and Events
2024
April 18th
May 2nd, 16th and 30th
June 6th and 20th
For more information contact:
Al Santucci alsantucci4@gmail.com President
Bill Brunner billbrunnerdesign@gmail.com newsletter/website editor
Or visit:
Website: https://www.jerseyhillswoodcarver.com/
Facebook: https://www.facebook.com/groups/736479646821641/
Holli Smithson – Helvie Knives
Please Pray for Holli
“There is no easy way to say what we have to share. Holli was diagnosed with squamous cell carcinoma rectal cancer. The surgeon and both the radiation and chemo oncologists are all lined up to take their part in the treatments that we, as a family, will be facing together. We know that God is in control, and we serve a mighty, merciful God. At this time we respectfully ask for all prayers warriors. We will do our best to work on outstanding paid orders, and halt taking any new ones. Paid orders will be very delayed moving forward. Orders not due, and not paid, please do not pay at this time. Anyone wanting to send a card, well wishes, or words of encouragement, can be sent to: PO Box 145, Tipton, IN 46072. If you want to help us pay for lost wages and medical bills we have a GoFundMe.”
https://www.gofundme.com/f/my-cancer-journeythe-club-no-one-wants-to-be-in
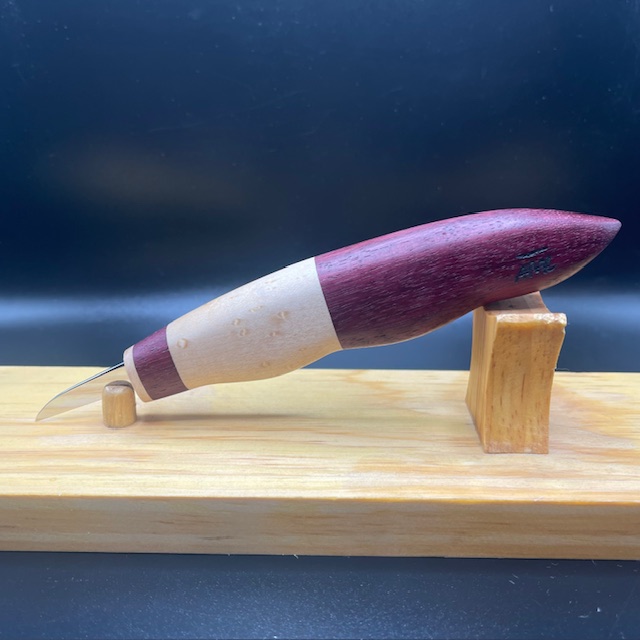
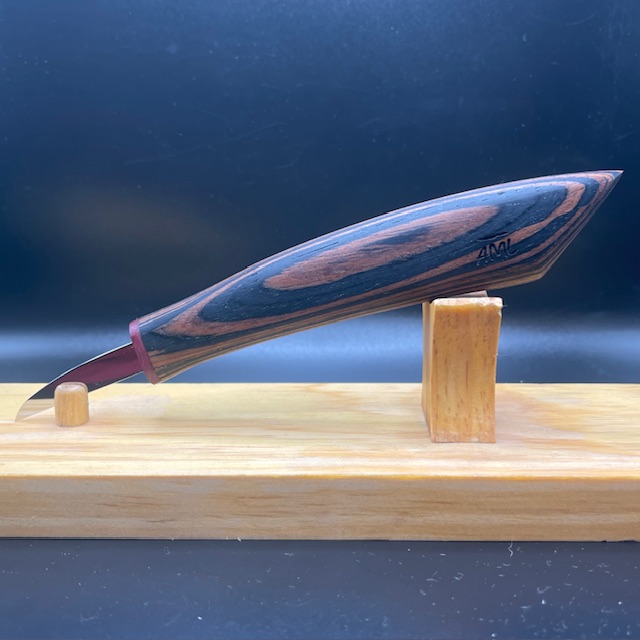
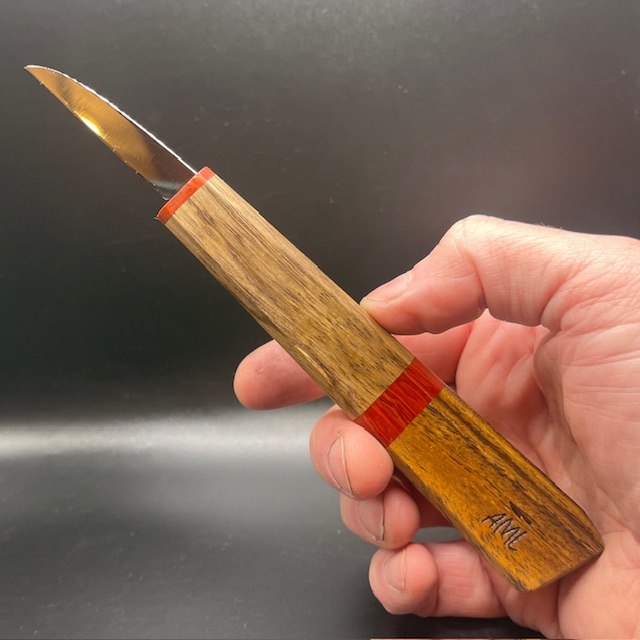
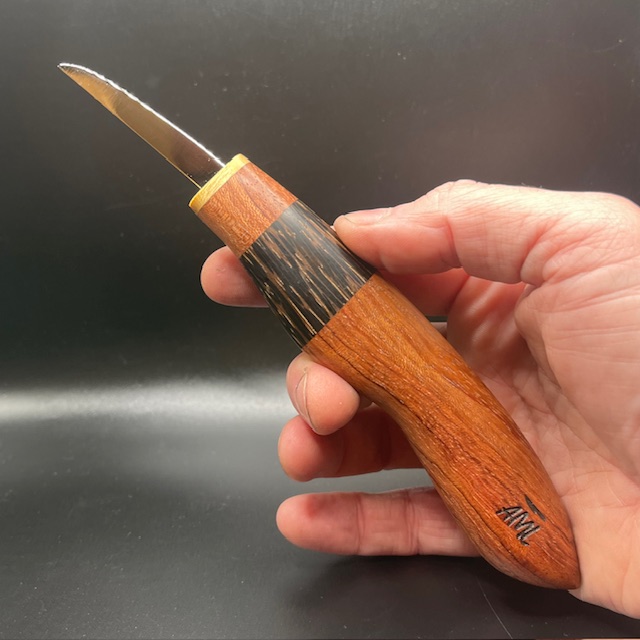
AML Wood Carving Knives
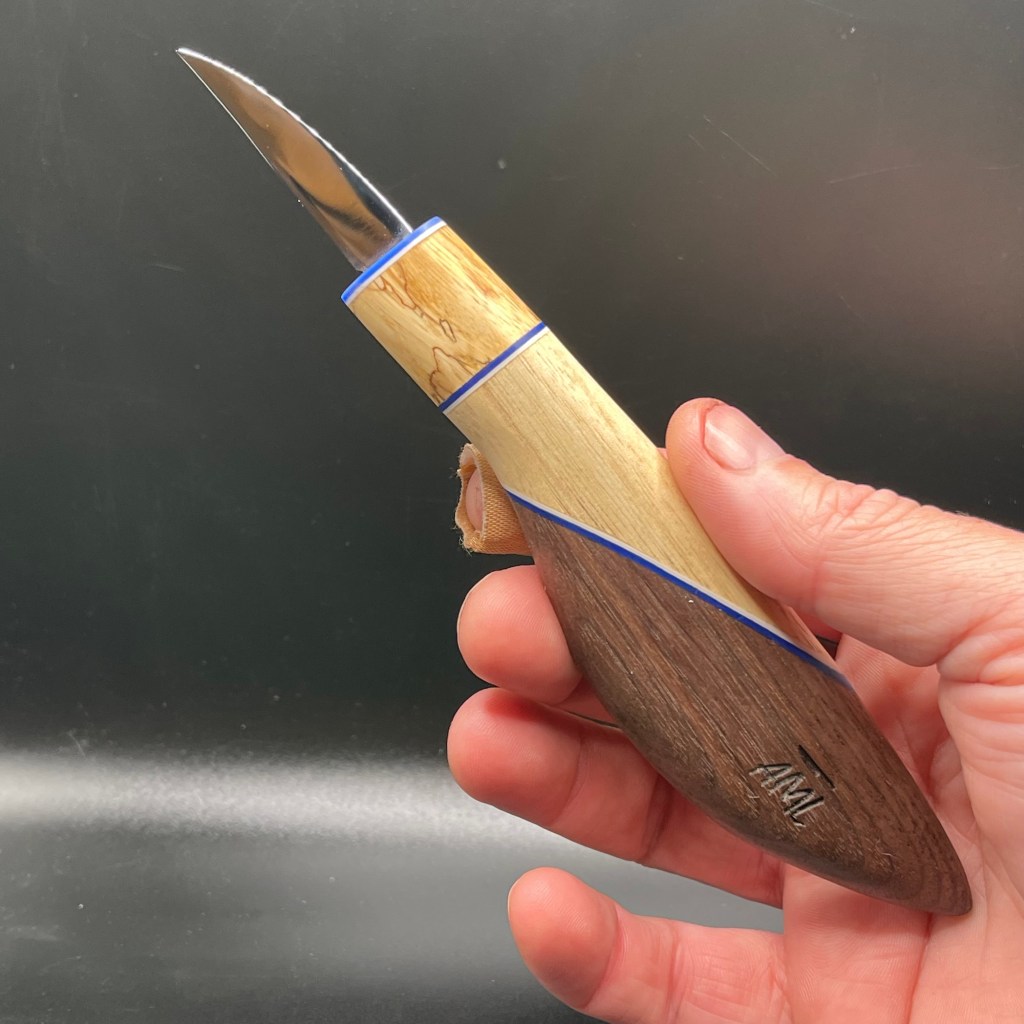
AML Wood Carving Knives are handmade by Andy Loughlin in Monroe, New York.
The blades are made from 1095 high carbon steel sharpen easily and hold an edge well. The variety of handle styles are all made from diverse exotic woods from all around the world. The knives are all available for auction on EBay under “AML Knives.” Bidding usually starts at $22 and most knives sell for between $40 and $100.
Every knife comes carving sharp right out of the package and each one comes with a custom made magnetic wooden sheath (see below) at no extra cost.
I now own two AML Knives and can speak personally about their quality. These are not production knives. Each knife is handmade by Andy, himself. The knives are very sturdy, well made, and will stack up well to the big boys. These knives have quickly become quite popular and sell out fast so check the site (“AML Carving Knives” on EBAY) often for availability. Below are examples of some knives currently available or which have recently sold:


Book Update
As many of you may know I have written my first book on carving simple ornaments. The book was expected to be released last September but for some reason Fox Chapel Publishing delayed the editing process. I’m happy to be able to tell you we are now finally into the editing process and the book’s anticipated release date, at this time is sometime in May or June. Fingers crossed!
The next issue of Wood Chip Chatter will be posted on May 3, 2024.

Keep a sharp eye out for it.
Keep a sharp edge, and keep on carvin’!


Funny Bone


<
div dir=”ltr”>
<
div dir=”ltr”>
Hi Bob..Attached photo of trout with scales. I found using wood burning hatched lines works well. The size of scales can vary based
LikeLike
Tim,
There is no photo attached. Try sending it again to my personal email: rwkoz51@gmail.com
LikeLike
Bob, Thanks for another great letter. I’d be happy to share what I’ve been doing and learning with stains. I’ll get working on it. I appreciate the invitation and opportunity to “give back” after having received so much help, input, and ideas from others. Jon Gledhill
LikeLike
Hi Bob..I sent you a message with suggestion for adding fish scales to a carving. Did not send pictures cause couldn’t figure out how from IPhone. Anyway i used a wood burner based on a recommendation from someone. Sorry I do not remember who, tho but they get the credit. I have attached two photos. One is with primer right after burning and the second is a completed project. I beleive I have sent this to you in the past. Hope this helps your reader….Tim
LikeLike
Tim,
I did not get you message or photos. Try sending them again to my personal email: rwkoz51@gmail.com
LikeLike
Hi Bob,
If I were to use refined walnut oil to season a wooden mug, how long should I let it cure before using it?
LikeLike
I worry about using refined oils for food-grade items. Generally, when oils are refined, other ingredients (some potentially toxic) are added. Try to find an oil that has been made through a natural process.
Oil drying times will always vary with the air’s humidity. The higher the humidity, the longer the drying time.
LikeLike
Thank you for the suggestion.
LikeLike