
Painting Tips for Wood Carvers
Synthetic Brushes vs. Natural Brushes
Paint brushes can be divided into two categories: Natural Hair(animal hair) which is broken down into bristle and soft hairs, like red sable and camel (which is actually a broad term for a group of hairs including ox, goat, pony, and squirrel), and Synthetic Hair, which is manufactured soft hair and bristle.
Synthetic brushes were once the choice for painting the outside of your house, but little else. Today’s technology produces a variety of types and qualities of synthetic fibers, so synthetic brushes are now the choice for many applications, including fine art.
Synthetic brushes are widely recommended for use with acrylic paint. The advantages of using a synthetic brush with acrylic paint include:
- Easy clean up. Synthetic hairs do not have an animal cell structure that can trap paint and other liquids.
- Acrylics are fast-drying, so your brush must be frequently submerged in water. This can leave a natural hair brush water-logged and limp during a long painting session.
- Acrylics and natural hair are opposites in pH. Acrylics can, in fact, break down natural hair over time.
- Synthetic hair is less prone to breakage. It is durable on many surfaces (including wood), and can be used in all media, including acrylics.
- Overall, as compared to natural hair brushes, synthetic brushes offer a more economical choice, size-for-size, quality-to-quality.
Brush Use & Care
- Paint on tip only – Just dip the tip of your brush into the paint and only paint with the tip of the brush. Don’t press down hard on your brush which squashes down the bristles and damages the brush. Paint with the tip, not the sides of the brush.
- Don’t twist – When loading, using, or cleaning a brush, let the hairs move in their natural direction. Excessive twisting, pushing down hard on an edge or point, and other unnatural actions will quickly result in permanant distortion of the brush.
- Don’t soak – Never leave a brush soaking in water, brush cleaner, or other solvent for an extended period of time.
- Take care not to let your brush head rest on the bottom of your water container where its shape can easily become distorted.
- No paint in ferrule – Don’t allow the paint to get so far up the bristles of the brush that it gets into the ferrule. This damages the brush as the paint hardens inside and is very hard to get out. It stiffens the bristles and spreads them apart.
- Don’t dry up – Never allow paint to dry on your brush. Be especially careful when working with acrylics. They dry quickly! Brushes should be kept moist during a painting session until thorough cleaning is possible.
- Don’t re-use paint – Never put paint from your pallet back in the bottle. This will cause your paint to thicken.
- Wash brush half way up – Wash your brush out once the paint gets half way up the brush. This eliminates the problem of the paint getting up into the ferrule of the brush.
- Change water often – Change your wash water often. Once your wash water becomes dirty and dark…change it. You don’t want to be using dirty water on your carvings, especially when applying light colors such as white.
- Don’t use grizzly brushes – Don’t paint with grizzly old brushes. Trim them with scissors if they’re salvageable or throw them away. You can’t paint fine detail when your paint brushes bristles are flared out all over the place.
Proper Brush Cleaning
In order to ensure the maximum life of your brushes they must be thoroughly cleaned at the end of each painting session.
- Remove excess paint by wiping your brush across a paper towel, newspaper, or rag.
- Use cool water and a mild soap to remove the rest of the paint. Many companies make brush cleaners formulated for acrylics and other water-based paints. If this is not available, use a mild liquid or bar soap; there is no reason to use anything stronger. Doing so may leave the hair in a worse condition (i.e., curled at the ends, dried out, etc.). Very cold or hot water should not be used as the extreme temperatures can cause the paint to harden before it is removed from your brush.
- Stroke the brush across a paper towel, and press up by the ferrule area to be sure all traces of color are gone. (Some filaments may become stained with color when first used. This is fine as long as the wet paint is gone.)
- Remove extra moisture and reshape the head with your fingers. Leave a trace of cleaner or soap in a synthetic brush to help maintain its shape. Just remember to rinse the brush thoroughly before using it again.
Photo Shop
“Photo Shop” is the section of Wood Chip Chatter where carvers can send in photos of their wood carvings for display. It’s your chance to show off your work…sort of a show and tell. The photos will only be displayed and no comments or critiques will be made. For critiques on your carvings send them in to the “Carver’s Corner.” Send your photos to: carverbobk@woodchipchatter.com
My good friend, Shannon Coker sent in a photo of some of her recent carvings; a slim snowman, a one-eyed troll, and a greenman:

Thanks for the photo, Shannon. Very nice job. Keep up the good work.
My very good friend, Geir Larsen from Norway is always busy carving. Here are two photos of the reindeer he recently carved following a Ddalo video:
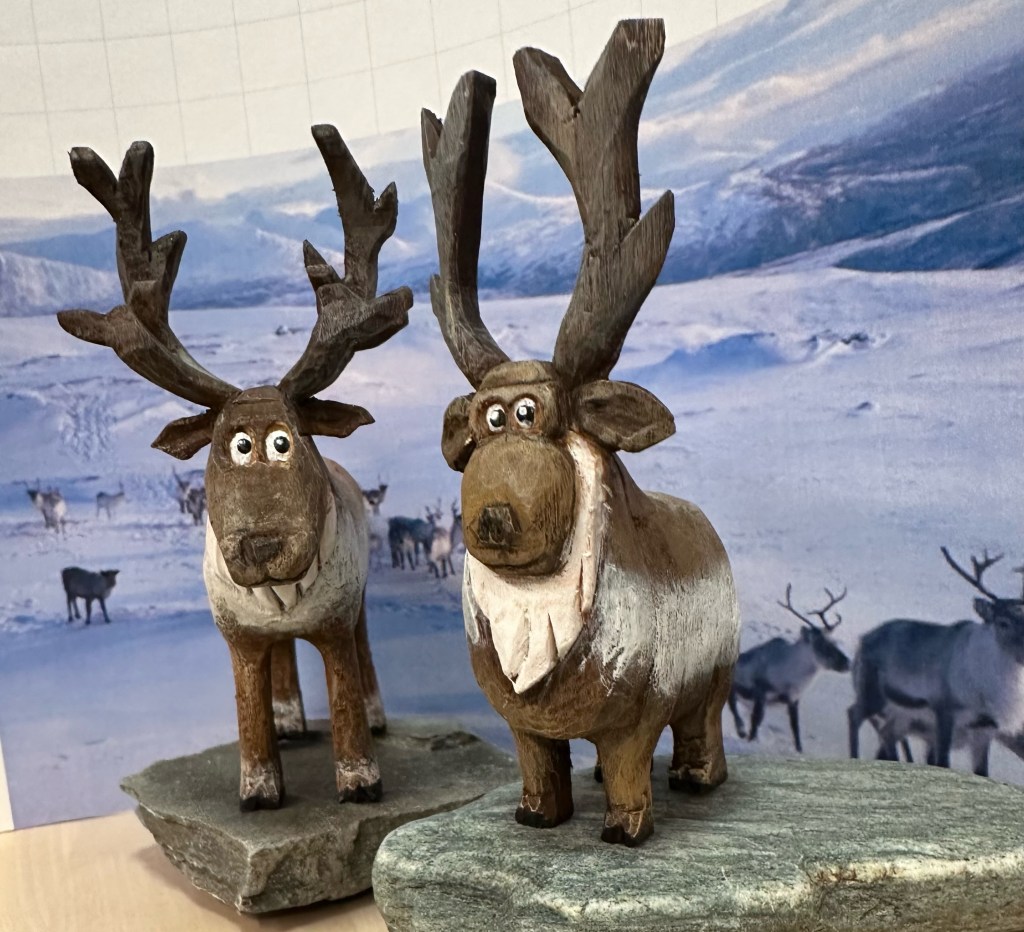

Excellent work as always, Geir, and thank you for the photos!
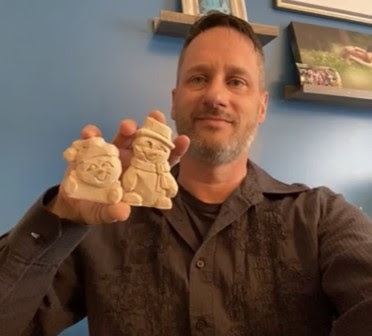
T Hoover (no other name given) carved a terrific Sasquatch from last month’s Pattern of the Month. T Hoover writes:
“Hi Bob. Thank you for the free carving pattern of the Sasquatch in the most recent “Wood Chip Chatter”. I really enjoyed carving, painting and photographing this mythical creature. Thanks again!”

That’s a really great Sasquatch! I’m glad you enjoyed the pattern.
Woodcarving Tip
Creating Eyebrows
Many times it can be a challenge to carve eyebrows on small wood carvings because the wood often crumbles and breaks off.
Painting them on is always an option, but here’s another idea to try:
Use 3D fabric paint to build your eyebrows. Apply the paint directly from the nozzle of the bottle.
You can find 3D fabric paint on Amazon or in your local craft store.
From the carvingjunkies.com
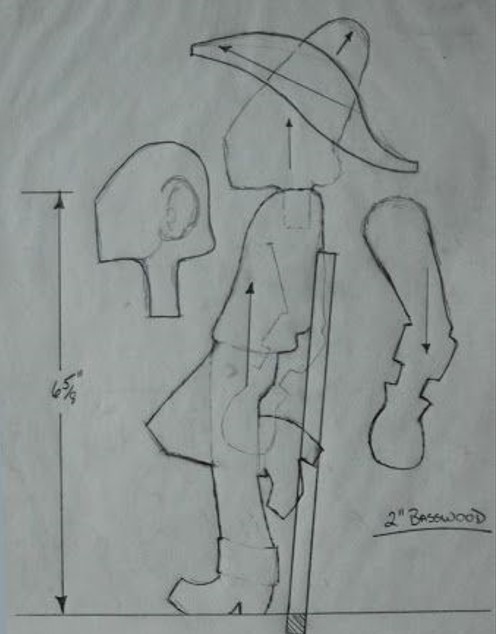
Pattern of the Month
Generic Cowboy
Upcoming Workshops & Seminars

Woodcarving a Girl
Teacher: Janet Cordell
Dates: March 8,11,25,29 April 1st
Times: 2-4 p.m. Pacific Time /3-5 p.m. Mountain Time /4-6 p.m. Central Time /5-7 p.m. Eastern Time /
10 hours ( 5 sessions – 2 hours each day)
Location: Online (Via Zoom)
For details and to sign up email Janet Cordell

Woodcarving Man on Floor
Teacher: Dave Stetson
Dates: March 9,10,16,17,23,24
Times: Sat, Sun – 9:30am-11:30 Pacific /11:30am-01:30pm Central / 12:30pm – 2:30pm Eastern
12 hours (6 sessions – 2 hours each day)
Location: Online (Via Zoom)
For details and to sign up email Dave Stetson
Access to Pattern & Recordings for Students

Woodcarve Handsome Hunks and Heartthrobs
Teacher: Ryan Olsen
Dates: August 3,4,10,11 (PM Sessions)
Time: Sat, Sun – 1:30pm-3:30 Pacific /3:30pm-05:30pm Central / 4:30pm – 6:30pm Eastern
8 hours ( 4 sessions – 2 hours each day)
To sign up Contact Ryan Olsen ryanscaricatures@gmail.com

Online Classes With Chris Hammack
Teacher: Chris Hammack
Chris Hammack is offering a new series of online classes to help students learn and sharpen their woodcarving skills. Individual and Group Classes are available through his web site chrishammackart.com/groupclass
TWhittle Tuesdays
Teacher: Dwayne Gosnell
Dates: Two – 2 hour classes each month on Wednesdays
Location: Online (Via Zoom)
To sign up contact Dwayne Gosnell via email dagwood_76@gmail.com
Woodcarving Academy
Established in 2020, the Woodcarving Academy offers dozens of videos and seminars created by some of the country’s top level instructors. More videos are added regularly as they are created by the instructors.
With a paid subscription to the Woodcarving Academy you can view any videos you like for as many times as you like.
Subscription rates: Monthly = $19.95 Quarterly = $49.95 Annual = $139.95
There is even a Free level which allows you to tour the website and watch the sample videos and content, and receive email updates as new content becomes available.
Check out the Woodcarving Academy and learn with the masters right in the comfort of your own home! Go to: www.woodcarvingacademy.com or Email: support@woodcarvingacademy.com
News & Announcements


Stop by Table #67 and say “Hi”


The International Association of Woodcarvers has upcoming Zoom meetings on the following Saturdays at 3PM EST with special guest presenters. Check them out…
Zoom: 310-460-3575
Presentation Schedule:
3/2 – Jim Nisbet
3/9 – James McCain
3/16 – Lee Simpkins
3/30 – Rod Gatlin
INTERNATIONAL ASSOCIATION OF WOODCARVERS
COME JOIN US!!!
The Jersey Hills Wood Carvers (JHWC) club is a small but growing group of wood carvers sharing their time, knowledge and joy of woodcarving. The JHWC generally meets from 7:00 PM EST to 9:00 PM EST on the 1st, 3rd and 5th Thursday of each month (when school is in session) at the Jefferson Township High School wood shop classroom.
Membership is “FREE” and open to anyone interested in woodcarving regardless of their ability.
JHWC’s Upcoming Meetings and Events
2024
March 7th and 21st
April 4th and 18th
May 2nd, 16th and 30th
June 6th and 20th
For more information contact:
Al Santucci alsantucci4@gmail.com President
Bill Brunner billbrunnerdesign@gmail.com newsletter/website editor
Or visit:
Website: https://www.jerseyhillswoodcarver.com/
Facebook: https://www.facebook.com/groups/736479646821641/
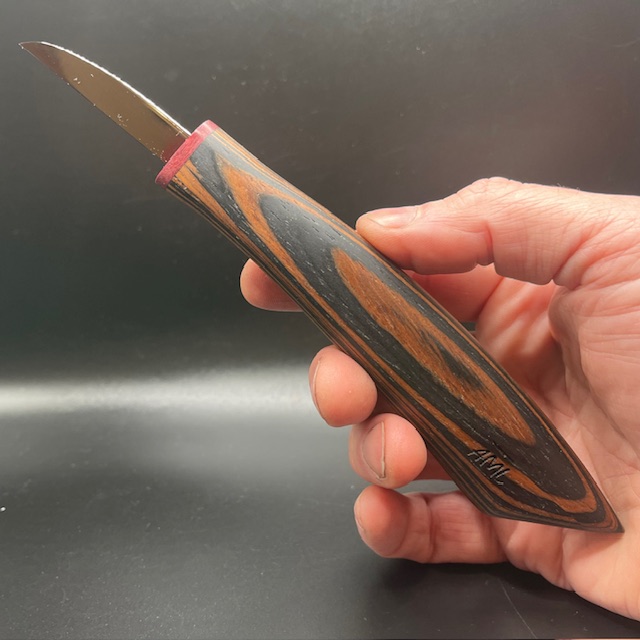
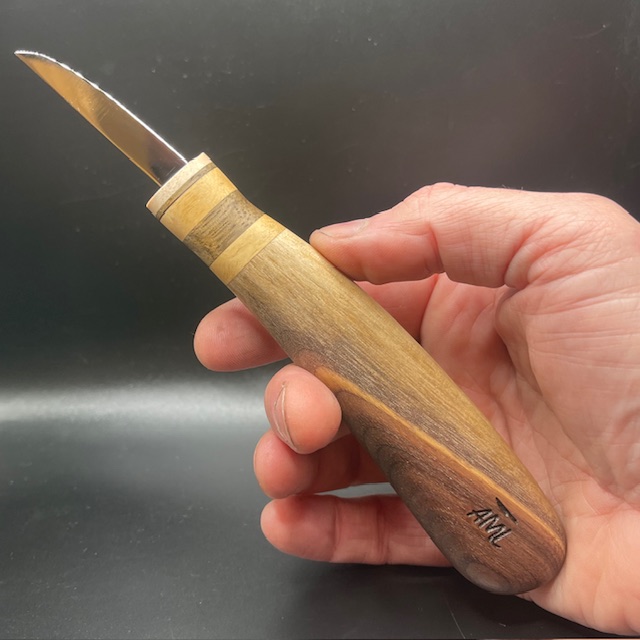
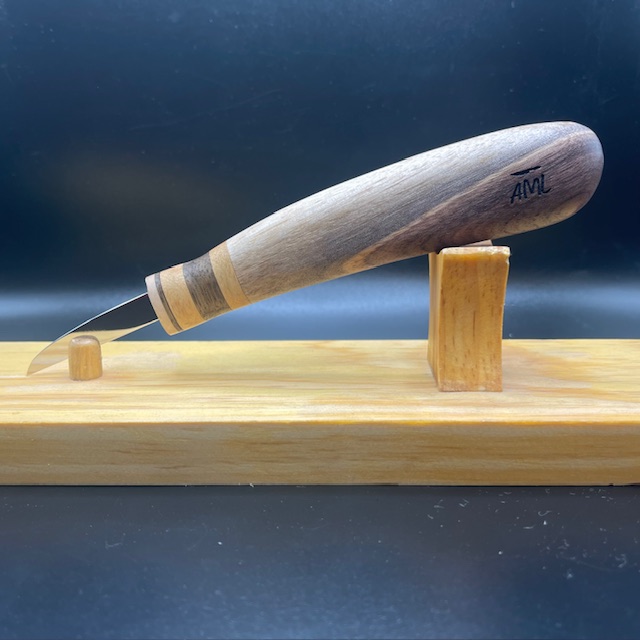
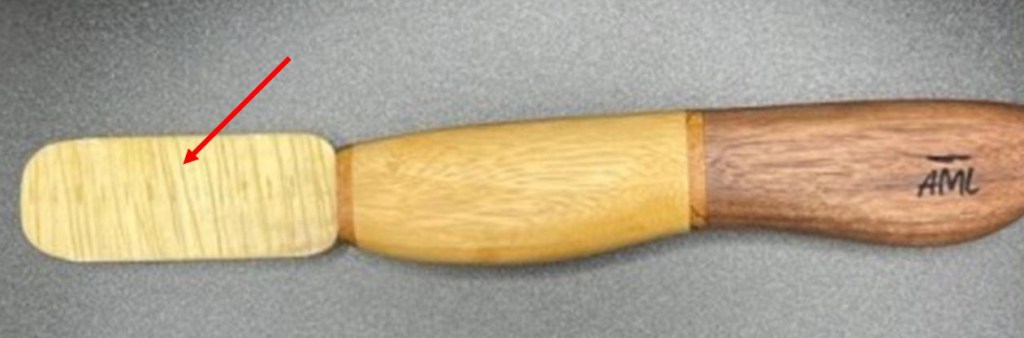
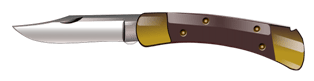
AML Wood Carving Knives
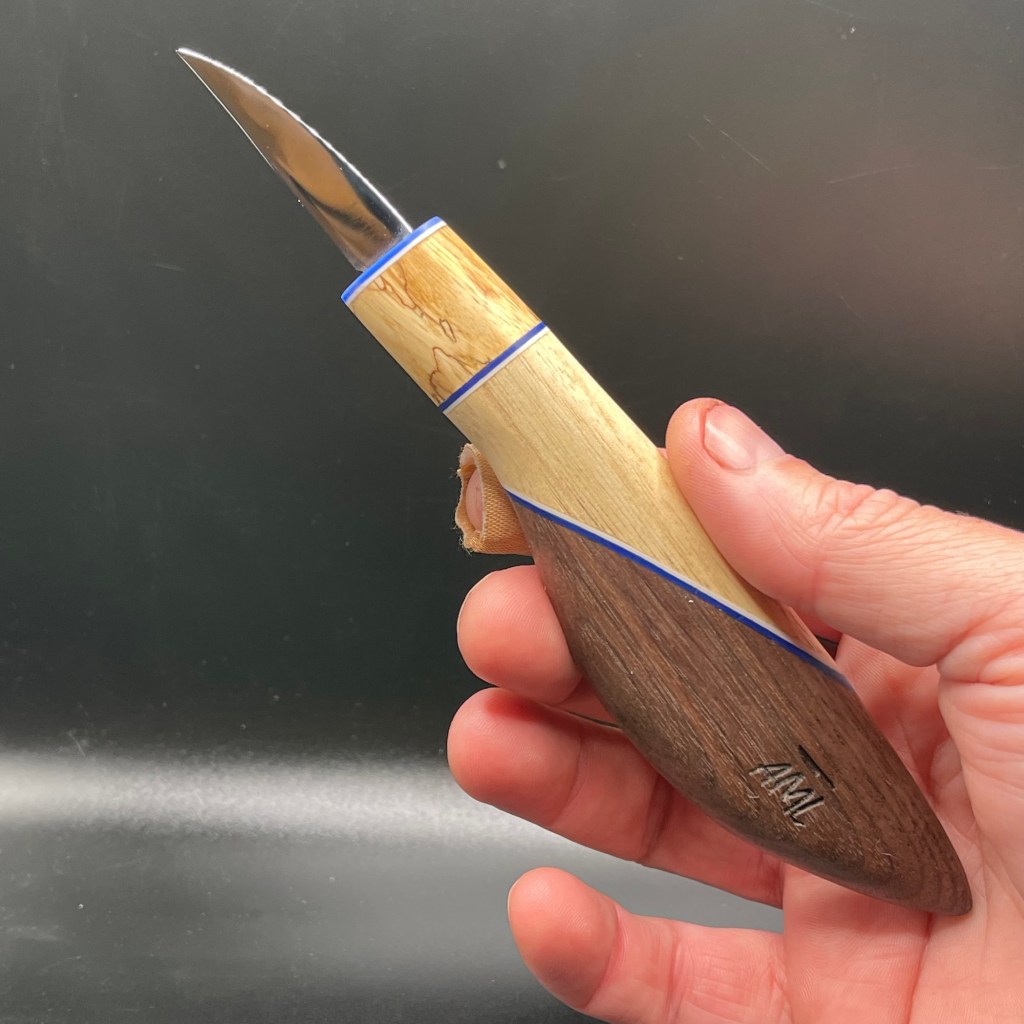
AML Wood Carving Knives are handmade by Andy Loughlin in Monroe, New York.
The blades are made from 1095 high carbon steel sharpen easily and hold an edge well. The variety of handle styles are all made from diverse exotic woods from all around the world. The knives are all available for auction on EBay under “AML Knives.” Bidding usually starts at $22 and most knives sell for between $40 and $100.
Every knife comes carving sharp right out of the package and each one comes with a custom made magnetic wooden sheath (see below) at no extra cost.
I now own two AML Knives and can speak personally about their quality. These are not production knives. Each knife is handmade by Andy, himself. The knives are very sturdy, well made, and will stack up well to the big boys. These knives have quickly become quite popular and sell out fast so check the site (“AML Carving Knives” on EBAY) often for availability. Below are examples of some knives currently available or which have recently sold:


Help Needed!
Wood Chip Chatter was rather on the light side this month due to the lack of reader contributions. I had no Reader’s Comments, Carver’s Corner or Questions & Answers sections to provide. Surely there must be many of you with questions to ask or carvings you would like to have critiqued.
Wood Chip Chatter is an interactive type of blog. It is unique in that there are two main drivers that make it work, input from me and input you. Without either one the newsletter cannot succeed. This blog has four main sections where you can contribute…Reader’s Comments, Photo Shop, Carver’s Corner, and Questions & Answers. Please pitch in and send your contributions addressed to carverbobk@woodchipchatter.com. All will be truly and greatly appreciated. Thank you.
The next issue of Wood Chip Chatter will be posted on April 5, 2024.

Keep a sharp eye out for it.
Keep a sharp edge, and keep on carvin’!

Funny Bone


Many thanks for the carvingjunkies shout out, Bob! Hope you are well!
Dana
<
div dir=”ltr”>
<
blockquote type=”cite”>
LikeLike