
Wood Properties of Red Oak
OAK, NORTHERN RED Quercus rubra (rubra – red)
Northern red oak is known also as CANADIAN RED OAK, GRAY OAK and RED OAK.
This tree grows across the mid-eastern part of southern Canada and the eastern section of the United States as far south as Alabama and Arkasas, and it is the state tree of New Jersey. It reaches an average height of 65 ft., though a height of 145 ft. has been recorded. It is probably the fastest growing of our native oaks. As a young tree it may add 2″ to the diameter in a year and 12″ to the height. It has a short trunk that divides into many heavy branches and is a broad, well shaped tree. The bark varies from gray to brown in color, and the leaves, from 4 to 9″ long, are dark green in color. The heartwood, of a light reddish brown color, is more coarse-grained than the white oak and is considered inferior to the white oak.
The wood is used for many purposes in furniture and flooring and takes a satisfactory finish, though all oaks, because of the open pores, should be filled before finishing or painting.
The red oak has become one of the most popular North American oaks used in Europe. It was introduced into France and England during the early part of the eighteenth century and today there are many fine buildings of this oak in France, Belgium and Germany.
It is estimated that there are over eighty billion feet of oak in this country and over 50% of this is red oak.


Reader’s Comments

My first comment this month comes from my good friend, Doug Prior of West Jordan, Utah in response to last month’s Halloween edition of Wood Chip Chatter. Doug Writes:
“Great entertainment with this month’s blog. I have never read or heard about the origins of “Halloween” so I really enjoyed that.
It was so funny you said just thinking about chip carving makes your head hurt. Mine too!
Take care Bob
Doug Prior West Jordan, UT”
Thanks for the kind comment, Doug! I think the stories of Halloween and the Jack O Lantern are entertaining and interesting. That’s why I post them every October. I hope my readers don’t mind.
Yeah, chip carving really makes my head spin!
My next comment is from an anonymous reader who wrote:
“Great letter this month!
Relating the origins of the spooky holidays adds to the mystique of the carvings you present from readers!
Keep up the good work.”
Thank you for your kind comment and words of encouragement.
Next, I received a nice comment from my friend, Glenn Calabrese of Fort Worth, Texas who wrote:
“Great edition! I read the whole thing and love the advice.
Thank you for this.
Glenn Calabrese, Fort Worth, Texas”
Thank you for your comment, Glenn! I’m glad you enjoyed it!
Photo Shop

“Photo Shop” is the section of Wood Chip Chatter where carvers can send in photos of their wood carvings for display. It’s your chance to show off your work…sort of a show and tell. The photos will only be displayed and no comments or critiques will be made. For critiques on your carvings send them in to the “Carver’s Corner.” Send your photos to: carverbobk@woodchipchatter.com
This month we have two entries to the “Photo Shop” from my good friend, Jon Gledhill who first writes:
“Bob, Thanks for your kind comments about my chip carving. I’m sorry I missed noticing your request to share pumpkin carvings. I don’t have any wood pumpkins, but thought you might enjoy seeing this one I carved a few years ago, using my wood carving tools. Best wishes for a wonderful holiday season! Jon Gledhill”


That’s an outstanding job you did on that pumpkin, Jon! I’ve been wanting to try carving that style of pumpkin for a few years but have never found the time to do it. Thanks for sending it in, it’s terrific!
Jon later writes:
“Bob, thought you might like this. I saw this 4′ quilt at a customer’s house during my day job, and asked if I could take a picture of it. She agreed, and I later took her one of the 4” painted coasters I carved from the photo, to thank her for sharing it with me.
The other photo is a positive image version of the design.
Have a great weekend!
Jon”
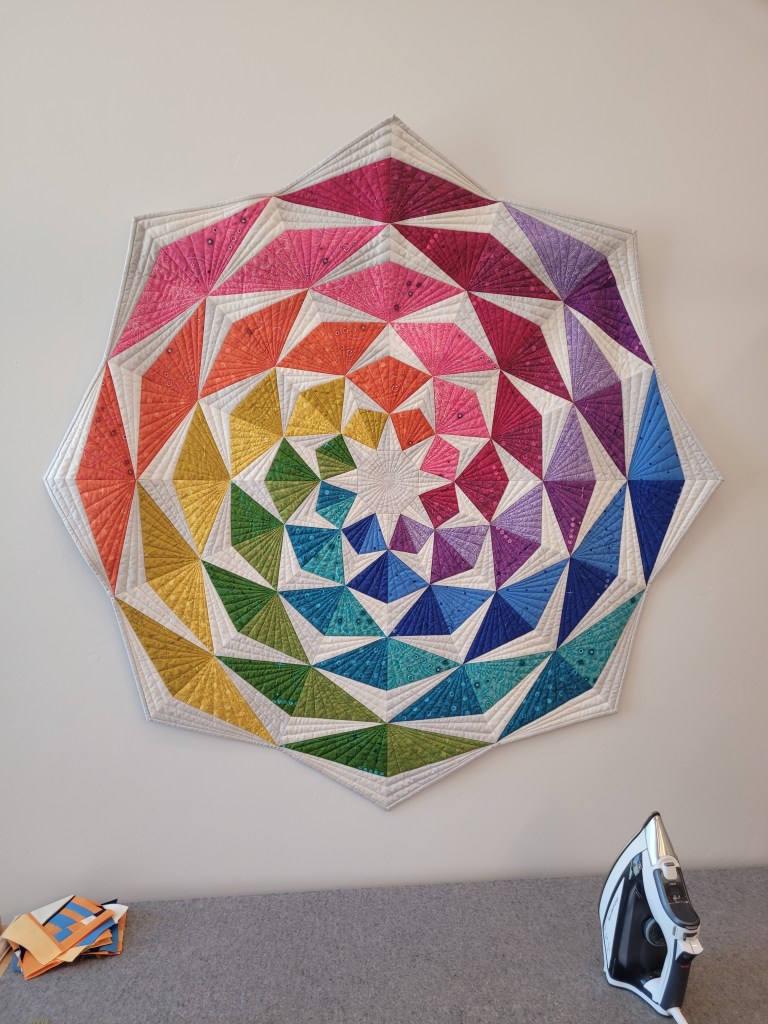

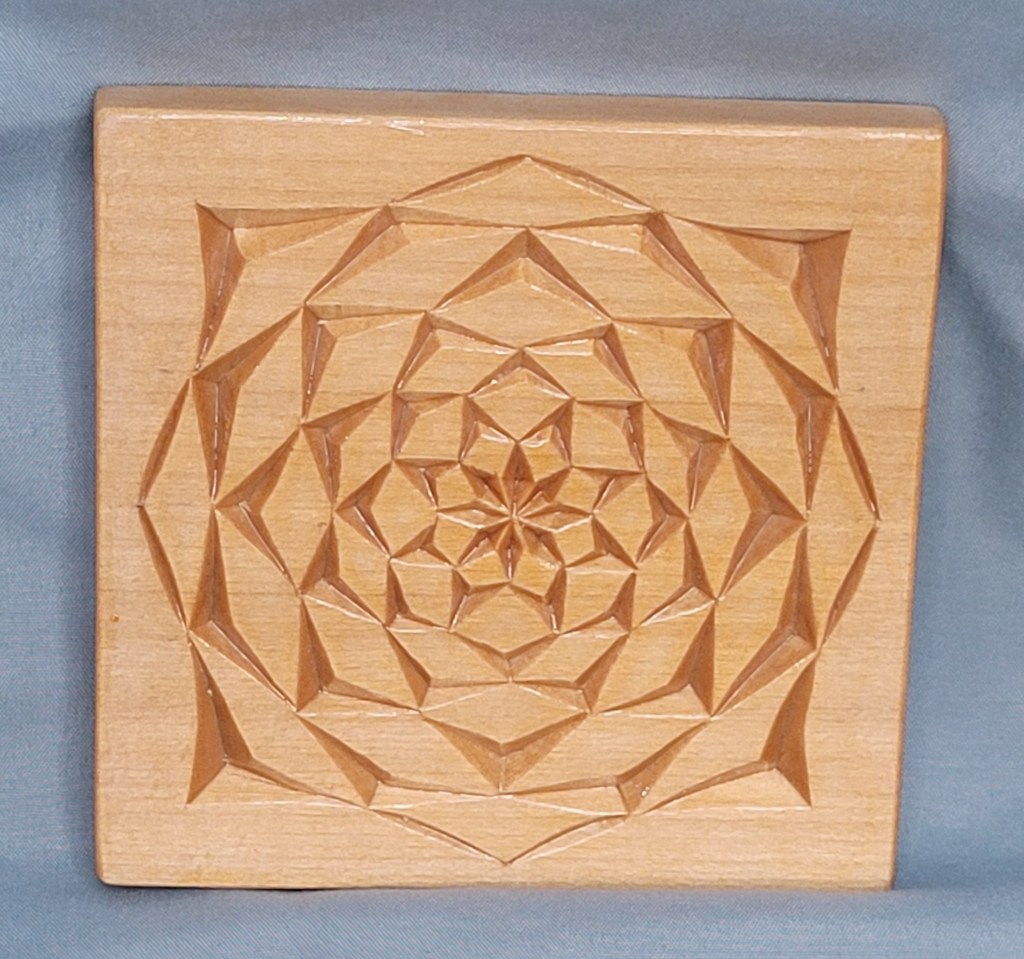
You matched the 4″ quilt pattern perfectly with your coaster, Jon and although I prefer the unpainted versions of chip carvings better, your painted coater makes it much easier to see the pattern. The way you managed to reverse the pattern and carve the positive image is what really boggles my mind. Excellent work, my friend!
My friend Shannon Coker sent in a photo of the beautiful fall pumpkin set she carved for her mom. Shannon writes:
“A gift for my mom. Doug Linker inspired
Shannon”
“Don’t ever apologize it’s a sign of weakness”
John Wayne
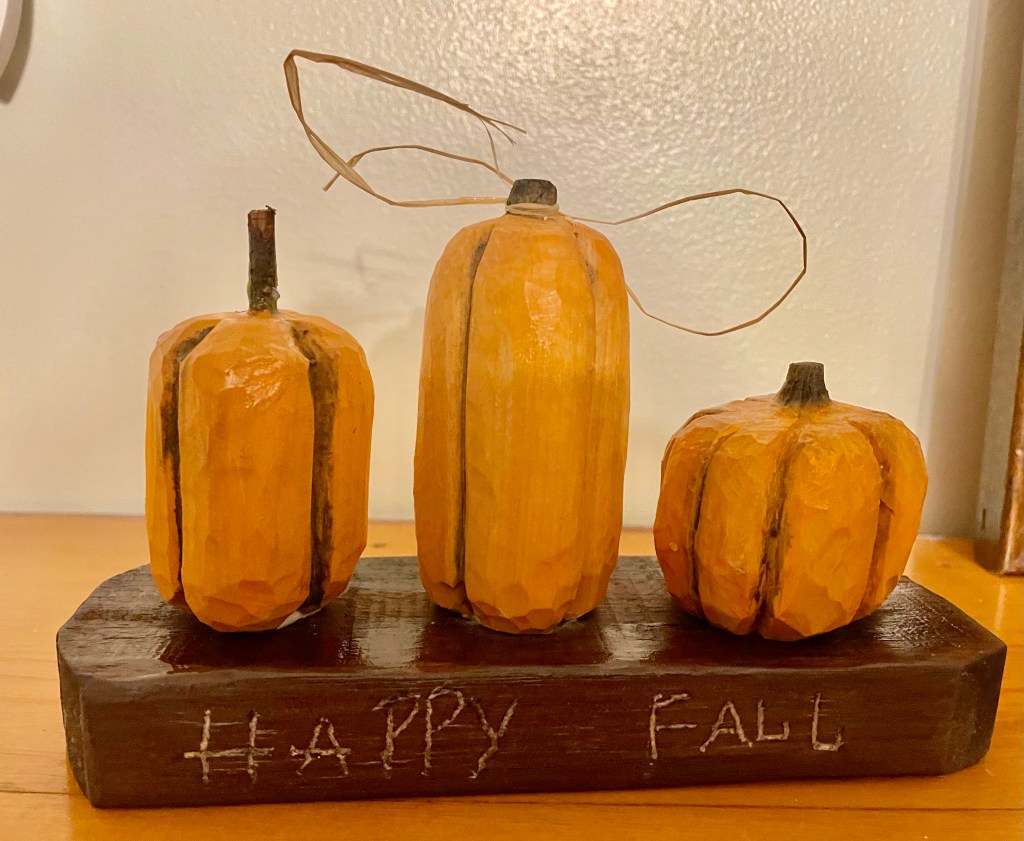
I love your pumpkins, Shannon, and especially like how you carved them all different shapes and sizes and mounted them on a base. I’m sure your mom appreciated them.
Also, thank you for the John Wayne quote. I will definitely remember it.
Next, we have some photos of a bluebird that was power carved by my good friend, Dick Bonewitz from Carmel, Indiana. Dick writes:
“Here are photos of a bluebird I recently power carved from Tupelo wood. I followed a study cast and painting instructions from Josh Guge, a champion carver. Painted with Liquitex heavy body acrylic paints. I spent a day with Josh in his studio in Elgin Illinois when painting and I highly recommend him as an instructor.
Dick Bonewitz
Carmel In”
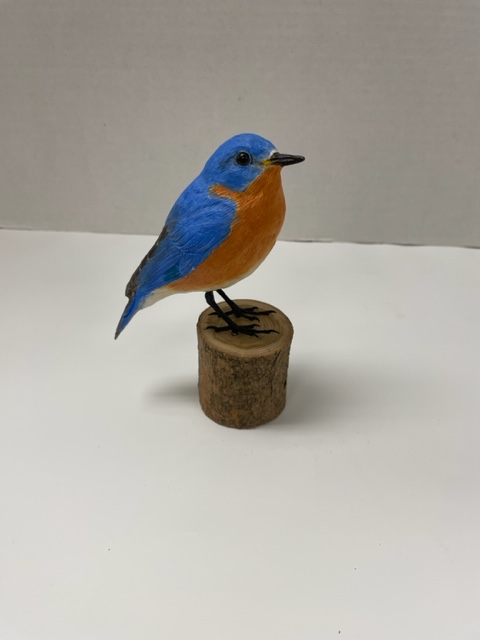
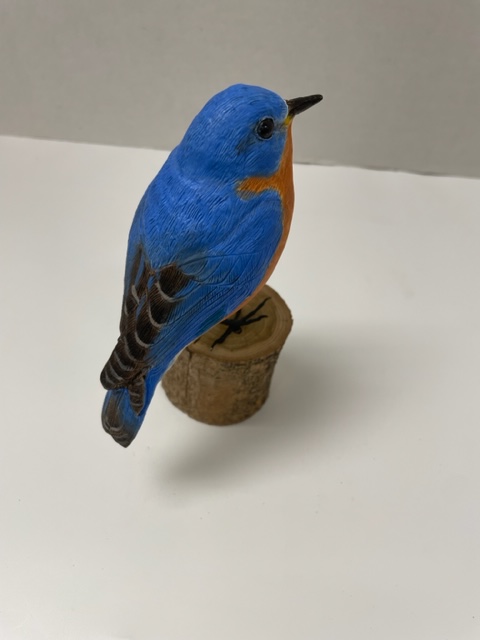
Magnificent job on your bluebird, Dick! Everything about it seems to be spot-on right down to the fine feather details. You have apparently learned well from your time spent with Josh Guge.
Carver’s Corner

“Carver’s Corner” is the section where you can send in photos of your carvings to have me critique them and offer you my truthful opinions on what you did right and what you might improve on next time. It’s an excellent opportunity to improve your carving skills! Send your photos to: carverbobk@woodchipchatter.com
This month in the “Carver’s Corner” we have some photos of Santas carved by my friend and new subscriber, Andy Doiron from Maine. Andy would like some advice on how to improve his carvings and writes:
“Hello,
I came across your blog and page after hearing about it on Woodcarving Weekly with Uncle Jack on youtube.. I was hoping you would take a look at these 3 Santas that I recently carved. I have started following Van Kelly’s videos and he has helped with my facial features. I have been carving for about 2-3 years but it is more 8 months off, 4 months on type of things.. I know I should carve every day but with other hobbies and seasons other things take precedence. Everything is done with a knife except the whiskers and the eye groves.
Any advice would be appreciated.
Thanks
Andy
from Maine”
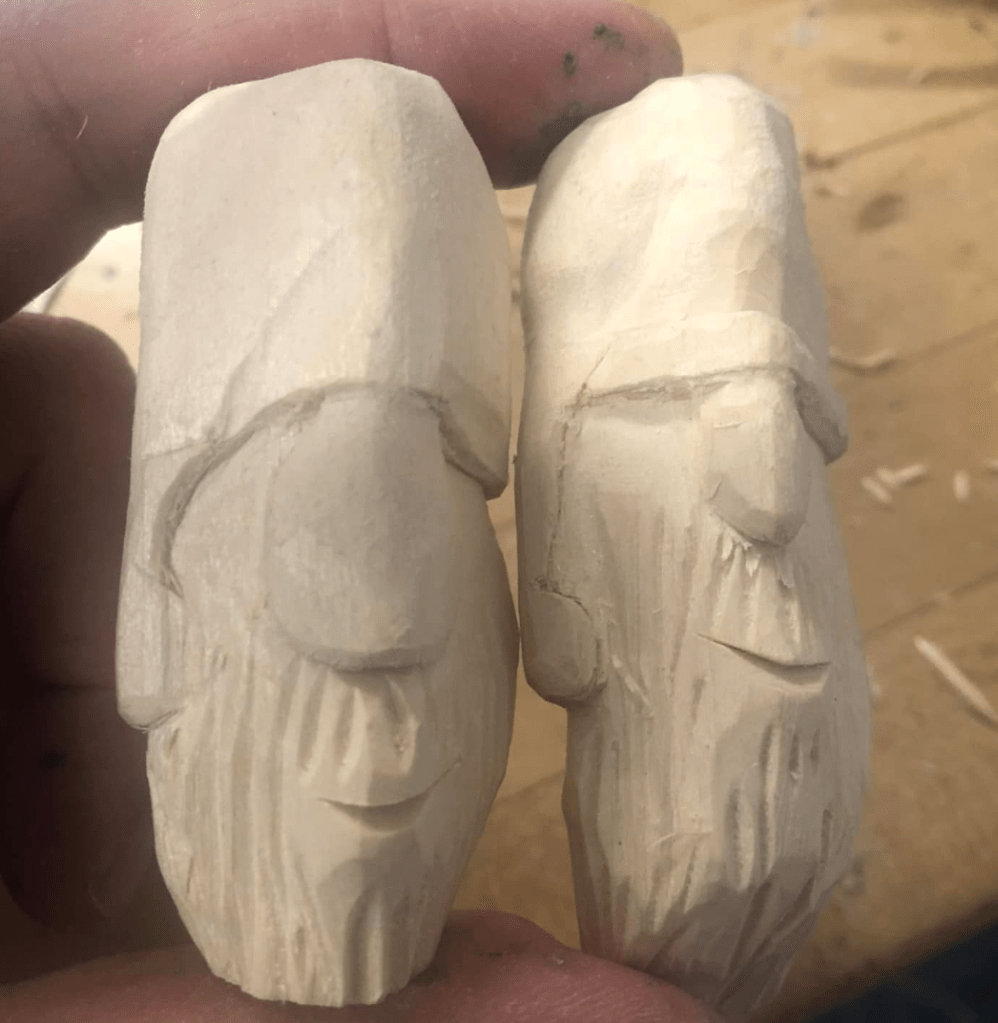

From looking at your photos I can see you’ve made a vast improvement in one year and you have the right idea but you’re consistently making the same mistakes and as a result all of your Santas look basically the same.
I guess I’ll start at the bottom and work my way up. So starting with the beards, they are unfinished at the bottom. Instead of leaving them cut off flat try either rounding the bottoms or bringing them to somewhat of a point. Your hair texture is too straight and short. Most hair does not grow straight. When doing any kind of hair texture you want to make lazy “S” and “C” cuts, and try to make them a bit longer. Instead of straight up and down make your cuts on an angle and vary the size and depth of the cuts. Use different sized gouges to accomplish this. You can even use your carving knife to deepen some of the cuts.
The next thing I notice is that your noses seem to be too long, straight and narrow. Try making your noses shorter (which will alter the entire look of the face), Also, the outer part of the nostrils should line up with the center of the eyes. Try adding nostrils to your noses for added realism. Use a small gouge to make a single cut to carve in each nostril. It will make a big difference.
You seem to be on the right track with the eyes which are probably the most difficult part of the face to carve.
Hats come in all different shapes and sizes, and are often a matter of the carver’s choice. The first thing you should do is carve the point off the center of the hat. Santa’s hat does not come to a point in the front. Take that point off and carve it back to flatten it out. This will give the hat a more rounded appearance. I personally like to make my hat trim on the wider side, just a matter of preference. Add texture to your hat trim with gouge cuts throughout the area. There are lots of ways to carve hat trim. Study photos of other carvings for ideas.
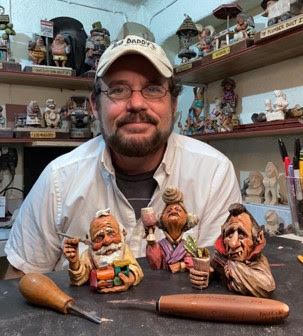
I have included a photo of one of my Santa ornaments to help demonstrate what I have explained above. It’s by no means perfect bu hopefully it will give you some guidance.

I’ve given you a lot to digest but if you follow this critique you will surely see your carvings improving in short order. Keep up the good work and please send in another photo after you’ve had time to practice.

Pattern of the Month
Here is a simple owl pattern that can be carved as a stand-alone figure or carved as a tree ornament:

Upcoming Workshops & Seminars

Carving Light the Way Santa (5″)
Teacher: Dale Green
Dates: December2,3
Saturday & Sunday 9:30 am-11:30 Pacific / 10:30 am – 12:30 pm Mountain /
11:30 am- 1:30 pm Central / 12:30 pm – 2:30 pm Eastern
4 hours ( 2 sessions – 2 hours each day)
Location: Online (Via Zoom)
Cost: $95, includes class, rough-out and shipping in the US
(International students $115)
Pay for registration with Dale here: https://paypal.me/DaleGreenWoodcarving
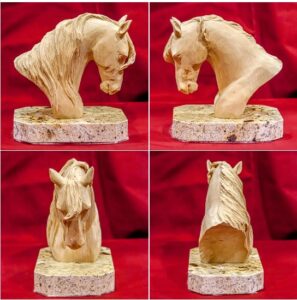
Horse Head
Teacher: Janet Cordell
Dates: January 5, 8, 12, 15, 19, 22, 2024
Times: 2-4 p.m. Pacific Time 3-5 p.m. Mountain Time 4-6 p.m. Central Time 5-7 p.m. Eastern Time
12 hours ( 6 sessions – 2 hours each day)
Location: Online (Via Zoom)
Cost $175 cost includes one blank.
For details and to sign up email Janet Cordell
Contact Janet
Online Classes With Chris Hammack
Teacher: Chris Hammack
Chris Hammack is offering a new series of online classes to help students learn and sharpen their woodcarving skills. Individual and Group Classes are available through his web site chrishammackart.com/groupclass

Whittle Wednesdays
Teacher: Dwayne Gosnell
Dates: Two – 2 hour classes each month on Wednesdays
Location: Online (Via Zoom) To sign up contact Dwayne Gosnell via email dagwood_76@gmail.com

Woodcarving Academy
Established in 2020, the Woodcarving Academy offers dozens of videos and seminars created by some of the country’s top level instructors. More videos are added regularly as they are created by the instructors.
With a paid subscription to the Woodcarving Academy you can view any videos you like for as many times as you like.
Subscription rates: Monthly = $19.95 Quarterly = $49.95 Annual = $139.95
There is even a Free level which allows you to tour the website and watch the sample videos and content, and receive email updates as new content becomes available.
Check out the Woodcarving Academy and learn with the masters right in the comfort of your own home! Go to: www.woodcarvingacademy.com or Email: support@woodcarvingacademy.com
News & Announcements


The Pennsylvania Delaware Valley Woodcarvers will be hosting a two day seminar/class with CCA member Kevin Applegate at the Montgomeryville Community Center in Montgomeryville, PA on November 4-5. Cost is $100 for members and $125 for non members. For information contact: Maxine Ernest at 267-316-8969 or Wade Huggins at 215-531-0238
The International Association of Woodcarvers has upcoming Zoom meetings on the following Saturdays at 3PM EST with special guest presenters. Check them out…
Zoom: 310-460-3575
Presentation Schedule:
11/4 – Live from the Mid-South Alabama Show
11/11 – OFF
11/18 – Dave Stetson
11/25 – Thanksgiving
12/2 – Timmy Yusuf
INTERNATIONAL ASSOCIATION OF WOODCARVERS
COME JOIN US!!!
The Jersey Hills Wood Carvers (JHWC) club is a small but growing group of wood carvers sharing their time, knowledge and joy of woodcarving. The JHWC generally meets from 7:00 PM EST to 9:00 PM EST on the 1st, 3rd and 5th Thursday of each month (when school is in session) at the Jefferson Township High School wood shop classroom.
Membership is “FREE” and open to anyone interested in woodcarving regardless of their ability.
JHWC’s Upcoming Meetings and Events
2023
November 16th and 30th
December 7th and 21st
2024
January 4th and 18th
February 1st, 15th and 29th
March 7th and 21st
April 4th and 18th
May 2nd, 16th and 30th
June 6th and 20th
For more information contact:
Al Santucci alsantucci4@gmail.com President
Bill Brunner billbrunnerdesign@gmail.com newsletter/website editor
Or visit:
Website: https://www.jerseyhillswoodcarver.com/
Facebook: https://www.facebook.com/groups/736479646821641/
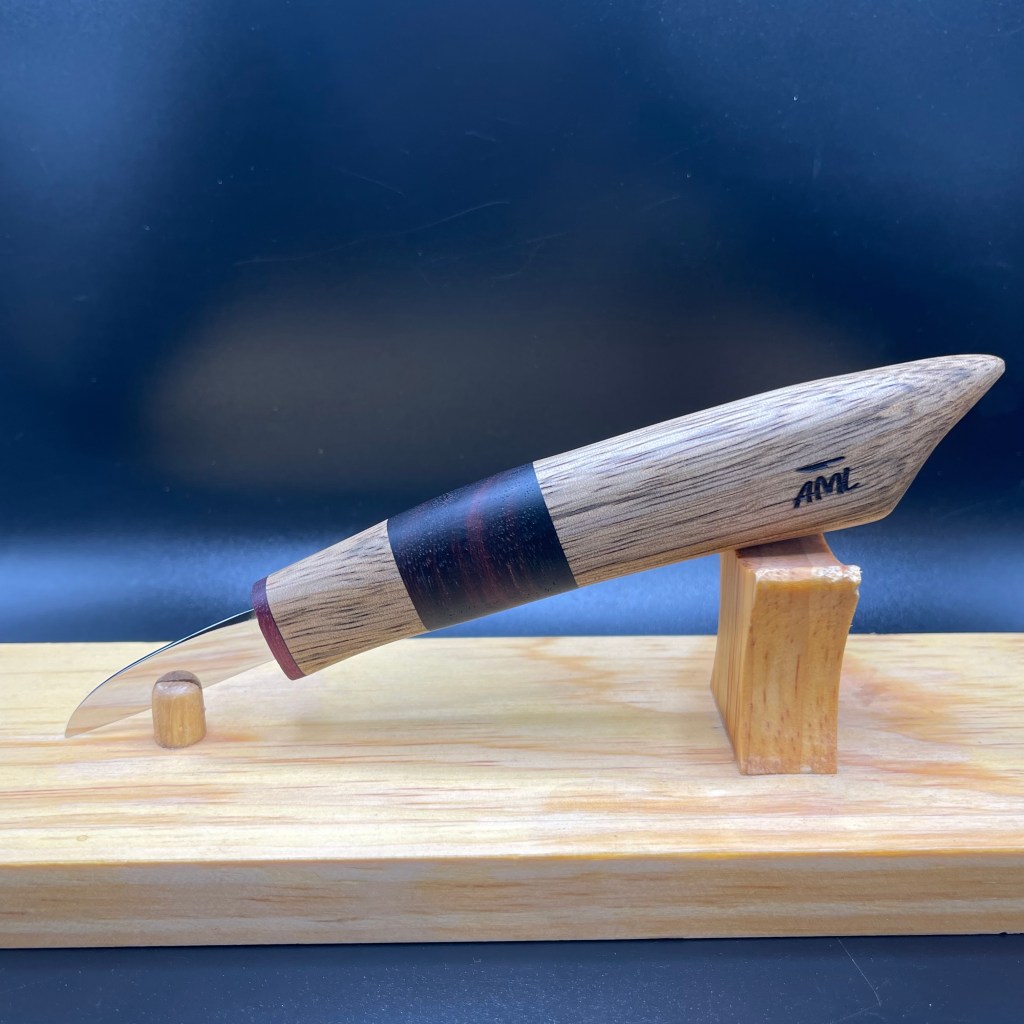
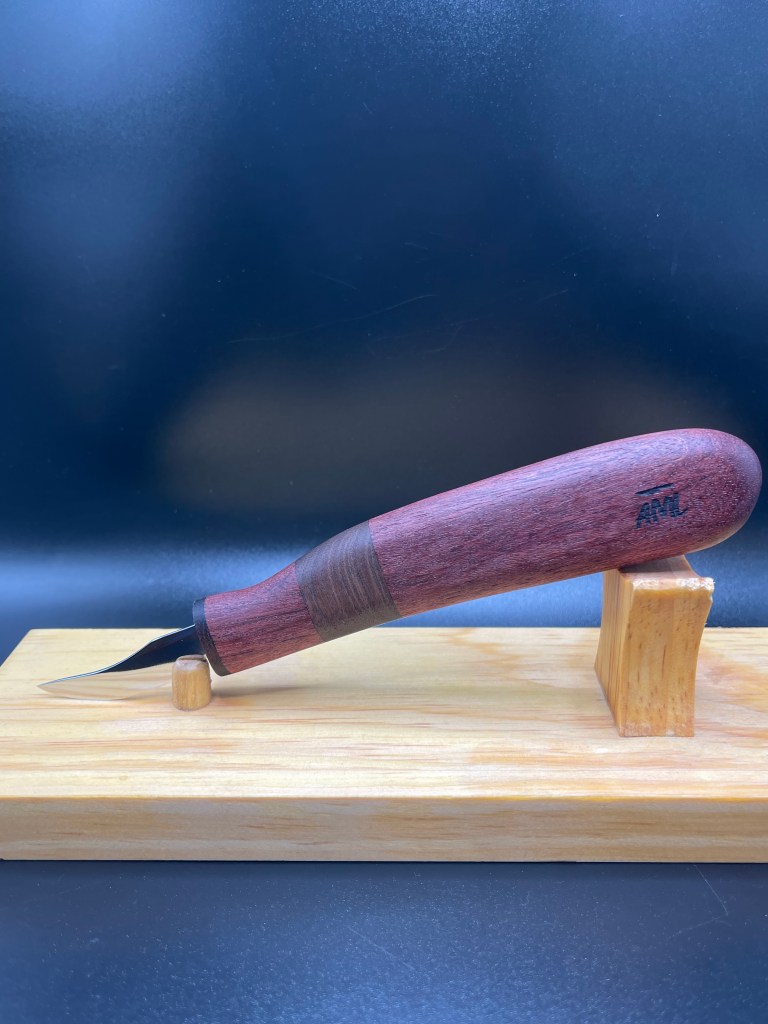
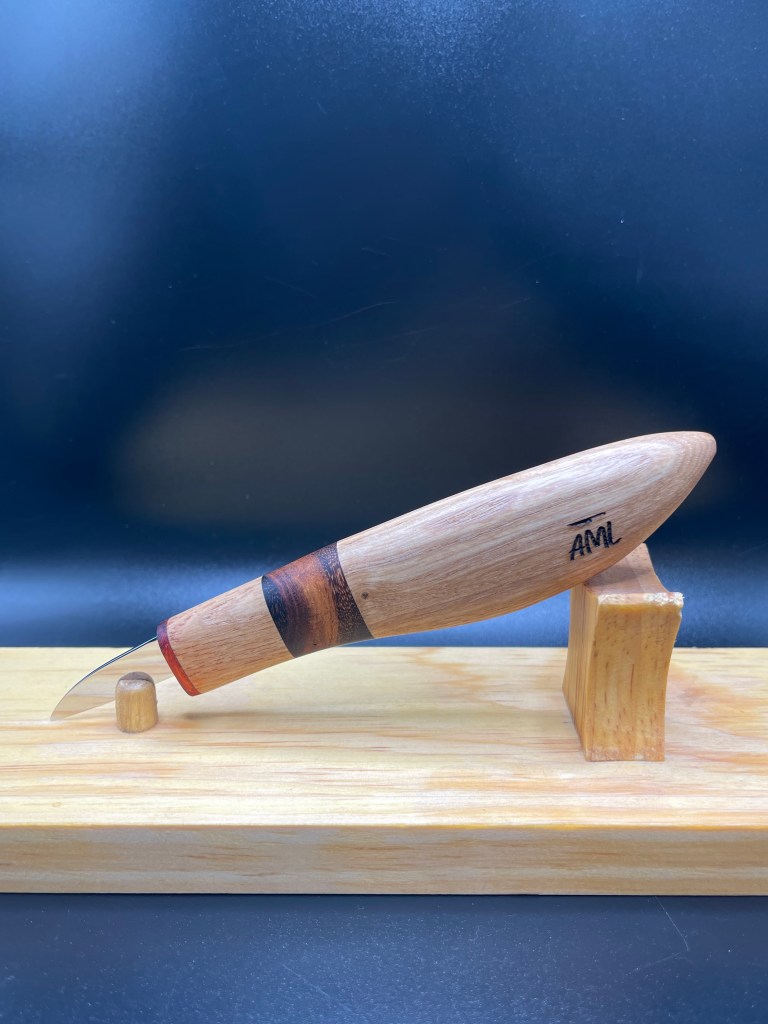
AML Wood Carving Knives

AML Wood Carving Knives are handmade by Andy Loughlin in Monroe, New York.
The blades are made from 1095 high carbon steel sharpen easily and hold an edge well. The variety of handle styles are all made from diverse exotic woods from all around the world. The knives are all available for auction on EBay under “AML Knives.” Bidding usually starts at $22 and most knives sell for between $40 and $100.
Every knife comes carving sharp right out of the package and each one comes with a custom made magnetic wooden sheath (see below) at no extra cost.
I now own two AML Knives and can speak personally about their quality. These are not production knives. Each knife is handmade by Andy, himself. The knives are very sturdy, well made, and will stack up well to the big boys. These knives have quickly become quite popular and sell out fast so check the site (“AML Carving Knives” on EBAY) often for availability. Below are examples of some knives currently available or which have recently sold:


The next issue of Wood Chip Chatter will be posted on December 1, 2023.
Keep a sharp eye out for it.

Keep a sharp edge, and keep on carvin’!


Funny Bone


Another great issue Bob, thank you for doing this. Gary Baker
LikeLike
CarverBobK,I think your Santa ornament looks just fine. It is very close to the Santa cookies my exwife used to make. They were delicious and did not last very long. I think your Santa will last quite a bit longer. Nice job.Ivan
LikeLike
Bob I don’t think I got the October issue. Can you resend it to me
Thanks
<
div>Dick Bonewitz
Sent from my iPhone
<
div dir=”ltr”>
<
blockquote type=”cite”>
LikeLike
Dick…There are two ways you can find it. 1) Go on the Home Page and click on Blog in the blue bar that goes across the page. Then scroll down through the current post and the October blog will be right below it. 2) Type Stories of Halloween and the Jack O Lantern in the Search box and you can find it there. Let me know if you have any problems…Bob K.
LikeLike
I found the Halloween articles. Interesting! Thanks for your hard work on the blog. Always look forward to it. And thanks for your kind comments on my praying hands and my recent bluebird.
Dick Bonewitz
Sent from my iPad
>
LikeLike