
Six Ways to Clean Your Paint Brushes
I tend to use somewhat more expensive paint brushes when I paint my carvings. I just like the way they work. But whatever kind of brushes you use, if you’re like me you go through paint brushes as fast as the water you wash them in. Here are a few tips on cleaning your brushes and preserving them to get longer life out of them:
1. Swirl your brush back and forth over the cake of “The Masters” Brush Cleaner & Preserver until bristles are soapy. Brush back and forth in my dampened hand until all paint is removed. Repeat a second time. Rinse well, then reform the bristles with a little soap on the fingers. Let dry with the soap on the bristles. Rinse brush with water before using.

2. Clean in a cup of Dawn, put soap in my hand and clean the brush back and forth in the palm of my hand. Rinse well. Then reform bristles with a little Dawn on the fingers. Let dry with some soap on the bristles. Rinse brush with water before using.

3. Clean brushes in a bowl of Aqua Net hair spray. Mash bristles well until no more paint comes out (add more Aqua Net if necessary). Reform the shape and let dry with some Aqua Net on the bristles. Rinse brush with water before using.

4. Wash brushes with soap and use a little bit of hair conditioner on them and they will smooth back out. Reform the bristles and let dry with a little conditioner on them. Rinse brush with water before using. Use regular hair conditioner. They sell brush conditioner in art supply stores, however it’s the same stuff.

5. Do your final brush cleaning with rubbing alcohol. It removes any remaining residue and allows the bristles to relax. Also, find a spring you can stretch atop your glass and put the handle in the coil holding the brush off the bottom. Use the same for drying. And when the brush gets ratty give it a haircut. You’ll get maximum life from your brushes this way.

6. Clean brush on a bar of Lava soap. Rinse clean. Reshape with a little soap on the fingers. Set out to dry. Rinse brush with water before using.

Reader’s Comments

I got a couple of very warm and kind comments from two of my readers this week that I want to pass on.
The first one comes from spwilcen who said:
“Always a good read. And I am ALWAYS impressed!”
The second comment came from Jim Shay who wrote:
“Another great edition of Wood Chip Chatter Bob. Thanks for posting my inquiry about Bryan. I am still searching also. There’s some great examples of carvings shown in this week. Keep up the good work to all the readers. As soon as I get this process of posting figured out here I’ll send one or more too. Thanks again to Bob for his diligent efforts in producing this forum for us to communicate about our fantastic hobby. Jim Shay”
Thank you both so very much, spwilcen and Jim, for taking the time to send me your kind thoughts. Reading comments like those makes me feel that I’m doing the right thing and pushes me to continue with the work I do every week to make Wood Chip Chatter the best I can make it.

Carver’s Corner

“Carver’s Corner” is the section where you can send in photos of your carvings to have them critiqued by me and get my truthful opinions on what you did right and where you might improve next time. It’s an excellent opportunity to improve your carving skills! Send your photos to carverbobk@woodchipchatter.com.
Our first entry to the “Carver’s Corner” is a Santa ornament carved by Nicky Foley:

Nicky, this is a first-rate Santa ornament that was skillfully carved and painted in every way. The face is expertly carved and I like how you broke the beard up into clumps of hair for more realism. The hat trim is also clean and well done, and the nose and eyes are spot on. I like the skin tone color as well.
Now for the things I would have done differently. Make the lower lip a little fatter…it’s too thin. Try adding some curvature to the mustache hairs by using some “S” cuts, and tint parts of the face with red blush, particularly on the nose and cheeks.
Overall, an impressive job! Keep up the great work!
Our next entry is a cowboy carved by Dianne Walker. Dianne writes:
“Hi Bob,
I shared the video info with group and they are checking them out. Good idea. I used to watch them all the time. Don’t know why I didn’t think about that.
Anyway, I’m attaching another pic of carving I just finished and would love a critique since you stated on blog you would be glad to do that. It’s the first time I ever used wood burning on a carve and I think I like it. I can’t decide. Lol.
Would love your feedback.
Thanks again for the info you sent previously.
Dianne”


Overall, I like your cowboy very much, Dianne. You paid careful attention to detail, it is carved quite well, and I like the choice of colors. I’m especially impressed with the way you carved the hat and how you fit it onto the head…terrific job there! Good job on the ears and bandana, and the chaps are well detailed.
You need to work on your hands, though. Hands are hard to carve, especially the thumbs. Your thumbs are not positioned properly. I don’t know if you were carving fists or open hands but either way the thumbs should come from over the top. They are not positioned the same way as the fingers. Carefully study your own hands and you will see what I mean. When carving a hand, use your own hand as a model.
I understand that you like the wood burning on your carving, many carvers use it. But wood burning, in my opinion should be used sparingly. Wood burn the areas where one main part/color meets another, the purpose being to avoid one color from bleeding into another. For example, where the jeans meet the boots and chaps or where the bandana meets the shirt. Avoid burning creases in garments. Instead, carve the creases deeper using a small gouge, V-tool or your knife to create shadows. I would have also made a couple more loops of rope around his hand…just a cosmetic thing. I’m always curious about what other carvers use for rope and how they make it stiff.
An all around great job, Dianne. A carving you can be proud of.
Photo Shop

“Photo Shop” is the section of Wood Chip Chatter where carvers can send in photos of their wood carvings for display. It’s your chance to show off your work…sort of a show and tell. The photos will only be displayed and no comments or critiques will be made. For critiques on your carvings send them in to the “Carver’s Corner.” Send your photos to carverbobk@woodchipchatter.com.
Our first entry to the “Photo Shop” this week comes from Kerem Kozak of Calgary, Alberta, Canada who carved a few of my Chimney Santas from my article in the 2019 Winter issue #89 of Woodcarving Illustrated:
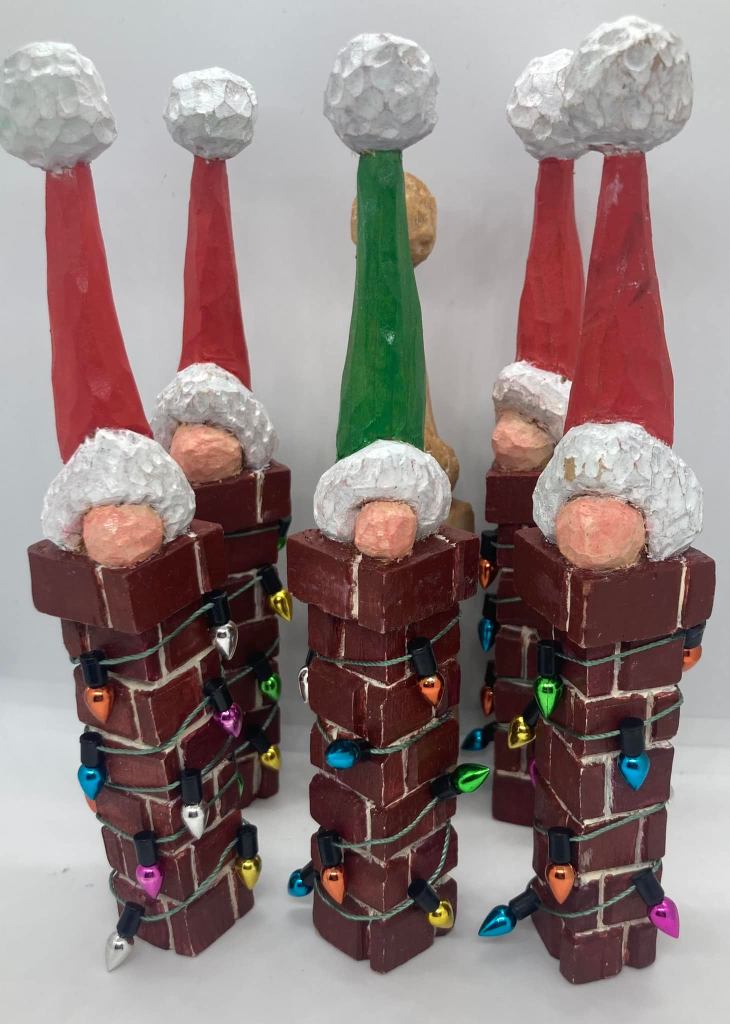
Those are really excellent, Kerem! Very neatly carved. You did a nice, clean job on the bricks and of course I love the Christmas lights!
Our next entry comes from my good friend, Phyllis Stone of York, Pennsylvania. Phyllis carved a cottonwood bark house scene as an anniversary gift for her son and daughter-in-law. The Gnome was carved by Miroslaw Czeladka of Poland:

That’s a beautiful job you did on the bark house and tree, Phyllis, and the heart base was a terrific idea! Of course Miroslaw’s Gnome made a perfect addition too. Well done and very thoughtful of you. I’m sure your son and daughter-in-law loved it.
News & Announcements

Announcing that I will be at the Lancaster County Woodcarving & Wildlife Art Festival at Millersville University, Millersville, PA. March 12 & 13; Sat. 10 to 5, Sun. 10 to 4. Located in the Student Memorial Center, 101 Shenk Lane on your GPS (the entrance is across the street from this address). Masks are required as per Millersville University policy. I will be at Tables 67 & 68 so stop by and chat for awhile!
The International Association of Woodcarvers has upcoming Zoom meetings on the following Saturdays at 3PM EST with special guest presenters. Check them out…
Zoom: 3104603575
Schedule:
2/26 – Dave Francis
3/5 – Rich Schneider
3/12 – Roger Beane
4/9 – Ray Meyer
4/16 – Steve Tomashek
4/23 – Joe You
4/30 – Chris Hammack
5/7 – Brett Andrews
INTERNATIONAL ASSOCIATION OF WOODCARVERS
COME JOIN US!!!
WOOD CHIP CHATTER NEEDS YOUR PHOTOS!!!

I’m sure you all have some terrific carvings to share in my “Photo Shop” section. Photos of your carvings help to liven up the blog’s appearance and make it more interesting. Also, my “Carver’s Corner” is a great way to get constructive critiques on your carvings so you can learn where to improve on your next ones. When sending in photos please specify whether you want them for display in “Photo Shop” or if you want me to critique them in the “Carver’s Corner.” Send your photos in to carverbobk@woodchipchatter.com. Thanks!
KEEP THE CHIPS FLYING!!!
Send in your questions and comments so we can keep Wood Chip Chatter active and keep the conversations going! Effective discussions are one of the best ways to learn about the topics that interest you. Remember, there’s no such thing as a dumb question. Plus we would all love to learn about the unique tips, techniques and products YOU use in your woodcarving process. Send your questions and comments to carverbobk@woodchipchatter.com. Thanks!
Keep a sharp edge and keep on carvin’!

Funny Bone


Great info on cleaning brushes, thanks!
LikeLike
Glad you liked it!
LikeLike
Bob, Thanks for tips on cowboy. Good info and as usual there is always more to learn.
LikeLike
Hi Dianne,
You’re welcome. I hope I wasn’t too hard on you. We all are always learning.
LikeLike
Bob,
Another great lesson on care and cleaning of paint brushes. I also use the Master’s product and clean the brushes as you described. Like you I try to use good brushes as well, so my question to you is what brand to you prefer?
I also have been finishing my carvings with the mineral oil process as you wrote about. I need to get some photos out to you as well.
Regards,
RJ Nes Carver
LikeLike